Sunday, January 30, 2011

Nature's Alphabet- Stitching is Done!

I put the final stitches in Nature's Alphabet Friday night!
I still need to add petite black beads to the "B" block, white seed beads to the centers of the flowers in the "F" block and to the Christmas tree in the "X" block, and of course the glass hare to the "H" block and a glass tulip to the block with my initials. I will need to visit my LNS to purchase those. But all the actual stitching is done!

Love that thistle!

There was no "1" charted for this, so I had to make my own for the date. I love that the design included the date and the stitcher's initials. I think it is so important to "sign" your work.

The glass tulip will go right above my initials, in the leafy frame. The next time you see this, it will be 100% complete and stretched for framing.

I also pulled out my old design notebook and found the charts I had made for the Valentine sampler. I was right- I did already have a chart for it. I should be able to finish it up in time for Valentine's Day.


In sewing news. I hemmed the flutter sleeve blouse, so all that's left is buttons. I plan to make a run to the fabric store next weekend (after pay day!) for some pretty buttons, so I should have that finished and ready to wear and share next weekend. I also have the pencil skirt from the previous post all done except for the hem, so I hope to get that done and be ready to share soon, as well. I haven't cut out my Vintage Sewalong dress yet, but the day is still young...
Wow. Can you believe January is almost over?

Friday, January 28, 2011

On the Agenda

I am hoping to get some serious sewing done this weekend. I have finished my last muslin and I'm ready to cut out my Vintage Sewalong dress, McCalls 2206:
I'm making the long sleeve view.

I also have this little number cut out and ready to go:
This is Burda Style 02-2011-103. I hope those back darts turn out interesting and not awkward looking.

And, most exciting of all, Nature's Alphabet is almost done! I fully intend to put the final stitches in it this weekend!
If I can get to the fabric store to pick out buttons, I will try to get the flutter sleeve top finished, too. I'm not sure if I'll make it this weekend...
In the meantime, Happy Sewing!

Sunday, January 23, 2011

Burda Style 01-2011-102 Pre-review

I spent most of the day yesterday working on Burda Style 01-2011-102, otherwise known as the Flutter Sleeve top. Here it is in it's not quite finished glory.
The side seams are only basted, and it still needs a hem and buttons/buttonholes. (The front is pinned closed.) I doubt I'll finish before next weekend- I need to make a run to the fabric store for suitable buttons. Nothing in stash is even remotely appropriate.

It was done enough to try on, however, and I thought I'd go on and share my thoughts on it before I forget. I am not in love with this blouse like I thought I would be.


First let me just say that in my opinion, this thing runs huge. I made a muslin using the size 44, easing out to the size 46 for the peplum. That's my "usual" Burda size and the top simply swallowed me. So I went down to a size 42 and a 44 for the peplum, thinking that would solve the problem. The new blouse is better, but still too blousy for my taste. I could probably go down one more size and be happier with it. If you're thinking about making this, make a muslin! You may find that you need to go down at least one size, maybe two.

Maybe it's supposed to be large and blousy. Who knows? Burda only provided a pin-up picture to judge from; you can't really tell from the photo in the magazine.

One thing that really bothers me about this blouse, and you can kind of tell from the photo at the top of this post, is that once you stitch the waist darts, the center front no longer hangs straight. See how the edges of the peplum want to swing out to the sides? I have it pinned in the photo, and I suppose once I get buttons on it it may look better, but when I put it on and pinned it closed, the peplum wanted to flare out at the bottom. That, combined with the loose fit, just made the top seem sloppy to me.

I had planned to wear this top loose and untucked over a pair of grey slacks. I just don't know that I'm going to like it now. On the other hand, I think it might look nice tucked into my high waist pencil skirt. But it just seems like a waste of time and energy to have made those waist darts and done all that gathering and sewing on the peplum in back just to wear the darn thing tucked in. (Although now that I've wasted all this time on it already you can bet I'm going to wear it, even if I have to tuck it in!)
And speaking of time and energy, this top is not an easy sew. As I mentioned in a previous post, you have the gathered waist darts, the four (count 'em) inset square corners where the sleeves are set in, and all that gathering around the yoke. And you really need to use a fluid fabric to make this romantic little top look right, so you get the pleasure of doing all that tricky sewing on difficult fabric.
I do plan to finish this and post pictures of the final results. Maybe I'll feel better about it then. In the meantime, I've cut out that sweet high waisted pencil skirt with the unusual back darts and the godet from the February issue. I hope it turns out to be a more satisfying project.

Friday, January 21, 2011

Progress... And a New Old WIP

More progress has been made on Nature's Alphabet. I am enjoying stitching it at night while watching TV and winding down before bed. My 9 year old daughter and 11 year old son like looking at it and trying to guess what each little picture represents. The Princess is adamant that the "C" square features cranberries, not cherries!


Here is a closeup of the latest progress. I ended up substituting Weeks Dye Works "Cypress" for the "Holly" in the juniper trees, and "Ivy" for the "Celadon" in the oak leaves. It works for me.

I love the little satin stitched pumpkins. I used DMC 3776, as per the pattern, but looking at it now, I could have substituted an overdyed thread from stash. Oh, well. I doubt I'll go back and change it.

I'm getting close on the alphabet, but I'm feeling that itch to work on something else... something completely different. So I pulled out this little WIP.

This little Valentine sampler is my own design. I don't remember when I started it- years ago when I was really into making up my own stuff. I still need to dig through my notes and find the sketches and diagrams I must have made for it.
It's stitched on a strange light pink linen that has white warp threads and pink weft threads which give it a vague homespun vibe in person. You can't really pick up on it in the photo.
The heart at the top is stitched with Caron Waterlilies "Flame," a gorgeous red and purple silk which was my inspiration element for this piece. As you can see, I was in the process of adding Algerian Eyelets to it using pink metallic braid. The tiny heart in the center is red metallic braid. I planned to remove the inner threads and complete the hardanger with the same silk thread.
The bands below the heart are stitched in various red and purple shades of DMC, pink braid, and "Flame." I especially love the row that says "Love" over and over in "Flame."
I gathered several types of beads to possibly use for embellishment: satin purple, red aurora borealis, and bright red. I'm not sure what I was planning with them, so I'll just have to see as I go.
This wasn't meant to be a large piece, so it shouldn't take long to stitch a few more bands and finish it up. If I can find my notes and I already had it graphed out, it will be super quick to finish up. Otherwise I'll have to design as I go.

I took today off, so I have a nice, long, three day weekend. I hope to get a lot of stitching done and complete my muslin for my Vintage Sewalong dress. I posted an update on my progress over at the Vintage Sewalong blog.

Have a good weekend!

Sunday, January 16, 2011

Burda Style 01-2011-133- Done!

The knit dress from the plus section of the January Burda Style is done. And not a moment too soon.
I used a charcoal grey Ponte de Roma knit from Joann's and I cut a 44 from shoulder to hip and a 46 from the hip down. I should have graded down to a 42 through the bodice. It's a knit, after all, and the plus patterns seem to be drafted with a little extra ease. In any case, after making a muslin of the bodice, these are the adjustments I made:

1. Added 1.25" of length at the waist.
2. Made a petite adjustment above the bust by folding out 3/8".
3. Folded out 1/4" vertically from the side front bodice pieces and the back bodice pieces.
4. Made a swayback adjustment by shaving off 1/4" at the bottom of the back bodice, tapering to nothing at the sides.
5. Moved the CF fold in 1/8" and raised the neckline by adding 5/8" to the top of the CF piece.
6. Adjusted the waist and skirt pieces to match the adjustments to the bodice.

I wish I had added the sleeves to the muslin. There is a ridiculous amount of ease in the sleeve cap, so much so that I went back and checked to make sure I hadn't traced the wrong size. If I had known ahead of time, I could have adjusted. As it was, I had to shave off 1/2" from the top of the sleeve pieces after I had cut them. There was still a lot of ease, and it was a challenge to attach them, but it looks okay.

I did not follow the pattern instructions, but just sewed the pieces in the order that made the most sense. I sewed the sleeves in flat and stitched the side seams last so I could tweak the fit if needed.

The pattern went togther nicely (except for the sleeve issue) even if there were a lot of pieces- 14 to be exact. I had a hard time with the neckline. The corners were challenging to sew, and once the facing was stitched to the neck, it was very difficult to press. That's really more of an issue with the fabric than the pattern, though.
If I were to make this again, I would take the sleeves in slightly and shorten them a bit. I have very short T-rex arms and what looks like lovely 3/4 length sleeves on the model looks rather awkward on me.
I like the dress as is, but I'll be on the look-out for a cool belt to wear with it. I think it looks nice with the black tights, but a nice belt or some colorful jewelry would really help keep it from looking too drab.

Now that this dress is finished, I can get back to work on my Vintage Sewalong dress and I can get started on the flutter sleeve top from the same Burda Style issue. Happy Sewing!

Saturday, January 15, 2011

More Alphabet Progress

I began assembling BS 01-2011-133 this week. As soon as I work up some mojo, it's off to the sewing room today to hopefully get it finished. It's been a really long, exhausting week, so there hasn't been a lot of sewing going on. I did, however, manage to get a little bit of stitching in on Nature's Alphabet while watching TV.


I've almost got the third row of squares completed and I've begun the backstitching between the squares. I still need to add petite black beads to the "B" square (to mimic bees) and I need to get a Mill Hill bunny to attach to the "H" square (H is for hare.) I'm holding off on the "J" square. The juniper trees are stitched in a particular color of Sampler Thread that I don't have. I pulled the DMC substitute, but I don't know that I want to stitch such a relatively large, plain area in just DMC. I'm going to check my stash for another overdyed thread to substitute, or maybe try two different colors of DMC in the needle. In any case, it's stitching up nicely.

Now it's off to the sewing room for me. I've got the Burda dress to finish so I can get back to my Vintage Sewalong dress. And then there's the Burda Flutter Sleeve Top. So much to do, so little time...

Sunday, January 9, 2011

Burda Style 01-2011-133 Muslin Update

I got the muslin of the Burda Plus Dress done, and the results are positive. It was no small feat getting this thing ready to muslin. There are 14 pattern pieces to trace and add seam allowances to! That is a lot!

I cut a 44 from shoulder to waist, and graded out to the 46 at the hip. I had to add 1.25" of length to the bodice, which I did by slashing and spreading right above the waist band. Definitely check the length of the bodice if you are thinking about making this.

I did not use a zipper for my muslin. The bodice fit over my head with no problems, so I will not use a zipper for the real dress either.

For the real dress I plan to raise the neckline 1". It's really not bad as is, but since I plan to wear this to work, I figure it can't hurt to be a little more modest. Besides, the neckline is wide and I can see my bra at the corners, so raising the neckline will help take care of that little problem as well.

I might leave out the back vent. If I do, I will cut the skirt back and the back waistband on the fold. I could cut the back bodice on the fold as well, but there is some very subtle shaping to that back seamline, so I may just leave it.

I think I need to take in the waist ever so slightly, but I may wait and get the real dress basted together before I decide for sure.

I'm satisfied with the progress I've made this weekend- hopefully, I'll have a completed dress to show next weekend. The I can get back to my little mod dress for the Vintage Sewalong!

Saturday, January 8, 2011

Alphabet Progress

This is my latest needlework project. I shared a peek a few posts back- see how much I've gotten done since then? I promised to share a little more about this design, so here goes.

This is Alphabet Sampler by Elizabeth's Designs. I fell in love with this the moment I saw a stitched model at my LNS. It was stitched on 40ct Lambswool linen, like the pattern calls for, and it was dainty and gorgeous. I decided to use a 32ct linen from stash (Antique Lace by Wichelt, purchased "on spec" from Hobby Lobby ages ago) because a.) I already had it on hand, and b.) I don't think my eyes could take stitching on 40ct. I'm happy with the size and the way the colors are looking on it. (The photo is a little dark and "blue" on my monitor.)
I'm using DMC floss as called for in the pattern. The model does use some Sampler Threads, and I do plan to check my stash to see if I have any of the listed colors, or suitable substitutes, on hand. If not, there are DMC conversions in the leaflet.
What I love about this design is how it's "compartmentalized." Each letter has its own square with a little example. A for acorn, B for beehive (haven't stitched it yet because I need to subtitute threads), C for cherry, etc. And it's not just cross stitching, which gets boring after a while. There are several specialty stitches: the cherries are Rhodes Stitches, the grapes are tiny Smyrna Crosses, and there is lots of satin stitching and straight stitching. Each little square is fun to stitch as well as quick to complete.
Stay tuned for progress as the alphabet progresses...

Thursday, January 6, 2011

Mama Wants Another Knit Dress

I just posted a photo of my second muslin of McCall's 2206 over on the Vintage Sewalong blog. I am excited about the project and making good progress, but I'm thinking I might take a break from it this weekend to make this:

This is the super fabulous knit dress from the plus section of the January Burda Style. It has shoulder princess seams, a square neckline, and a wide waistband (hidden under the belt in the photo.) I love it!

I've already purchased a charcoal grey Ponte de Roma knit to make it up. I plan to trace tomorrow evening and maybe cut out the muslin. Hopefully I won't get distracted this weekend and I can make good progress.

Tuesday, January 4, 2011

Burda Style 09-2010-122: Mama Gets a New Red Dress

Bet you thought I was kidding about making this:
One thing that I love about Burda Style magazine is how the designs I am most drawn to are almost always too small for me. Forty two seems to be some kind of magic number for them. Dress #122 from the September 2010 issue was no exception.

When I got my hands on the mag, having already fallen in love with the dress in the online preview, I eagerly checked the size. It's 17-21. Wait, that's the petite equivalent of 34-42. My heart sank. If I wanted to make this dress, I was going to have to grade up and deal with the petite issue. Not a small thing with such an unusual pattern.
So I procrastinated. You see, I really love Burda. The garments are interesting and always turn out to be conversation pieces. But, and this is a big but, the prep work is daunting. I hate to trace, and adding seam allowances is no fun either. Especially when I have tons of Big 4 patterns that are ready and waiting to be pinned and cut out. Add adjustments to the mix and things are starting to get annoying. And for all the raving that goes on about Burda's superior fit and draft, I often find that I get better results from the Big 4. So I have to really want something from Burda to actually go to all the trouble of making it. And I really wanted this dress.
So what did I have to do to make it fit? I graded up. I decided to start with the size 21 (42) at the shoulder, and I graded out to a 22 (44) at the first horizontal seam. From the underarm down to the hip I graded up one size to a 22/44, and from the hip down, I graded up two sizes to a 23/46. Then I had to "unpetite" the pattern. I decided not to adjust the upper bodice piece because I usually petite my patterns above the bust by folding out 1/4" to 3/8". Burda conveniently did it for me. The rest of my torso, however, is not petite, so I added 1.5" of length to the midriff piece- 1/2" to make up for the petiteness of the pattern, and another 1" to compensate for my long torso- a standard adjustment for me. Once I made all my adjustments, I then added my seam allowances last.
After making a muslin to check the fit (amazingly all my grading and adjusting worked) I cut into my fabric- red Ponte de Roma knit from Hancock's. This stuff was a dream to work with- easy to sew and easy to wear, too. All those curved seams went together like magic!
And those seams are the key to this dress. I love the curved front seams that wrap around to the back, and the back seams that are topped off by the horizontal yoke seam at the top. They give a nice width to the shoulder and length to the body.

The construction was easy. I mostly ignored the instructions. Basically, all the front horizontal seams are sewn, then the front is sewn to the back, the back yoke is added and the shoulder seams are stitched last. Since I left off the arm flaps, I was able to assemble the dress and then use bias tape to finish the armholes. The neck facing was kind of tricky, but not difficult. I serged the edges of the facing to finish them (all seams are serged inside) and then sewed the facing on- the trick is to only sew your shoulder seams on both the dress and the facing up to the neckline stitching line. Leaving the seam allowances unsewn allows you to turn the facing to the inside- the enclosed neck seam allowances lay nice and flat inside and there is minimal bulk. I tacked the facing down all the way around like a hem so it wouldn't roll to the outside.
I love this dress. It's unique, it's flattering, and it's red. What more could I ask for? I plan to get lots of mileage out of this one. (I left off the arm flaps to keep it from looking too trendy and possibly outdated too soon.)

Would I make this again? At first I was sure I wouldn't. It's pretty unique and one is probably enough, but I wore it to work today and it was so comfortable and fun to wear that I got to thinking. It would be gorgeous in another color- maybe emerald green, or teal. And what if it had a little cap sleeve? Maybe a different neckline- a scoop in front or maybe a V-neck in back?

You might see this one again...

In other sewing news, I have completed a muslin of my Vintage Sewalong pattern. Stay tuned for a report on that project, and there are a couple more Burda projects in the pipeline, too.

Sunday, January 2, 2011

First Finished Project of 2011

Cider House Garden is finally finished! I hoped to finish it before the year ended, but I just couldn't quite make it. So here it is- finished on January 1st, 2011!
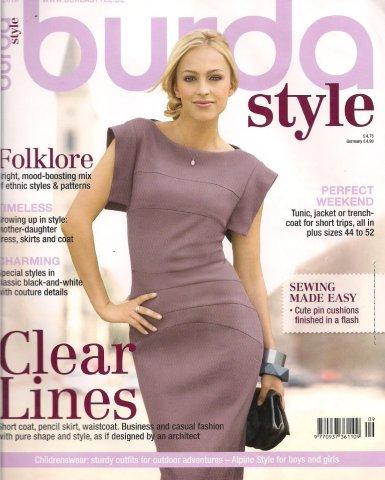
I pressed it, but it isn't stretched yet. It will look even better once I have it stretched. I'm going to frame this one and hang it somewhere in my home. I don't know just where yet.

I have really enjoyed working on this the last several weeks. So much so that I was itching to pick out a new project. Here's a peek at the new piece that I started just last night:


More details about this pattern coming soon.

In other news, I have finally finished the Burda Cover Dress! (Jan 1st was a BIG day for me!) I can't wait to show it off, but I have to get some good photos first. The ones I took this morning were awful, so I'm going to try again this afternoon when the light is better. Now that the dress is done, I can get back to the flutter sleeve top, and I need to make a muslin of my vintage pattern for the Vintage Sew Along.

Here's to a new year full of lots of sewing and stitching!