Sunday, December 28, 2014

Burda Style 08-2009-137

This dress has been finished for over a month.  I've been waiting for just the right combination of an available photographer, sunlight, and motivation to take pictures.  Today is the first day in about 2 weeks that the sun has shown its face, so I decided it was time.

This is Burda Style 08-2009-137.


It was part of the plus offering in that issue and was pictured like so:


I was drawn to the design, but puzzled because the photo shows a rather close-fitting dress, while the tech drawing shows a more structured piece with unusual shaping.


I'm still kind of puzzled even after finishing the dress.  I started with my "normal" Burda size and made a muslin size 44.  It was big- loose and baggy.  I made a 3/8" petite adjustment above the bust to bring the horizontal seam up to the right place and to shorten the darts.  That helped a lot.


I used quilting cotton for the muslin and ironically, I think that the dress was more interesting in the stiffer fabric.  It certainly made the lantern shaped sleeves and the rounded skirt stand out more.

I ended up using ponte knit for the final dress.  It's certainly comfortable and I like the color, but the fabric is really too limp to show off the design to the best advantage.  I believe the magazine called for a woven wool (I don't have it handy to check) and in this case I probably should have used the suggested fabric or something similar.


When I had the dress basted together, I tried it on and it was still way too big.  The horizontal seams were okay, but I had to take the sides in about 1/2" on each side from just under the arm to the hip.  Even with those adjustments, it is still loose on me.  I decided that was okay.  Everyone needs at least one loose dress in their wardrobe.


At the last  moment, I also decided to change the slouchy collar to a simple band.  I like the look, but unfortunately I didn't cut my band short enough and I have some rippling in the front.

Looking at these pictures, I have to admit this project is a fail.  The dress doesn't fit quite right, the seams look puckery, and the band is wonky.  I wonder if taking it in to be more fitted like the photo is worth the effort.

At this point, I think not.  I'm ready to move on to something else:


I traced Burda Style 10-2014-139 and cut out a muslin today.  I am interested to see how this goes together and how it looks on.  The dress in the photo is clearly too big for the plus sized model.  Although Burda describes it as a "figure-concealing A-line dress" with a "sixties look," I like the style lines and I think if it was fitted better, this could be a really pretty dress.  I guess we'll see.

Saturday, November 29, 2014

Simplicity 1317 A Sweatshirt That Works

Occasionally everything comes together just right and I end up with a project that I'm really pleased with.  Simplicity 1317 is one of those projects.  I am thrilled with the way this top turned out.


After being disappointed in the Burda pattern from the last post, I turned my attention to this simple sweatshirt pattern from Simplicity.  It's a raglan sleeve sweatshirt with a neckband, two sleeve options, and an optional hip band.  It was the raglan sleeves that cinched it for me.  I figured they would fit better and be more flattering than the dropped shoulders of the Burda top.


My fabric is this red and black ponte "scroll" from Hancock's.  I love the colors and the pattern, and it has a nice beefy texture which seemed perfect for a dressy sweatshirt.  It was a bit pricey at 19.99/yard, but it was on sale for 40% off and I only needed 1 yard for this project.


The sleeves and neckband are plain black ponte, also from Hancock's.


This pattern is sized XXS through XXL and I didn't really trust the back of the envelope.  If I had gone by my measurements and made a size L, I think I would have been disappointed.  Instead, I measured a favorite RTW sweatshirt and compared it to the pattern tissue.  I decided to go with a Medium and just add a bit at the sides to give myself the extra ease needed to mimic the RTW shirt.  Basically I used the M cutting line as my seam line and added 5/8" extra to the sides.


I also added 1.5" of length at the waist and another 1" to the hem.  That allowed me to keep the deep, 2" hem allowance and have the top still be long enough to look nice and cover the top of my jeans.  I shortened the sleeve by 5/8", not because I really needed to, but to fit the pattern piece on my fabric.  The sleeves turned out just right.

I decided before cutting to eliminate the hem band.  I felt that a plain, straight hem would be comfortable, flattering, and look more polished than a contrast band snugged up around my hips.


The pattern pieces are well drafted and go together very easily.  In fact, I don't think I even looked at the instructions.  The neckline seems wide once you sew the backs, fronts, and sleeves together, but the neckband is cut perfectly- you stretch it to fit the top while you sew and then it snugs up just right to lie perfectly flat.  I added a row of topstitching close to the neckline seam to keep the allowance in place inside.  (This is one of those patterns that changes to a 3/8" seam allowance at the neck- you have to watch out for that.)  I love the finished neckline, too.  It's wide enough to be comfortable and flattering, but you could easily layer another top, even a turtleneck underneath for extra warmth.

There is no waist shaping in this pattern.  The sides are straight and the finished top is boxy.  I like it, especially since that is the relaxed look I was going for, but I think I might like to make this again and experiment with nipping the waist in just a bit.

And I will be making this again.  It's so easy and I like the finished top so much, how could I not?  The Princess wants one, too.  I am already on the lookout for my next fabric combination.

Happy Sewing!

Tuesday, November 11, 2014

Burda Style 09-2014-114 When Sweatshirts Go Wrong

I finished Burda Style 09-2014-114 a little over a week ago.  I was so excited to make this top- really looking forward to making a "fancy sweatshirt."

It didn't turn out quite like I'd hoped...


This top was pictured in the magazine like so:


Flashdance flashback anyone?

It was also pictured in plaid fleece with light contrast sleeves and hem band:


Both versions look like loose, easy pieces that could easily be paired with jeans or a skirt... or (ahem) leather shorts.  

I made a straight size 44.  I really should have gone down to a 42 at the shoulder, but I figured it wouldn't make a whole lot of difference.  


It turned out huge.  This thing swallows me.  The sleeves are too long, and the neckline is way too wide.  I feel like I'm swimming in this.


Pushing up the sleeves helps, but not a lot.  Nothing can really help the neckline, though.  I planned to layer this over another top, but as it turns out, I don't have a choice.  The neckline literally extends out to my shoulders.

Funny thing is, though, it really looks like it was designed that way:

Size issues aside, this is a very easy, straightforward pattern.  There are only 5 pattern pieces including the wrist and hem bands, which are rectangles with measurements provided.

The front and back are nearly identical- the front neckline is just slightly lower than the back.


I used a printed ponte from Fabric.com for the front and back, and black ponte from Hancock Fabrics for the sleeves and bands.  The print fabric is very light and soft and doesn't have quite as much body as the black fabric.  I think it's almost too light for this project.  A little more body may have helped this over-sized design.


Grrrrrr...  I'm just not happy with this.  Looking at the pictures, I wonder if it's even worth cutting it apart and trying to reduce the top.  I could kick myself for not making a muslin and figuring out that there were problems, but I thought how could a simple sweatshirt go wrong?


The back doesn't look so bad.  Well, except that the sleeves are still too long.

What could possibly make this top look better?


I know, pairing it with a 2014 Corvette Stingray convertible!  Sadly, the car is not mine.  It's just a fun shot of the top "on location."

I still want a fancy sweatshirt and I'm not going to let this pattern defeat me.  I'm going to try again with Simplicity 1317 and a different design:


I already have a red and black textured knit picked out for view C.  I think I will like the raglan sleeves better and the neck band on this pattern looks like it will be more comfortable and flattering.

I will have to think some more about 09-2014-114.  Maybe I will take it apart and re-work it.  We'll see...

Sunday, October 26, 2014

Burda Style 11-2011-114A A Sweatshirt Alternative

Lately I've been on a mission to make some comfortable tops that I can wear to work on casual Fridays.  An added challenge is the coming colder weather, as well as the fact that my office is also quite cold.  Although jeans and sweatshirts are perfectly acceptable, I find myself wanting to step it up a notch.

I rediscovered this pattern while poring over back issues searching for something else.  And I remembered this houndstooth ponte which I originally ordered "on spec" to possibly be made up into a shift dress.  When it arrived, it didn't speak shift dress to me, so into the stash it went.


I figured why not give it a  try with this pattern.  I was hoping for a warm, snuggly top that was casual enough to wear with jeans, yet different enough to be work appropriate and not look like just another sweatshirt.


Here is the original top from the Burda issue.  As you can see the fabric used is very lightweight and semi sheer.  I knew going in that my heavier ponte might not give me the desired results, but I decided to forge ahead and go with my gut.


The pattern itself is quite clever.  And EASY.  This is the illustrated sewing course from that particular issue and the course, although quite helpful, could be simplified even more.  It walks the beginning sewist through thread tracing the facing and the lines at the sides where the front edges line up, but none of that is necessary.  You can literally just fold and baste.


All of that gathering at the neckline is the result of the long back yoke which scrunches up and falls in soft folds around the neck when worn.  There is not a gathering stitch to be had in this pattern.  All of the seams are straight or very gently curved, and of course, in a knit, gentle curves are a snap to sew.


I assumed when I decided on this pattern, that I would need a cami or a t-shirt underneath, but I was pleasantly surprised to find that my neckline came out very modest- no cami or even safety pins needed.    This is probably due at least in part to my heavier fabric, which doesn't drape as much as whatever was used for the model.  It's also possible that the magazine version fits the super slim fashion model more loosely...

You can see the seaming in the back below.  The yokes are cut in one piece with the fronts.  You fold one neck facing down and then wrap the other around it and sew the CB seam.  When you pull the one facing out of the other, they both automatically fall into place with a nice enclosed seam and finished neck edge.  All that is left at that point is to sew the lower back piece on with one long, slightly curved seam.


The pattern is offered in sizes 34 to 42.  I graded up to a 44 at the bust and on to a 46 at the hip.  It was very easy because all I really had to do was add to the side seams.  I made my customary 3/8" petite adjustment above the bust and added 1 5/8" of length at the waist.  Once I got everything basted together and tried it on, I realized that I really should not have added to the length at all.  This pattern is drafted long.  That's the first time I've run into this problem with a Burda pattern.

 
The extra length really worked against me.  The pattern has definite waist shaping and is very straight at the hip, which you can see in the mannequin photo and the tech drawing.  Not only did the top turn out way too long, but when I trimmed it to the desired length (I removed about 2.5") I ended up with some of the side hip flare at the hem.  You can see it in a couple of the photos above.  I really should go back and trim the sides to be a bit straighter and fix the hem.

I also shortened the sleeves by about 3 inches.  They are drafted extra long.  My arms are short and I didn't need the extra fabric calling attention to that fact.

The front is literally two mirrored pieces laid one on top of the other and you can see above that most of the front is two layers.  I knew that could be a problematic with the heavier ponte knit fabric, but I also knew that warmth was a major consideration and I really like the way the ponte worked for this top.  I wore this to work to road test it and it really was warm and comfortable, snuggly even, all day long.  I felt like I was wearing a sweatshirt, but no one else knew because it didn't look like a sweatshirt.

I am seriously thinking of making this again and removing the extra waist length.  I would also remove some of the back yoke length.  You can't really see in the photos, but I get some bunching at the high back where there is just too much fabric and not enough neck to distribute it along.  I  highly recommend a muslin even though the top is super easy.  I wish I had made one because I could have avoided these two issues and had a better garment.  I still have a wearable garment, though, and wear it I will.

In other sewing news, I have four projects cut out and waiting to be sewn:  A top and a dress for the Princess, and a top and a dress for me.  There will soon be more sweatshirt action here at House of Frog.

Happy Sewing...

Tuesday, October 7, 2014

Burda Style 01-2014-135 A "Camo" Dress for Fall

 Okay, it's really not "camo" but more on that in a minute.  This is Burda Style 01-2014-135, the jersey dress from the plus section of this year's January issue.


If you missed it, it's probably because it was pictured like so:


It's actually a very nice dress with soft, feminine details and a retro vibe to it.  I wanted to make it the moment I saw it, but I didn't have any suitable knit fabric on hand, and several trips to my favorite fabric stores didn't turn up anything inspiring either.


As you can see, the design is relatively simple- the V-neck bodice and the skirt are gathered onto what Burda calls a "wide inset waistband."  Bodice and skirt have CF seams and the skirt features a waterfall effect in front with the front hem being noticeably higher than the back.


I cut my standard 42 at the shoulder (had to grade down one size) 44 at the waist and 46 at the hip.  I folded out 3/8 above the bust and added my 1.75" length adjustment to the waistband, making my band much wider than the model.  Actually, I think the waistband, as drafted, is skimpy.  Adding the extra width not only helped with the fit, but the proportion as well.  At least for me.

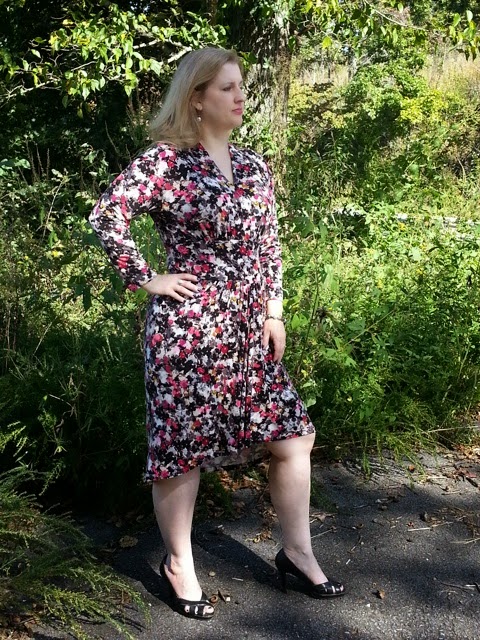
As it turns out, my fabric is so busy, it's hard to tell there even is a waistband unless you look closely.


About this fabric...  I found this knit print at Joann couple of months ago and I just fell in love with the colors and the print.  It seemed very "fall" to me as well as suitable for this dress.  I had felt all along that it needed a floral or an abstract print to look right.


The picture doesn't do this fabric justice.  It's a gorgeous combination of pink, fuchsia, maroon, coral, taupe, black, gray, slate, tan...  I see another color every time I look at it.

JoAnn calls this Floral Camo Pink Rayon Spandex Jersey, hence the title of this post.  It's not really camo, more like an abstract floral.  It is, however, rayon spandex jersey.  I have no idea how I lost my mind and bought this because I hate sewing with rayon knit.  I guess I was seduced by the pretty print and wasn't thinking straight.  It was absolutely horrible to sew.  It wanted to shift and stretch and I had to fight to get it to go under the presser foot.


The finished dress, however, is incredibly comfortable to wear.  The fabric is soft and stretchy and feels like a comfortable pair of old pajamas.  But it did necessitate a few "tweaks" to the construction.

When I sewed the gathered bodice and skirt to the flat waist band, the seam was a mess.  The gathered portion wanted to drag under the presser foot and the whole thing just wanted to slide along the thread after the seam was sewn.  It also stretched way out while sewing.  I was worried about the seam being stretched out and about the fabric growing while wearing and having the dress loose it's shape.

To remedy that, I used double fabric in the waistband.  Since I eliminated the zipper (I can only imagine the nightmare of inserting a zipper into rayon knit!) and the dress needs to go on over my head, I felt interfacing wouldn't allow the waistband to stretch enough.  In order to keep the waist from bagging out, I stabilized the waist seams by sewing clear elastic onto the seam allowances.  It worked great- after road testing I can report that the waist fit perfectly and never gaped all day.


As you can sort of see, with the busy print, the back of the dress is cut very narrow.  And long.  Very long.  I removed 3 inches of length from the skirt pattern pieces.  This would have hit me at the bottom of my calf as drafted and I felt that length would not be flattering.


 The front, on the other hand is cut fuller with the CF seam at an angle to the waist.  That's what forms the drape in the front.  The hem is above my knees at CF.  Because of the way the skirt is designed you really need to decide on the length before you cut.  And it's tricky- I think I got a decent length with a happy medium between short in front and long in back.  When I road tested this by wearing it to work, my co-workers teased that it's "business in the back, party in the front."

I opted for a hand sewn hem, partly because of the shape, but mostly because I knew trying to hem this unruly fabric by machine would be a disaster and I would end up ripping it out and doing it by hand eventually anyway.  (I don't sound bitter, do I?)


One other thing- I did raise the V-neck by about 2.25 inches.  The bodice front has a nifty cut on facing that you join with a cool, dart-like seam.  I simply sewed the fronts together from the tip of the dart a little higher.  It worked because the fabric is so stretchy- a more stable fabric would have bubbled and pulled.  My neckline looks almost frumpy in the photos, but that's because I just pulled the dress out of the dryer where it got a steam refresh before the photos were taken.  I almost lowered it back down an inch but I'm glad I didn't.  The dress did "grow" a bit throughout the day and the neckline stayed modest.  Besides, this is a work dress and I don't need to show more than this while on the job.  If I made this again, I would raise the neckline the right way- by adjusting the pattern before cutting out.


So the long story short is I got a great dress.  I like this a lot.  I like the way it looks and I like the way it feels when I wear it.  I still love the print and the colors are perfect for this time of year.  I'm just going to block out the sewing experience from my mind and next time a rayon knit tries to seduce me in the store, I'm going to put it down!

The pattern itself is a winner.  It's easy enough to put together (2 dots) and the style is pretty and flattering.  The only thing to be careful of is the length of the skirt- you have to find that balance before cutting your fabric.  I can see myself making this again, but not any time soon.  There are too many other patterns calling my name.

In other sewing news, I made a decision on which dress to make out of the teal knit.  I cut out 08-2009-137, the funky shaped dress with the rounded skirt, dolman sleeves, and stand-up collar.  Cross your fingers for me!

How is your fall sewing going?

Sunday, October 5, 2014

Burda Style 10-2014-105

It's very rare that I actually make something out of Burda the moment I get my hands on the issue.  But that's exactly what happened with this project.  I got the magazine two weekends ago and I made this dress last weekend.  Today I had the perfect combination of time, good weather, and an available photographer, so here is Burda Style 10-2014-105, "Dress with Boat Neckline."


I wouldn't really call it a boat neckline, but I like it.  It's actually a gently draped neckline on a very simple dress.


The front has a fold-back facing, exactly like a cowl neckline and the back shoulders wrap over to the front and are stitched down to the front forming a draped, but modest neckline.  The sleeves are drafted extra long for that ruched look that Burda likes to show.


This is a very simple dress to make.  In fact, it's a 1.5 dot pattern.  There are only three pattern pieces, which are well drafted and go together perfectly.

The pattern is offered in sizes 34 to 42.  I graded up to a 44 at the bust and to a 46 at the hip.  It was super easy due to the simple design.  The sleeves are very long and narrow.  I removed five inches of length and then did a full bicep adjustment to give myself an extra 1.5" of width.  I didn't want the sleeves to be tight.


I added my standard length adjustment at the waist.  There is a little bit of fabric pooling in the back, which I may try to adjust if I make this again.  It doesn't bother me because no one but a fellow sewist would even notice.


My fabric is a zig zag patterned ponte knit from Hancock Fabrics.  I bought it last year during some retail therapy, and I knew as soon as I saw this pattern that it would be perfect.  In fact, that's one of the things I like about this pattern- it's a perfect way to showcase a printed/patterned fabric or a textured fabric like the one shown in the magazine photo.

I did attempt to match my pattern.  You can see in the photo below that I did pretty well at the waist, but further down the side seam, things get a little "off."  No bother.  Once again, no one but a fellow sewist will notice.


I love this neckline.  It's very modest.  It's not quite drapey enough to fall like a cowl.  In this ponte at least, it wants to fall to one side in a more origami-like fold.  It's okay with me.  I feel comfortable and covered at the same time.


I'm really pleased with the way this turned out.  The weather is still quite warm and nice right now and I'll probably wear this with pumps and maybe some nude hose for the time being.  Once the colder temps arrive, I will try it with tights and black boots.  I could also see it with a red or a royal blue shoe for a pop of color.


I'm not sure I need another one of these, but I can see making the top version, which is exactly the same, just cut off at the hip.  There is also a pieced/color blocked version offered in the magazine.  The Princess likes it too, and I already traced and cut one out for her in a much more colorful striped knit.

If you have your eye on this one- go for it!  It's a great pattern, and easy to fit and sew- a great dress from a great Burda issue.  Happy Fall Sewing!