Monday, June 20, 2016

McCall's 5378 Shirtdress Sew Along Part 2

This McCall's 5378 View C, the second shirtdress from the McCall Pattern Blog Shirtdress Sew Along.


When I decided to participate in the sew along and I was choosing a pattern, this one was the first runner up.  I ended up choosing M5024 for some of it's design features, but I kept this one pulled out and handy.


The cover dress really is ugly- plain brown with a black scarf tied around the waist, but the drawings are cute.  The short dress appears to be seersucker and the long, black and white version looks lean and cool.  I just happened to purchase this black and white stretch twill a couple of weeks ago at the Hancock's clearance, having no idea what I would do with it.  I had just enough for this pattern.  It seemed like it was meant to be.


This pattern is much easier than the last one (M5024.)  There are fewer pieces since the facings are cut on and the collar is pretty much a straight piece attached to the neckline- no inset corners!    The only thing I didn't like is that this pattern has no pockets!  I decided to use the pocket pieces from M5024 and add them to the side seams.  It worked beautifully.


Although this pattern is pretty plain, it does have a back yoke and front shoulder yokes.  I really like those features, even though they are kind of hard to see with this print.

I didn't make a muslin for this.  I just made the same adjustments that I made for M5024 (graded to a size 14 at the shoulders and neckline and cut size 16 from bust down, 1.25" of length added to the bodice, 1/4" sway back adjustment) and crossed my fingers.  They worked.


This dress is long.  I briefly considered shortening the skirt pattern pieces, but decided against it.  I figured I could always hem it shorter if I needed to.  I didn't.  It's almost a maxi dress, but I love how dramatic it is.  The skirt moves beautifully and it's very comfortable.  I wore it to work today and it wore very well and got compliments, too.

I could see making this again.  It might be nice to have another long shirtdress in a solid color- maybe a vivid red or cobalt blue.  I also like view A with the puffed sleeves.  In the meantime, I have really gone off the shirtdress deep end because I've started a 3rd one.  More on that in a future post!

Sunday, June 19, 2016

McCall's 5024 Shirtdress Sew Along Part 1

When the McCall Pattern Blog recently announced a shirtdress sew along, I thought it sounded like fun and a great motivator to make a shirtdress, something I haven't done in a long time.  I love the style so I don't know why I didn't already have one of these in my closet.


I knew I had at least a few patterns in my stash and I wanted to use one of them, preferably along with stash fabric.  I chose M5024.  It is a very traditional looking style with a darted bodice and an a-line skirt.  I liked the way it looked on the model with the close fitting bodice and squared shoulders.  The sleeve bands and the button band cinched the decision for me.


After doing a little internet research, I found that M5024 is the stitch 'n save version of M4769, which has been released with various cover photos.  You may recognize this one:


For my fabric, I chose a turquoise seersucker from stash.  It wasn't my first choice.  I wanted to use a novelty print from stash but I didn't have quite enough of it to cut all my pieces out with the print running in the right direction.  The pattern does not have a "with nap" layout so the fabric requirements listed are not enough for directional prints.  I figure I needed about 1/2 yard more of my 45" fabric to make the pattern work.


I ended up going with the seersucker because I had it on hand, there was plenty of it, and I love seersucker.  It's very cool and comfortable on a hot day.  And it was very hot and muggy when these photos were taken.  The dress, however, was quite crisp and comfortable.


The pattern envelope I had included sizes 16 to 22.  I had to grade the neck and shoulders down to a size 14 and I cut a 16 everywhere else.  I added 1.25" of length to the bodice pieces, my standard adjustment for my long torso.


The pattern went together easily.  The directions were good and the pieces, for the most part, were well drafted.  I can't speak for M4769, but with M5024 I did find that some of the notches did not match up correctly.  You can see in the photo above that the bodice side seam notches are slightly off.  It was not a big deal- the seams themselves lined up perfectly.


The only problem I found was the sleeve bands which are too short.  You can see above where I have the size 16 sleeve cut out and the sleeve band below it.  I cut the band on the size 16 line on one end and the size 22 on the other end.  If I had used the size 16 lines on both ends, my bands would have been too short to attach to the sleeve.  I checked the pattern pieces and the instructions to see if smaller seam allowances were indicated for the bands, but no.  (You can also see the notches don't line up.)  Luckily for me I noticed this before cutting out the bands.  I've adjusted the pattern piece so that if I make this again it won't be a problem.


The dress went together very well.  There are quite a few pieces to this pattern.  More than you might think because the facings are all separate, and there are sleeve bands and a button band.  Most of the sewing is pretty straight forward, although there is an inset corner where the collar attaches to the neckline, so that requires some precision sewing.  I also love that the dress has pockets in the side seams.

I went a little large on the buttons using 1" instead of the 5/8" called for.  I adjusted the spacing to account for my length adjustment and because I knew I would wear a belt with this dress.  I added a hook and eye inside the button band right at the waist to keep it from gaping.

I'm happy with the finished dress and I can see myself making this pattern again if the right fabric came along.  I would still like to make it in a print.  I had such a good time making this and I like it so much, I made a second shirtdress for the sew along.  More on that in the next post.

Sunday, June 5, 2016

Burda Style 05-2016-115 A Zigzag Dress

I am so happy to have this dress finished.  I cut it out weeks ago, but couldn't sew it until last weekend because I didn't have the right needles for the fabric.  Now, I've stocked up and I'll be sewing some knits again.


Anyway, this is dress #115 from the May issue of Burda Style.  I loved it when I first saw it and knew I would be making it.  Burda showed theirs in a  solid, which is quite lovely, but I wondered how it would look in a print.


The dress is really quite simple.  It has side seams, small darts at the shoulders, and a neckband.  The front and back overlap at the shoulders and really, there isn't much sewing to it.

I think I cut a 42 through the top and eased out to a 44 at the hip.  It was several weeks ago and my memory is foggy now.


My fabric is a chevron print jersey from Hancock's.  I bought it "on spec" a year or two ago and I decided to just go ahead and use it.  The colors are very nice- blues, greens, and purples with a little bit of black.  The scale is nice, too, and I think it worked well for this pattern.


The dress went together very easily.  In the photo below you can see a close-up of the arm opening.  I was worried about coverage- flashing the bra band under the arm.  If the front and back fall open like the model photo- the armhole gets bigger.


The key is keeping the front and back overlapped, so I hand stitched the edge of the back down.  That keeps it in place and keeps the opening pretty well closed.

The neckband was a little tricky.  It is simple enough to attach, but I ended up trimming 3 inches off the length and I still feel it could be smaller.  My fabric is pretty stretchy, so that probably was a factor.  If I make this again, and I might because I think I'd like to have the top version, I will take another inch or two off the length of the neckband strip.


This would have been a very quick project if I'd had the right needle on hand and could have sewn it up right after I cut it out.  I'm happy it's done, though, and I look forward to road testing it this week.  This will be another loose, comfortable dress for the hot summer months.

Happy sewing, and may you never run out of needles!

Saturday, June 4, 2016

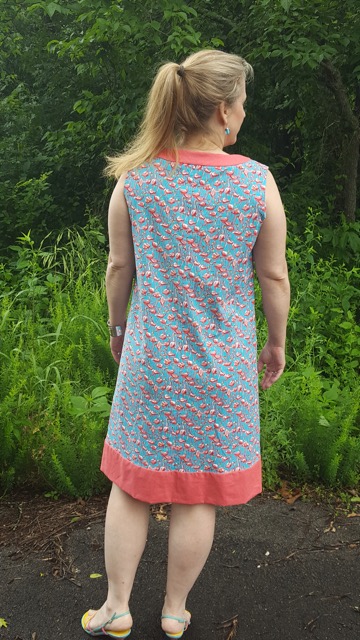
MCCall's 5621 A Shift Dress

Hello, 2008 called.  They want their neckline back...

So a few weeks ago I was puttering around my sewing room just itching to sew something.  I had a jersey dress all cut out and ready to go, but no needles to sew it.  I had some ponte to work on, too, but... no needles.  On the other hand I had plenty of universal needles and plenty of cotton prints, and a hefty pattern stash...


I ended up pulling M5621 out.  I love a shift dress and I love this "key hole" neckline, too, even if it was trendy 8 years ago!  I never got around to making it then, and I still wanted to try it.  Besides, the pattern looked simple, it only called for 2 yards of 45" fabric, and I just happened to have...

 ...this flamingo print marinating in my fabric stash along with this coral linen that I apparently bought a whole bolt of at some point because I have a ton of it.


I was going for a Lilly Pulitzer-esque look with all the turquoise and coral and the flamingos.  I don't think I quite got it.


For this dress, I cut a 14 through the neck and shoulders and a 16 from the bust down.  There are no darts in this pattern, and very minimal side seam shaping.  The only adjustment I made was an extra inch of length at the waist.  That extra inch almost caused me to not have enough fabric.  The pattern just barely fit on my 2 yd cut of fabric.  Of course, the print is directional, so I had to cut it with the pattern running the right way.


Check out those awesome flamingos!

Of course the best part of this dress is the dramatic neckline.  I love the look- it shows quite a bit of skin, but isn't scandalous at all.  I feel very comfortable in this.

The neck pieces are cut from linen with the outer pieces interfaced.  It did take some precision sewing- you have to put in stabilizing stitches and clip into the corners.  And of course the endless curves all have to be graded and clipped so that everything lies flat.  But it wasn't too terribly difficult and I spent a relaxing afternoon working on it.


The print is cut to the full pattern length, which I felt was too short for me.  To bring the hem to mid knee, I added a simple band of linen approximately 4" wide.  I just measured the bottom of the pattern and then used my rotary cutter to cut strips the width of the pattern and twice the length of the hem band plus allowances.  I folded the band up and hand stitched it to the inside of the dress so all the raw edges are enclosed.


The dress is very comfortable and I figure it will get some wear during the hottest part of the summer when a cool cotton dress can be a life saver.  I could see wearing it to work with a cardigan.  I just don't know, though.  I don't get that LP shift vibe from it... I get more of a fancy hospital gown vibe... a fancy maternity hospital gown.  Maybe its the colors.  I thought the turquoise and coral would be more pronounced.  Instead I see pink and blue.  Baby pink and baby blue.

It's okay though, because I like the dress enough to try again.  Although I'm thinking of making the next version in a rayon challis- the drapier fabric will be more flattering- and I'm also thinking of cutting it off at the hip to make a top.  A cool challis top to wear with jeans on casual Fridays will get a lot of wear this summer.

In other news, I've been participating in the McCall's Shirtdress Sew-Along and my first shirtdress is almost done.


Here it is laid out so I could play with button placement.  I'll have it finished up and ready to share soon.

Happy Sewing!