I knew the moment I saw this sheath dress in the August issue of Burdastyle that I would be making it. Dresses like this- knit sheaths with interesting seaming- make up a significant portion of my work wardrobe. I've even had a coworker say that it's my "uniform." I take that as a good thing.
I love the style lines on this garment. They are different enough to be interesting, placed well enough to be flattering, and just complicated enough to make sewing this dress fun. I also love that the neckline is modest and the whole package looks elegant and suitable for my lifestyle which consists of going to work and coming home.
The magazine photos didn't really do the design justice in my opinion. Thank heavens for tech drawings because otherwise I might have missed all that gorgeous seaming. Burda showed this dress in navy and in tan:
I felt that I needed a light color to show off the seaming and the intricate, inset corners of this pattern. When I saw this beige ponte knit at Fabric.com I thought it would be perfect and I ordered it as a birthday present for myself. I've been trying to add more varied colors to my wardrobe and the truth is, other than gray and black, I don't have a lot of neutrals in my closet. I don't even own a pair of khakis. I wanted to try something outside my color box and I pictured this paired with gold accessories maybe with pearls.
I'll admit when the fabric arrived I had second thoughts. It seemed very close to my skin and hair color. I was afraid I might end up looking like a big blob of beige. But what the heck, I already had the fabric and I just forged ahead. In the end I'm happy with how this turned out.
This pattern is offered in tall sizes 72-88. I cut an 84 through the shoulders and an 88 from the bust down, which compares to my "regular" burda size of 42/44. Because this is a tall pattern, I did not add any length to the waist, but I did remove 3/4" of length above the bust; 3/8" to "un-tall" the pattern, and another 3/8" as my standard petite adjustment. I also removed 1" from the sleeve cap.
I assembled the front and the back and basted them together at the sides and then began the long process of fitting this just right which I did by trying on, basting new side seams, trying on again, basting again, and so on. In the end, I took the side seams in 1/4 all the way down, and an additional 1/2" at the waist. I also took the CB seam in at the waist about 1/4". I also had to tweak the side front seams just below the corners. I have a little bit of tummy and it causes a hollow area on either side right below my hip bones. I had a little bit of fabric pooling there, but taking that seam in about 1/8" helped.
And oh yes, I shortened the sleeves by about 1" to accommodate my T-rex arms.
Burda rates this as a 2.5 dot pattern. It really isn't difficult at all- the pieces are perfectly drafted and fit together like a jigsaw puzzle. In fact, I didn't even look at the written instructions. There is some precision sewing involved with the inset corners, 4 in front and 4 in back, but they were very easy to do in the ponte knit. It helps that they aren't right angles, but a little bit wider.
All my seams are serged inside for neatness. I remembered to interface my facings, which really helps with pressing and keeping them tucked neatly to the inside. They are tacked down at all the seam intersections for extra security.
I have already worn this to work and road tested it and I love it. It's comfortable and looked nice all day. Because of the neutral color, I think I can change up the shoes and jewelry and get several different looks with this. I'm looking forward to trying, anyway.
I don't have plans to make this dress again, but who knows what the future will bring. I could see myself making the top version. I've seen a couple of really nice color-blocked versions of this and I might like to play around with that idea.
Up next will be this dress, I think:
Vogue 9050, but with sleeves. Another sheath with interesting seams made up in ponte knit to add to my uniform collection.
Do you have a "uniform"?
Saturday, October 24, 2015
Sunday, October 4, 2015
Princess Sewing Update
If you judged by the activity on this blog, you would think there hasn't been much sewing going on around here this year. The truth is that there has been plenty of sewing, it's just that taking pictures for the blog has become a chore. The kids are older and have more activities going on and I work more and want to do other things when I come home. But last weekend the Princess and I took time out to snap a few shots of this summer's projects.
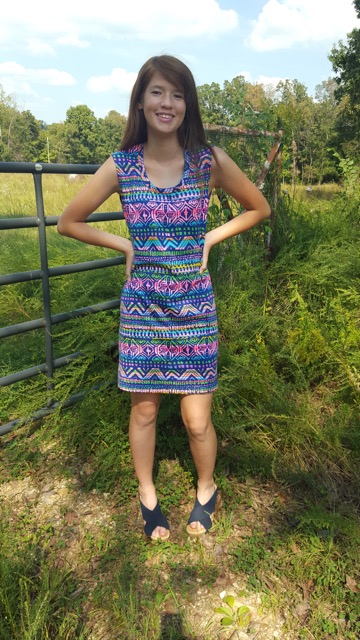
We started the summer out with this, McCall's 6886, an insanely easy knit dress.
This was actually our muslin, made up in this awesome tribal print ponte knit from Hancock's. The princess loves these kinds of prints and she was thrilled with this dress.
We actually bought this pattern to knock off a dress she had seen in a department store. I liked the dress on her, but I felt it didn't fit well enough to buy it- it was way too short and the bottom was too snug while the top was too loose.
After the successful muslin we made this one- the knock off version. It has a CF and CB seam and a waist seam which we added by cutting the pattern pieces at the waist and adding seam allowances there and to the center fold lines.
Like I said, this pattern is insanely easy. There are just 2 pattern pieces for the sleeveless version- front and back- no facings or bindings! I don't really like the "turn under and stitch" method of finishing necklines and armholes in knits, so we added a neckband and finished the armholes with a binding strip on the inside.
If you want a very quick and easy knit dress, I highly recommend M6886!
I made Burda Style 6-2015-121 for myself and was very pleased with it. The Princess liked it, too, so I thought why not make one for her?
For her version, I used another tribal print, this time an ITY knit from Joann's. I also hemmed hers much shorter than mine. She likes to show her knees and her legs are long enough to make the shorter length work.
I think we cut a size 36...
It's so much fun for us to go through the Burda magazines together, although it's hard for me to believe I'm sewing adult patterns for her. Seems like just yesterday it was smocked dresses and Children's Corner patterns. Where does the time go?
We started the summer out with this, McCall's 6886, an insanely easy knit dress.
This was actually our muslin, made up in this awesome tribal print ponte knit from Hancock's. The princess loves these kinds of prints and she was thrilled with this dress.
We actually bought this pattern to knock off a dress she had seen in a department store. I liked the dress on her, but I felt it didn't fit well enough to buy it- it was way too short and the bottom was too snug while the top was too loose.
After the successful muslin we made this one- the knock off version. It has a CF and CB seam and a waist seam which we added by cutting the pattern pieces at the waist and adding seam allowances there and to the center fold lines.
Like I said, this pattern is insanely easy. There are just 2 pattern pieces for the sleeveless version- front and back- no facings or bindings! I don't really like the "turn under and stitch" method of finishing necklines and armholes in knits, so we added a neckband and finished the armholes with a binding strip on the inside.
If you want a very quick and easy knit dress, I highly recommend M6886!
I made Burda Style 6-2015-121 for myself and was very pleased with it. The Princess liked it, too, so I thought why not make one for her?
For her version, I used another tribal print, this time an ITY knit from Joann's. I also hemmed hers much shorter than mine. She likes to show her knees and her legs are long enough to make the shorter length work.
I think we cut a size 36...
It's so much fun for us to go through the Burda magazines together, although it's hard for me to believe I'm sewing adult patterns for her. Seems like just yesterday it was smocked dresses and Children's Corner patterns. Where does the time go?
Saturday, October 3, 2015
Simplicity 3846 A Long Time in the Making
Just recently (a few weeks ago) I finished up these pants from Simplicity 3846:
These are a very simple, plain pair of pants from this now OOP sportswear pattern:
The pants have straight legs, a flat front, back darts, a contoured yoke and an invisible zip in the side seam. The interesting thing about them isn't really the pants themselves, but how long it's taken me to finish them and finally wear them.
You see, I made these pants in 2009. That's right, six years ago. Right after I made the city shorts version. I finished everything except the hems, and I must have laid them aside thinking I'll work on that later, let me sew something exciting right now. And they got pushed aside, covered up with other projects and fabric, and next thing you know they were forgotten.
I know I pulled them out from time to time over the years, but most of the time, they were too snug to wear due to my fluctuating weight and so I didn't bother with those hems. After all, how can you hem pants if you can't even get them on to mark the length?
Well, with my new, more active lifestyle I've noticed that I'm now able to wear a lot of things that had gotten too tight and had been pushed to the back of the closet, so I pulled these pants out and tried them on. I mean, they were completely done except for those hems. It seemed insane to let a perfectly good pair of pants go to waste! And they fit! So I immediately marked those hems and finished them. And wore them!
(Please excuse the wrinkles in the photos, I took these pics after the pants had lain on a pile of laundry overnight. I have to grab that photo opportunity when I can!) I made the original city shorts in a size 20, tapering in at the waist and CB. I felt at the time that they were too loose so I cut these pants in a size 18. I know all this because I pulled the pattern out and cut another pair using whatever adjustments I had already marked on the pattern pieces.
The original dark grey pair is made of a poly suiting that I'm about 98% sure I picked up at Walmart. This new version is also a poly suiting, this time from Joann's.
When I wore the dark grey pair to work, I felt that they were just a smidge too snug. Not enough to tell by looking, but I thought I could feel it. So for the light grey pair, I used 3/8" seams. Well, I can't win for loosing because after a couple of weeks, the light grey pair feels too loose and the dark pair feels just right. Ugh! I'll probably go back and take the light ones in to 5/8" seams.
So, there's not too much to say about the pants themselves. They are very simple and quick to make (as long as you don't set them aside and neglect the hems for 6 years!) There are no fancy details to them, but if you want a simple pair of pants that will lie smooth under un-tucked sweaters and tops, these are perfect. This pattern is now OOP, but it looks like it's still available here and there out on the internet. Of course, Simplicity and New Look offer similar styles all the time in their sportswear patterns such as S1324, or NL6080.
So I have new pants and a UFO finished and out of my sewing room. What is your oldest project that you've finally finished and worn?
These are a very simple, plain pair of pants from this now OOP sportswear pattern:
The pants have straight legs, a flat front, back darts, a contoured yoke and an invisible zip in the side seam. The interesting thing about them isn't really the pants themselves, but how long it's taken me to finish them and finally wear them.
You see, I made these pants in 2009. That's right, six years ago. Right after I made the city shorts version. I finished everything except the hems, and I must have laid them aside thinking I'll work on that later, let me sew something exciting right now. And they got pushed aside, covered up with other projects and fabric, and next thing you know they were forgotten.
I know I pulled them out from time to time over the years, but most of the time, they were too snug to wear due to my fluctuating weight and so I didn't bother with those hems. After all, how can you hem pants if you can't even get them on to mark the length?
Well, with my new, more active lifestyle I've noticed that I'm now able to wear a lot of things that had gotten too tight and had been pushed to the back of the closet, so I pulled these pants out and tried them on. I mean, they were completely done except for those hems. It seemed insane to let a perfectly good pair of pants go to waste! And they fit! So I immediately marked those hems and finished them. And wore them!
(Please excuse the wrinkles in the photos, I took these pics after the pants had lain on a pile of laundry overnight. I have to grab that photo opportunity when I can!) I made the original city shorts in a size 20, tapering in at the waist and CB. I felt at the time that they were too loose so I cut these pants in a size 18. I know all this because I pulled the pattern out and cut another pair using whatever adjustments I had already marked on the pattern pieces.
The original dark grey pair is made of a poly suiting that I'm about 98% sure I picked up at Walmart. This new version is also a poly suiting, this time from Joann's.
When I wore the dark grey pair to work, I felt that they were just a smidge too snug. Not enough to tell by looking, but I thought I could feel it. So for the light grey pair, I used 3/8" seams. Well, I can't win for loosing because after a couple of weeks, the light grey pair feels too loose and the dark pair feels just right. Ugh! I'll probably go back and take the light ones in to 5/8" seams.
So, there's not too much to say about the pants themselves. They are very simple and quick to make (as long as you don't set them aside and neglect the hems for 6 years!) There are no fancy details to them, but if you want a simple pair of pants that will lie smooth under un-tucked sweaters and tops, these are perfect. This pattern is now OOP, but it looks like it's still available here and there out on the internet. Of course, Simplicity and New Look offer similar styles all the time in their sportswear patterns such as S1324, or NL6080.
So I have new pants and a UFO finished and out of my sewing room. What is your oldest project that you've finally finished and worn?
Monday, August 17, 2015
Burda Style 07-2015-127 and 06-2013-144- A Big Shirt and Slim Pants
I just finished this top and pants a couple of weeks ago and I wore them to work today to road test them.
The top is #127 from the plus section of the July 2015 issue. I was intrigued by the loose, relaxed fit, the center front seam, and the split hemline. The top was shown in the magazine with flared pants, but it looked to me like it would go better with something a little bit slimmer. More on the pants in a minute...
This is a super easy pattern. There is only one pattern piece- the front and back are cut as one big piece that folds over the shoulder and is seamed together at CF and CB. It takes quite a bit of fabric, though. I made a size 44 and it took all of my 2 yards of fabric.
And speaking of fabric, this is cotton interlock from Hancock's. It's a little on the heavy side, but I wanted the shirt to have some weight to it and not get hung up on the pants. I also wanted it to keep me comfortable (warm) in my meat locker office.
I thought about grading down to a 42 above the bust, but I decided not to. 1.) I sometimes have problems with Burda patterns with cut on sleeves and I didn't want it to be too tight. 2.) I was too lazy. I figured it would be easy to take in if needed.
The top turned out HUGE. Voluminous doesn't even begin to describe it! I didn't need to worry about anything being too tight. These pictures were taken after I removed a total of 8 inches from the circumference! I took the side seams in a whole inch from wrist to hem and the CF and CB seams as well. These adjustments not only took the top down to a more pleasing proportion, but taking the CF and CB in also narrowed the neckline. I would have had visible bra straps otherwise.
Unfortunately, the adjustments to CF and CB also altered the hem slits. Mine are much more shallow than the model photo.
As you can see, the top is still pretty loose and breezy even with the amount of fabric I removed with my adjustments. It's comfortable and feels good to wear. I could almost see making it again- maybe even straightening the hem out to make a swing dress... Or shortening it to hip length and using a snuggly fleece fabric for colder weather.
About the pants...
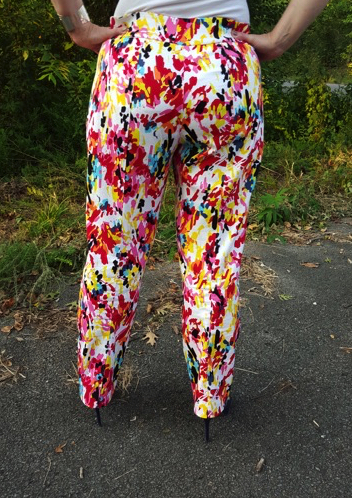
I've had my eye on pants #144 from the plus section of the June 2013 issue for a while now. They are simple, with a slim, streamlined silhouette, and I thought they would pair well with the big shirt.
I love the flat, contoured waistband/yoke and the seams in the back of the legs give them a little extra interest.
For my version, I used this stretch twill print from Hancock's. I was so excited to get this fabric- I saw it a few months ago when it came out with the spring suitings, but at $17.99/yard, it was too expensive for me to buy just to stash it. I decided it would work for these pants and when I went back to get it, I was happy to see it with a 30% off sign on the table. I was even more thrilled when I asked the clerk to check the price and it had gone down to $5.99/yard!
I cut a 44 waist and eased out to a 46 at the hip. A quick and dirty muslin told me that I needed to remove 1/2" from the waist at CB and I needed an "FBA"- full bum adjustment, which I did by adding 3/8" of length across the backside tapering to nothing at the side seams. (Kind of like a princess FBA, but across the bum instead of the bust. The seams in the back made it super easy.) The fit wasn't perfect- there were a few wrinkles. I could have spent many more hours and a couple more muslins perfecting the fit, but I decided to just go for it. My body is still changing with my more active lifestyle and I figured in a couple of months these wouldn't fit any more anyway.
That was 2 weeks ago. They are loose already.
I'll just take the sides in a little on the next pair- oh yes, there will be a next pair! I've already ordered the fabric!
I'm happy with this top and the pants. It's kind of a different look for me, but I like it. Both pieces wore well and were comfortable all day. The top will pair well with jeans and will be a practical piece moving into fall. The pants will also work well with other items in my wardrobe and I anticipate plenty of wear from them as well. (Once I take them in a bit.) I also think this could become a TNT pants pattern for me with a little bit more tweaking.
And now I'm off- the September Burda came today and I need to go check it out while I unwind and get ready to fall asleep. Happy Sewing!
The top is #127 from the plus section of the July 2015 issue. I was intrigued by the loose, relaxed fit, the center front seam, and the split hemline. The top was shown in the magazine with flared pants, but it looked to me like it would go better with something a little bit slimmer. More on the pants in a minute...
This is a super easy pattern. There is only one pattern piece- the front and back are cut as one big piece that folds over the shoulder and is seamed together at CF and CB. It takes quite a bit of fabric, though. I made a size 44 and it took all of my 2 yards of fabric.
And speaking of fabric, this is cotton interlock from Hancock's. It's a little on the heavy side, but I wanted the shirt to have some weight to it and not get hung up on the pants. I also wanted it to keep me comfortable (warm) in my meat locker office.
I thought about grading down to a 42 above the bust, but I decided not to. 1.) I sometimes have problems with Burda patterns with cut on sleeves and I didn't want it to be too tight. 2.) I was too lazy. I figured it would be easy to take in if needed.
The top turned out HUGE. Voluminous doesn't even begin to describe it! I didn't need to worry about anything being too tight. These pictures were taken after I removed a total of 8 inches from the circumference! I took the side seams in a whole inch from wrist to hem and the CF and CB seams as well. These adjustments not only took the top down to a more pleasing proportion, but taking the CF and CB in also narrowed the neckline. I would have had visible bra straps otherwise.
Unfortunately, the adjustments to CF and CB also altered the hem slits. Mine are much more shallow than the model photo.
As you can see, the top is still pretty loose and breezy even with the amount of fabric I removed with my adjustments. It's comfortable and feels good to wear. I could almost see making it again- maybe even straightening the hem out to make a swing dress... Or shortening it to hip length and using a snuggly fleece fabric for colder weather.
About the pants...
I've had my eye on pants #144 from the plus section of the June 2013 issue for a while now. They are simple, with a slim, streamlined silhouette, and I thought they would pair well with the big shirt.
I love the flat, contoured waistband/yoke and the seams in the back of the legs give them a little extra interest.
For my version, I used this stretch twill print from Hancock's. I was so excited to get this fabric- I saw it a few months ago when it came out with the spring suitings, but at $17.99/yard, it was too expensive for me to buy just to stash it. I decided it would work for these pants and when I went back to get it, I was happy to see it with a 30% off sign on the table. I was even more thrilled when I asked the clerk to check the price and it had gone down to $5.99/yard!
I cut a 44 waist and eased out to a 46 at the hip. A quick and dirty muslin told me that I needed to remove 1/2" from the waist at CB and I needed an "FBA"- full bum adjustment, which I did by adding 3/8" of length across the backside tapering to nothing at the side seams. (Kind of like a princess FBA, but across the bum instead of the bust. The seams in the back made it super easy.) The fit wasn't perfect- there were a few wrinkles. I could have spent many more hours and a couple more muslins perfecting the fit, but I decided to just go for it. My body is still changing with my more active lifestyle and I figured in a couple of months these wouldn't fit any more anyway.
That was 2 weeks ago. They are loose already.
I'll just take the sides in a little on the next pair- oh yes, there will be a next pair! I've already ordered the fabric!
I'm happy with this top and the pants. It's kind of a different look for me, but I like it. Both pieces wore well and were comfortable all day. The top will pair well with jeans and will be a practical piece moving into fall. The pants will also work well with other items in my wardrobe and I anticipate plenty of wear from them as well. (Once I take them in a bit.) I also think this could become a TNT pants pattern for me with a little bit more tweaking.
And now I'm off- the September Burda came today and I need to go check it out while I unwind and get ready to fall asleep. Happy Sewing!
Tuesday, August 4, 2015
Burda Style 04-2011-132
This Burda shift dress has been on my to-do list for a long time. The simple lines and the easy shift silhouette caught my eye immediately when the magazine came out in 2011.
Of course, it was pictured like this and made up in suede leather...
But the tech drawing always looked like it had potential:
I finally decided to tackle the pattern this summer. The biggest change I made was fabric selection. Suede would not be very practical for me so I chose this teal rayon linen blend from Joann's. It sewed beautifully and feels comfortable in the summer heat and humidity.
The pattern was offered up to a size 46 so I traced a 44 from shoulder to hip and a 46 from the hip down. I made a muslin and everything looked fine except the waist was a tad too high. I compensated by taking a 3/8" seam allowance there rather than the 5/8" I added to the pattern.
That was about 2 months ago. I took my time cutting the fabric out and then had to put the project on hold while I helped my daughter with her 4H project. I finally got around to sewing this up about 2 weeks ago. To my surprise it was too big. I've been pretty active this summer, walking about 10-12 miles each week and I've lost an inch here and there. I ended up having to take the sides in about a half inch all the way down and I also took in the center back about 1/4". The fit is better, although not perfect, and I maintained the loose, shift dress look.
I didn't really use the Burda instructions. They were written for leather and called for raw edges, gluing seam allowances down, and did not provide for finishing the neckline. Since I used linen, I had to plan the order of construction and figure out how to finish things off inside. I serged most of the seams, but the center front and center back panels are lined with self fabric which finishes the neckline and the zipper nicely. (There is an invisible zipper in the center back seam and a hook and eye at the top.)
I was tempted to omit the pockets out of laziness, but I'm glad I put them in. They are a nice touch, although I think they look rather small. I might go back and add another row of topstitching right outside the existing one. It might at least give the illusion of a bigger pocket.
All in all, I'm pretty pleased. I might give this dress another go later on now that I've worked out the construction. I think I could tweak the fit a bit more through the bust and under the arms, and I could do a petite adjustment above the bust. I might even start over with a smaller size since this one turned out big.
And now off to squeeze in a little more summer sewing...
Of course, it was pictured like this and made up in suede leather...
But the tech drawing always looked like it had potential:
I finally decided to tackle the pattern this summer. The biggest change I made was fabric selection. Suede would not be very practical for me so I chose this teal rayon linen blend from Joann's. It sewed beautifully and feels comfortable in the summer heat and humidity.
The pattern was offered up to a size 46 so I traced a 44 from shoulder to hip and a 46 from the hip down. I made a muslin and everything looked fine except the waist was a tad too high. I compensated by taking a 3/8" seam allowance there rather than the 5/8" I added to the pattern.
That was about 2 months ago. I took my time cutting the fabric out and then had to put the project on hold while I helped my daughter with her 4H project. I finally got around to sewing this up about 2 weeks ago. To my surprise it was too big. I've been pretty active this summer, walking about 10-12 miles each week and I've lost an inch here and there. I ended up having to take the sides in about a half inch all the way down and I also took in the center back about 1/4". The fit is better, although not perfect, and I maintained the loose, shift dress look.
I didn't really use the Burda instructions. They were written for leather and called for raw edges, gluing seam allowances down, and did not provide for finishing the neckline. Since I used linen, I had to plan the order of construction and figure out how to finish things off inside. I serged most of the seams, but the center front and center back panels are lined with self fabric which finishes the neckline and the zipper nicely. (There is an invisible zipper in the center back seam and a hook and eye at the top.)
I was tempted to omit the pockets out of laziness, but I'm glad I put them in. They are a nice touch, although I think they look rather small. I might go back and add another row of topstitching right outside the existing one. It might at least give the illusion of a bigger pocket.
All in all, I'm pretty pleased. I might give this dress another go later on now that I've worked out the construction. I think I could tweak the fit a bit more through the bust and under the arms, and I could do a petite adjustment above the bust. I might even start over with a smaller size since this one turned out big.
And now off to squeeze in a little more summer sewing...
Saturday, June 13, 2015
McCall's 7046
This little dress has been finished for couple of months, but the Princess just now had a chance to road test it this afternoon. This is McCall's 7046 View C:
This is an adorable and easy little pattern with options for a top or a dress, with 3 sleeve choices (4 if you count sleeveless) and an option for a single or a double tiered skirt.
We chose view C, the sleeveless dress with double tiered skirt. It seemed appropriate for the season and for a 13 year old young lady.
The fabric is an ITY knit from Fabric.com. I originally ordered it for myself, but she liked the colors and the print and it seemed like it would work well for this design, so I decided to change plans. I love it on her.
The pattern is labeled "easy" and it was. I cut a 12 through the bodice and a 14 through the hip. I probably could have sewed a 10/12, but I didn't want it to be skin tight. The instructions were pretty easy. The ruching at the sides is created by sewing elastic into the side seam allowances. I don't care for the way McCall's finished the neckline and armholes- turn under and stitch, so I bound the armholes and added a band for the neck. I think it gives it a nicer finish:
I had planned to roll hem the flounces with red thread, but I got ahead of myself and stitched and serged the side seams, and then I was afraid I'd get a bumpy mess when I tried to roll hem over the finished seams, so I just left them raw. They hang nicely and the fabric doesn't curl at all, so all's well that ends well.
The Princess wasn't really in the mood for taking photos, so I'm lucky I got these. She likes her dress and I can see us making this again. I think it would be cute with one of the sleeve options for fall. In the meantime, she should get plenty of use out of this one.
This is an adorable and easy little pattern with options for a top or a dress, with 3 sleeve choices (4 if you count sleeveless) and an option for a single or a double tiered skirt.
We chose view C, the sleeveless dress with double tiered skirt. It seemed appropriate for the season and for a 13 year old young lady.
The fabric is an ITY knit from Fabric.com. I originally ordered it for myself, but she liked the colors and the print and it seemed like it would work well for this design, so I decided to change plans. I love it on her.
The pattern is labeled "easy" and it was. I cut a 12 through the bodice and a 14 through the hip. I probably could have sewed a 10/12, but I didn't want it to be skin tight. The instructions were pretty easy. The ruching at the sides is created by sewing elastic into the side seam allowances. I don't care for the way McCall's finished the neckline and armholes- turn under and stitch, so I bound the armholes and added a band for the neck. I think it gives it a nicer finish:
I had planned to roll hem the flounces with red thread, but I got ahead of myself and stitched and serged the side seams, and then I was afraid I'd get a bumpy mess when I tried to roll hem over the finished seams, so I just left them raw. They hang nicely and the fabric doesn't curl at all, so all's well that ends well.
The Princess wasn't really in the mood for taking photos, so I'm lucky I got these. She likes her dress and I can see us making this again. I think it would be cute with one of the sleeve options for fall. In the meantime, she should get plenty of use out of this one.
Wednesday, June 10, 2015
Burda Style 06-2015-121
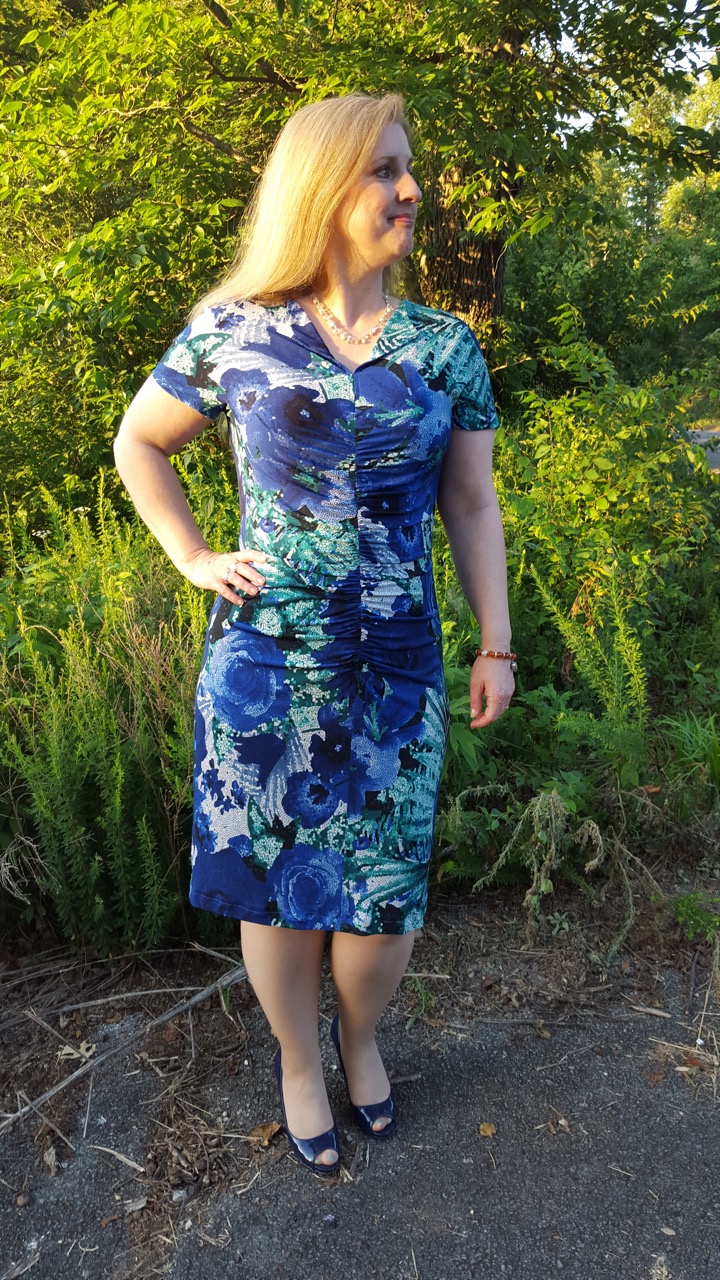
This past weekend I put the finishing touches on dress #121 from the June issue of Burda Style and took it out for a road test.
This short knit dress was pictured like so in the magazine:
Here's what Burda had to say about it: A stunning entrance and a great dress! It absolutely hugs the figure with gathered front and back seams, and sewn without a zipper. The sumptuous fabric takes it over the top for a real statement piece. The short kimono sleeves, with the double pointed darts, sit perfectly.
I have to say, it was the center front and back gathers that drew me to this dress. I thought they looked very flattering on the model and could possibly work for me, too. Burda has done dresses similar to this before, but this time I just had to make it.
It is a figure-hugging dress, but the cut is perfect and the gathers sit just so across the lower back- no swayback adjustment needed!
The pattern is offered in sizes 34-42 and I knew I would have to grade up, but it was super easy. I graded up to a 44 from shoulder to hip and to a 46 from the hip to the hem. That was the only change I made- I didn't add any length at the waistline like I normally do. I "eyeballed' the pattern and it looked like it was plenty long enough... and it was. The fit is spot on.
I did find that this pattern runs long. I traced and cut on the longer skirt line for this view (with a 1" hem allowance) and I ended up cutting about 3.5 inches off.
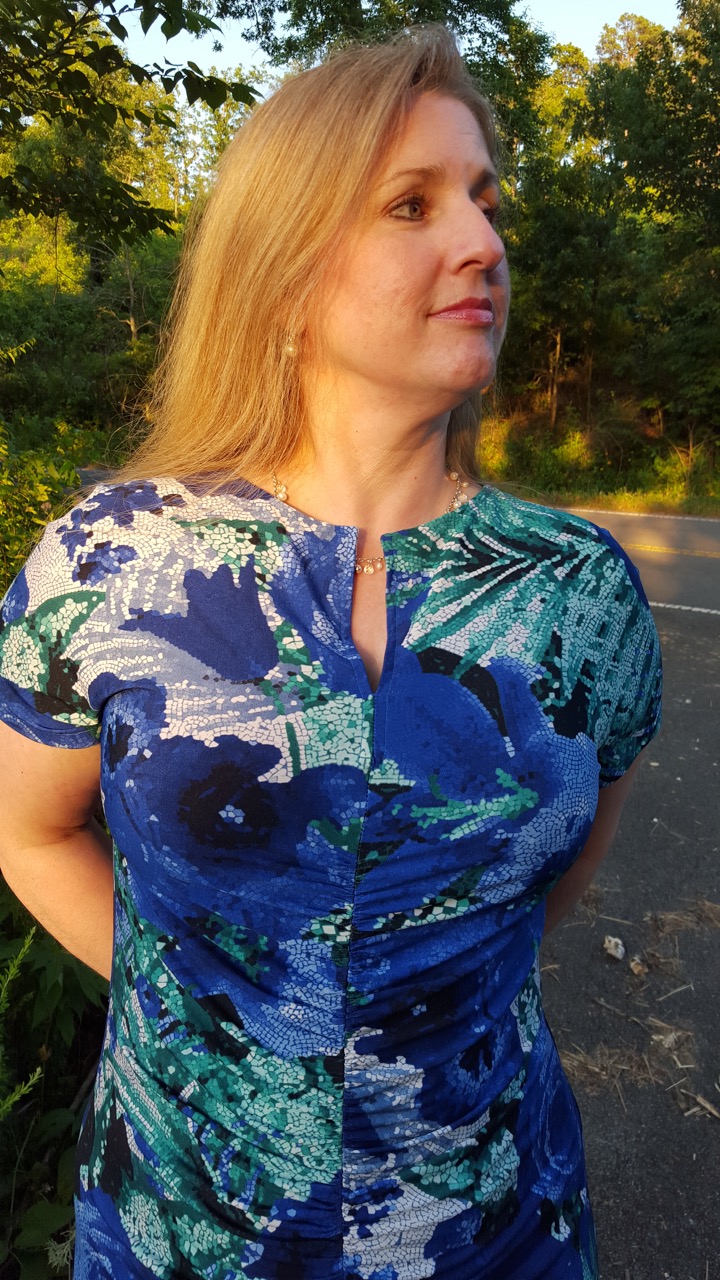
The pattern is super simple to put together. There are only 5 pieces including facings, but it is a 3 dot pattern, probably due to the underarm gussets. You have to sew 4 inset corners- 2 front and 2 back. You can see a close up of the gusset above. It extends from the sleeve hem to the waist and adds shape and interest to the simple design.
I didn't really use the instructions (it's pretty intuitive) except for the measurements to gather the CF and CB. I didn't like the way Burda said to sew the CF and CB together, so I cut a length of stay tape and gathered first one side to the tape and then the other. The tape is hidden in the seam allowance and adds stability to the seam, but no bulk.
The collar can be worn open or closed. You could easily add a button and loop at the neckline if you wanted to. I like it both ways, but I'll wear this one open because I foolishly forgot to interface my facings and my collar is limp and wants to flop.
I ended up hand sewing the bottom of the neckline slit closed about an extra 1.25". It wasn't particularly scandalous, but it looks better this way because the lack of interfacing left it unsupported and it pulled awkwardly. Oh, well. It's a work dress, anyway.
Burda describes the fabric in the model photo as "sumptuous" and I knew fabric choice would be key for this dress. I found this ITY knit at JoAnn's and instantly fell in love with the gorgeous blues and greens and the stylized floral mosaic design. It was perfect for this dress, which, by the way, takes only 2 yards!
I love the way this turned out. It looks great, it's comfortable, it doesn't take much fabric, and it's easy to sew. My daughter likes it, too. That's why I already traced and cut one out for her! I highly recommend this pattern and I might even make it again for myself. I don't know that one is enough!
This short knit dress was pictured like so in the magazine:
Here's what Burda had to say about it: A stunning entrance and a great dress! It absolutely hugs the figure with gathered front and back seams, and sewn without a zipper. The sumptuous fabric takes it over the top for a real statement piece. The short kimono sleeves, with the double pointed darts, sit perfectly.
I have to say, it was the center front and back gathers that drew me to this dress. I thought they looked very flattering on the model and could possibly work for me, too. Burda has done dresses similar to this before, but this time I just had to make it.
It is a figure-hugging dress, but the cut is perfect and the gathers sit just so across the lower back- no swayback adjustment needed!
The pattern is offered in sizes 34-42 and I knew I would have to grade up, but it was super easy. I graded up to a 44 from shoulder to hip and to a 46 from the hip to the hem. That was the only change I made- I didn't add any length at the waistline like I normally do. I "eyeballed' the pattern and it looked like it was plenty long enough... and it was. The fit is spot on.
I did find that this pattern runs long. I traced and cut on the longer skirt line for this view (with a 1" hem allowance) and I ended up cutting about 3.5 inches off.
The pattern is super simple to put together. There are only 5 pieces including facings, but it is a 3 dot pattern, probably due to the underarm gussets. You have to sew 4 inset corners- 2 front and 2 back. You can see a close up of the gusset above. It extends from the sleeve hem to the waist and adds shape and interest to the simple design.
I didn't really use the instructions (it's pretty intuitive) except for the measurements to gather the CF and CB. I didn't like the way Burda said to sew the CF and CB together, so I cut a length of stay tape and gathered first one side to the tape and then the other. The tape is hidden in the seam allowance and adds stability to the seam, but no bulk.
The collar can be worn open or closed. You could easily add a button and loop at the neckline if you wanted to. I like it both ways, but I'll wear this one open because I foolishly forgot to interface my facings and my collar is limp and wants to flop.
I ended up hand sewing the bottom of the neckline slit closed about an extra 1.25". It wasn't particularly scandalous, but it looks better this way because the lack of interfacing left it unsupported and it pulled awkwardly. Oh, well. It's a work dress, anyway.
Burda describes the fabric in the model photo as "sumptuous" and I knew fabric choice would be key for this dress. I found this ITY knit at JoAnn's and instantly fell in love with the gorgeous blues and greens and the stylized floral mosaic design. It was perfect for this dress, which, by the way, takes only 2 yards!
I love the way this turned out. It looks great, it's comfortable, it doesn't take much fabric, and it's easy to sew. My daughter likes it, too. That's why I already traced and cut one out for her! I highly recommend this pattern and I might even make it again for myself. I don't know that one is enough!
Subscribe to:
Posts (Atom)