Friday, June 7, 2013

BurdaStyle 04-2013-119


I finished up BurdaStyle 04-2013-119 this week.  And I'm going to have to call this one a fail.  It looks okay at first glance, but it has some serious issues that make it highly unlikely that I'll ever wear it.

You may remember the sweet picture in the magazine.  The blouse looks fine on the model, but who knows what kind of clips, pins, or what-have-you they have holding that top in place.


The top is great in theory:  A wrap front blouse with pleats, held together with ties inside and two small buttons on the outside.  The short sleeves have nice wide bands, subtle gathers, and pleats at the shoulder.
 Here's a side view.  Not too bad.  I could work on the fit in the back- I have some sway back wrinkles going on.  This was actually a muslin.  If I were to go ahead with a "finished" version, I would tweak the back, but I don't think that's going to happen.


Here is the back.  Again, not too bad.  I cut a size 42 at the shoulder, eased out to a 44 at the bust, and then gave myself a little extra room in the hips.  I ended up having to let the back darts out about 1/2" each.  Otherwise it was too snug for comfort.


Here is a close-up of my closure.  I used two pearl buttons from stash and loops made from 1/8" elastic rather than fighting with bias tubes.  You can't even see the loops so it worked out perfectly.


This is the nifty pleat at the sleeve head.  The shape is nice and keeps the sleeves from looking too precious.


Here is where the problems begin.  The neckline gapes something awful.  Now I could have stretched it a little bit during sewing.  And it's possible I messed it up when I adjusted my facings- I made a petite adjustment above the bust (standard for me) and maybe I didn't get the shape of the facing just right, although I double checked it and it looked pretty good.  So it could all be user error.  But you can see in the photo below that when I put my hands on my hips, suddenly the neckline isn't even touching my body anymore.


And in this photo I simply shrugged and all of a sudden I've got major gaping, pulling, and serious bra visibility.


I figured I'd have to sew a snap in it to keep the neckline closed, but I attempted to pin it for the photos, and I found that even pinned, the front pulled open and the facing simply rolled out and stayed pinned to the bottom layer.  A snap would probably do the same thing.

I also noticed that I just kept feeling like I needed to adjust it, to tug it into place, to keep checking that the front was closed.  I'd never be comfortable in this top.


It's a shame really, because I like the look Burda was going for.  I think a wrapped front woven top is a great idea.  It's just not working for me.  I could tweak it some more- work on the sway back, pinch out a bit at the neckline, lengthen the sleeve a little so the bands are parallel to the floor.  I'm just not feeling it.  Other patterns are calling my name.

Other patterns and other fabric. 

Sunday, June 2, 2013

My Image M1303 A Skirt that Works

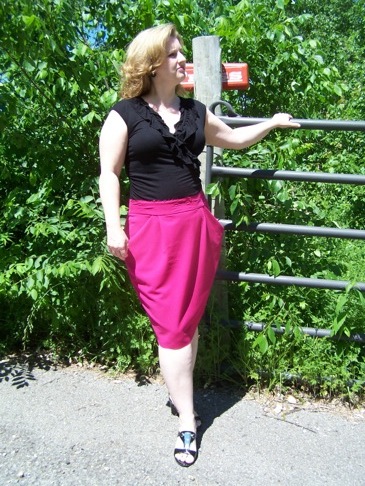
Allow me to present the finished M1303- the My Image skirt, and my first ever MI project:


Here is another peek at the model photo and tech drawing:


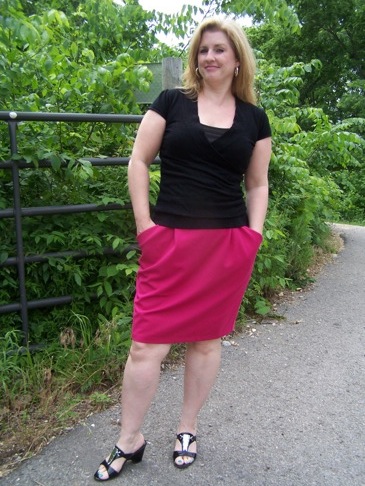
And here I am in my new skirt which I will wear to work tomorrow.  After all the second guessing, and fitting issues, I've decided I quite like this.  There is something really fun about those big 'ole pockets.


The back, of course, is pretty standard.  Not much to write about there.


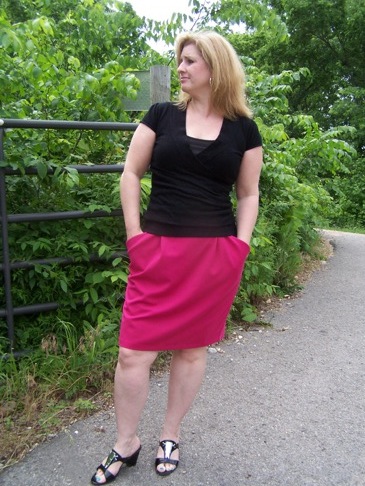
The side view isn't anything special either.


I think part of the reason that I like this, and a big part of why I didn't toss it in the trash when I tried it on the first time, is that the pattern itself is so unique and interesting.  Here is a shot of the pattern diagram in the magazine.  You can see how the skirt front is cut all in one piece:


Once the skirt is cut, all you have to do is fold, sew along the bottom of the pocket bag, clip one little place (where the upper pocket opening edge is attached to the side seam) and then sew up your sides.  Once you figure out how the pocket folds, it's really much faster and easier than sewing a traditional pocket.

Here is a look at the inside of the skirt:


I used a hot pink stretch poly crepe for this.  At first I was afraid it had a little too much body and made the pockets stand out too much, but I've since changed my mind.  The stretch makes the skirt quite comfortable, but I was afraid that throughout the day it might grow and start to sag, so I used a quilting cotton for my waist facings to help the waist hold it's shape.  The cotton was also less bulky and helped me get a smoother seam finish.

Here is the side seam before I serged it.  You can see where I clipped into the fabric right at that point where the upper pocket edge meets the side seam:


Here it is with the pocket lifted up (with the making thread still in the fabric:)


You can also see where I took the side in- twice above the clipped point, and once below.

If I were to make this again, I would start with a smaller size.  This skirt began as a straight 46 (MI offers it in sizes 36 through 46) and it was way too big.  I used the measurement chart provided in the magazine to chose the 46.  I'm not sure if maybe MI patterns run a little bit big, or if it is just the unusual nature of this skirt which causes it to finish up a bit on the large side.  I suppose I'll have to make another MI pattern to check!


In the end, I took in the waist approximately 2.5" total with all the adjustments I made.  I took in the lower part of the skirt about 1" over all below the clipped point.

I added 1.25" to the bottom of the pattern pieces for a hem allowance, but I ended up turning up just 3/4."  So I effectively added 1/2" of length to the skirt.  I like where the hem hits- mid knee.


Yes, I'm going to wear this to work tomorrow and see how it performs.  I'm thinking it will do just fine.

In other sewing news, I finally got around to putting new sleeves on BS 04-2013-119.  The sleeves fit now, but the blouse has other issues, including some neckline problems and issues with the back darts.  I'll be fiddling with it a little more before I share it.

I also have another project that I've been quietly working on, which I hope to share soon.  It features flamingos!  I love me some flamingo fabric!

How about you?  How is your spring/summer sewing going?

Thursday, May 23, 2013

My Image Skirt- Maybe This Will Work After All

Thank you for all the great suggestions in the comments yesterday and today!  Most of the feedback echoed what I already thought about this skirt- it was sitting too low on the hips and it needed to be taken in a bit.

So I snugged up the waist another 3/4" on each side tapering to just about nothing at the point where the pocket joins the side seam, and then on down to the hem taking in another 1/2"  If I made this again, I would just start with the next smaller size, maybe 2 sizes smaller at the waist.

And here is the skirt now:


(Please excuse the wrinkles.  I literally left this thing wadded up on a chair last night.)  The waist band is still not finished, but it sits much closer to my natural waist now.  The skirt is heavy and it still wants to slip lower.  The fabric has some stretch to it, so that doesn't help matters.  I can imagine after wearing this for 8 or more hours, it would start to migrate south.  But I think using a stable fabric for the facing, such as cotton or broadcloth, would help prevent stretching and keep the skirt in place.  It would also reduce bulk in the seams, which would be nice since this fabric is rather beefy.


The side view hasn't changed much.  It's possibly a tiny bit better.  Ironically, the front pattern piece is quite pegged.  The back is almost perfectly straight.  If I made this again I might try angling just the back piece in slightly at the hem.  I took the skirt in about 1/2" from hem to hip, but I was afraid that any more "pegging" would make the side seam angle toward the front.


And finally, the back.  It doesn't look much different, except that the waistline is now in the correct place.

The hem length was another issue.  A lot of the comments suggested raising the hem.  Raising the waist helped somewhat with that little problem.  Unfortunately, I like the hem right where it is in the photos- mid knee- but that's the raw fabric edge!  I added 1.5" of hem allowance to the pattern pieces, but that's apparently not quite enough.  If I made this again, I would add a little length to compensate.  Oh, well.  I suppose I can get away with a narrow hem.

As for whether this skirt works for me, I'm still not sure.  I do find though, that with the waist fitted better and the whole skirt sitting higher on my hips, that I don't mind the unusual elephant ear pockets.  In fact, they feel kind of daring.  Hey, I have hips.  Why not exaggerate them?

So I think I might just go ahead and finish this.  Thank you for all the feedback in the comments section.  You all helped a lot and I appreciate it very much!

Wednesday, May 22, 2013

My Image Skirt- Wadder or Possibilities?

I just got skirt M1303 from the Spring/Summer issue of My Image to the point where I could try it on.  This is what it looks like on the model in the magazine.  You can also see the tiny tech drawing on the right hand side:


And here is what it looks like on me:


Now bear in mind, I'm probably half as tall and twice as wide as the model.  This is also a "muslin."  The waist band is not finished and neither is the hem.  You see, I'm just not sure this skirt is working, and I'm not going to bother with finishing it if I decide it's just not for me.

That's where you come in, tasteful readers.  Your opinions and suggestions are welcome.


This is really an ingenious little pattern.  It's very unique with it's draped front pockets that are cut all in one piece with the skirt front.  It's also surprisingly easy to put together- you just do a little bit of folding, and a little clip into the seam allowance on each side, and voila!  You have a skirt!

The back is a simple straight skirt with two darts and a vent.  I used an invisible zipper in the center back.

Ugh!  My interfacing has bubbled on my waistband!  But you can also see the two small pleats in the skirt front:


I cut a straight 46, going by the measurement chart in the magazine.  It should have been just right, but this skirt turned out a little bit big.  I have already nipped in about 1/2" on each side from the pocket edge to the top of the waist band and this thing is still hanging on my hips.  I really think I could stand to take it in from hem to waist, but I can't really do that because of the way the pocket is stitched into the side seam.

I used a beefy stretch poly crepe for this project.  It was left over from Burda 09-2011-131.  I thought it would have plenty of drape and show off the pockets well, but I think it might be a little bit too heavy for this.  My pockets tend to want to stick out like two big ears:


In this photo I've pushed the pockets down some.  Much better, don't you think:


The front of the skirt is also heavy- the weight of all that fabric is actually pulling the waist down in the front.  Going down a size might help.  If the waist band fit correctly, the skirt would hang better.

I'm really irritated.  I wanted this thing to fit.  And look cool.  And seeing the photos, I really like that bright pink with the black top.  But I just don't think it looks quite right.

So what say you?  Should I continue to tweak and see if I can make this work?  Should I scrap it and start over with a smaller size and different (lighter weight) fabric?  Or should I just stop now before I drive myself crazy with this?

Sunday, April 21, 2013

Stupid Rookie Mistake

Here is a peek at Burda Style 04-2013-119, the cute little wrap front blouse I've been working on.


I got the sleeves sewn on yesterday.  They are very nice, with nifty pleats at the sleeve cap, gathers at the bottom and a nice, inch wide band.

Imagine my irritation when I went to try the darn thing on and I discovered that the sleeve bands are too tight!  Not just snug, but literally too tight to wear.


How did that happen?  Especially since I clearly remember measuring my upper arm (I always make my sleeves bigger- Burda designs for a much slimmer arm than mine!)  I knew exactly how long to make the sleeve bands, and yet, when I made the pattern piece, I made it an inch too short.  Stupid mistake.

Sigh....  So now I have to take the sleeves off and make new ones.  The current sleeves are completely finished (serged, and hand sewn) and since I have more fabric, it will be faster, and easier just to start over.

Of course, right now I'm too disgusted with myself to even get started.  I think I'm going to go play with my pattern stash instead.

Saturday, April 20, 2013

New Look 6095 in Horizontal Stripes

In my last post I talked about being inspired to make a horizontal striped dress for spring.  I finally got around to putting the finishing touches on it:


As I mentioned before, I used New Look 6095, a simple shift dress designed for woven fabrics.  I made view A, pictured in the model photo.


The finished dress is okay.  There are some issues, some of which may have stemmed from using a pattern for wovens with a very light weight knit fabric.  I used a black and red polyester/rayon striped knit from Hancock Fabrics

I cut a 14 through the shoulders and a 16 from the bust down, which is my standard size(s.)  I probably could have gone a size smaller on top since I used a knit, but I wanted the dress to be loose and easy, not too body conscious.


I made a 1/2" FBA by adding a 1/2" strip to the tissue right above the darts.  The pattern tissue looked fine, but the darts are too low on the actual dress.  Probably due in part to the weight of the dress pulling them down.  I avoided the diagonal drag lines, but the low hanging darts bother me.  Of course none of my non-sewing friends or co-workers will ever notice, so I'm going to ignore them.  Or at least try to.


There is a center back seam and 2 vertical darts in the back of this dress.  Check out my stripe matching!

When I first got the side seams basted and tried the dress on, the sleeves looked awful- way too wide and floppy, almost like flutter sleeves.  You could also see way too much "underarm cleavage." Ugh!  It could be partly due to the fact that I should have gone down a size in the knit fabric, but if you look at the envelope photo carefully, the sleeves on the model look a little too wide and flappy, too.  I'm going to chalk it up to a combination of user error and bad drafting.


I was able to somewhat fix the sleeves by taking the dress in about an inch under the arms, from the sleeve edge tapering to nothing at the bust dart.  That took some of the flap out of the sleeves, and gave me more coverage at the armpit.  The bust and chest circumference is still good, which further reinforces the idea that I should have cut a smaller size.

Of course the sleeves still aren't great.  If I made this dress again, I'd use a different sleeve altogether.  I'd also move the bust dart up about 3/4"

I pretty much got what I wanted:  a simple, striped dress to wear on warm days.  I can dress it up with a belt and heels, or wear it loose with sandals.  I'm not 100% pleased with the sleeves, but they are okay. The dress is comfortable and will be great for the hot days ahead.

Now that this project is finished, I can move on to my next project, the little wrap front blouse from the April issue of Burda Style.  How is your spring sewing going?

Saturday, April 6, 2013

A Striped Dress for Spring and Summer

I've been noticing some cute striped dresses popping up online lately.  Not so many that it seems like a momentary trend or anything, but just enough to catch my attention.  I've always heard that horizontal stripes aren't flattering, but I have to say, if the stripe is done just right, the look is quite nice.  


Really, what could be better for spring and summer, than an easy, relaxed t-shirt dress with stripes?  I've also been noticing some really nice striped fabrics, both online and in my "local" fabric store.


I decided I really wanted to try a horizontal striped dress.  A simple, comfortable t-shirt style seemed like the perfect way to go about it, too.  The look seems pretty versatile.  Dress it up or down with shoes, jewelry, a belt, whatever your mood might be.


I love that these dresses are so simple and therefore easy to make.  No zippers or closures, just an easy knit you can pull on and off.


Personally, I think a loose, easy fit is the best for me.  And although I'm seeing a lot of really adorable short dresses these days, I prefer a more modest length- at least to the knee.  All the more reason to make my own.


This dress is about the closest I could find to what I had I mind:


Pure and simple.

I chose New Look 6095, a simple sheath pattern for wovens.  I figured it would work for a knit, too.  The cover model is wearing a very cute dress with horizontal stripes and that helped me decide on this pattern.


The pattern is so simple- just a front and a back, and short, almost cap sleeves.  The back has a center back seam, which I could have omitted, but chose not to, as well as vertical darts for shaping.  I wanted a loose, "easy" fit, but I still need a little bit of shaping.

The dress is almost done.  I just need to finish the neckline.  The pattern provides a facing (since it was designed for a woven fabric) but I'm thinking about doing a narrow band in self fabric cut on the bias, or maybe just a narrow binding turned to the inside and top-stitched down.  It also needs a hem, but that shouldn't take too long.

I hope to reveal the finished dress before the weekend is over.  Unfortunately, I'm fighting an ugly spring cold that has me feeling drained and useless.  Even if I can muster the energy to fire up the sewing machine, I'm not sure I want to risk sewing in my condition.  I'd hate to have any mistakes so late in the construction process because I wasn't feeling good.

So what are you working on for spring?  Is there anything on your "must sew" list right now?

Monday, March 18, 2013

McCalls 5974- Wrap Dress in Black and White

This weekend I wrapped up McCalls 5974, the Palmer & Pletsch wrap dress.  I wasn't really thrilled with it until I wore it to work today.


Here's a shot of the pattern envelope.  I made the view with the wrap over bodice like the red print dress and the green solid dress:


It's really kind of hard to see the dress details in my fabric, a black and white poly knit that I bought at Hancock's a few weeks ago.  Now that I've worn it, I like it more than I thought I did.


I cut a 14 through the shoulders and a 16 from the bust down.  The dress ended up very wide on me.  I took it in about 3/8" from wrist to hem and then another  3/8" from just under the bust to the hip to get it to fit correctly.


I added about 1.5" of length at the waist- about 3/4" to the waistband (which is hidden under the sash) and another 3/4" to the skirt just below the band.  I also added approximately 3/4" of width to the bicep.    

The length was the reason I didn't really like this dress at first.  I made my standard adjustments, but I didn't really move the sash down significantly to compensate.  You see I wanted the sash to completely cover the waistband like it does in the pattern photos.  The finished sash wraps around my lower rib cage, not really around my natural waist, which is slightly uncomfortable.  And the waistband peeps out at the center front anyway.

But after wearing the dress and seeing the photos, I don't really mind the sash placement.  and my print is so busy no one will ever notice the waist band.


I did not make my standard petite adjustment above the bust because I was afraid of not having enough length in the bodice.  I should have made the adjustment.  Sigh...

Considering how much I had to take the dress in at the sides and how roomy the bust is, if I were to make this dress again, I would probably just go down a size.  But I probably won't make it again.  There are other wrap dress patterns in my stash that I'm itching to try and even though I like this dress, it isn't so wonderful that I need another one.


I pretty much followed the instructions on this pattern, except that I left out the back zipper (it's a knit!!!) and I added clear elastic to the neckline.  It snugs up nicely and doesn't gape, but I still added a small safety pin for work just to keep things modest.

I'm glad I made it, and I'm sure I'll wear this dress a lot, but I'm going to put the pattern back in the box.

I sure like the light in that last photo.  You'd never know it was kind of nippy out today while I was getting these pictures.  I sure wish we'd hurry up and get some warm spring breezes.  I'm starting to get excited about sewing with crisp cottons and linens, sweet florals, and seersucker!

What are your spring sewing plans?