
This is how it appeared in the magazine. There is a 105B in the issue too, but it appears to be the exact same dress just in solid white instead of a print.

I knew as soon as I saw this dress that I would be making it. It's a relatively simple style and work appropriate. But that cool little cutout detail (which really isn't a cutout, but the illusion of a cutout created with an overlay) makes it just interesting enough to be different.

Here is a little bit better picture. The main dress has a deeper, faced neckline and the overlay is caught into the right shoulder seam. The neck band is attached to the right back, the overlay and then forms a bridge over the left shoulder and attaches to the left back about an inch or so past the left shoulder seam.

In the photo above, you can just see where the band attaches to the left back. I wish it laid more flat, but oh, well.
So this is a 3 dot pattern. It's a little bit challenging because of the neckline construction. I read and re-read the instructions and I finally just had to take a leap of faith and do what I thought was going to work. You cut the back pieces together and then you have to trim a little bit off of the left back bodice piece to create the "cutout." The line for trimming is clearly marked on the pattern sheet. What wasn't clear were the instructions, which said to trim off the seam allowance. What? What on earth for? I went back and forth over that and finally figured it out. DO NOT TRIM OFF THE SEAM ALLOWANCE. If you do, you will have nothing to attach your neckband to!
What the instructions really mean, is to sew the left back facing to the left back bodice as far as the marking and stop. Then you clip the seam allowance at the marking (I put in some stay stitching before sewing the facing to the bodice) and turn the facing to the inside leaving a nice seam allowance to attach the neckband to:
This is the right side of the left back. The shoulder is on the left and the CB is on the right. My facing is neatly turned to the inside and my seam allowances are basted together.
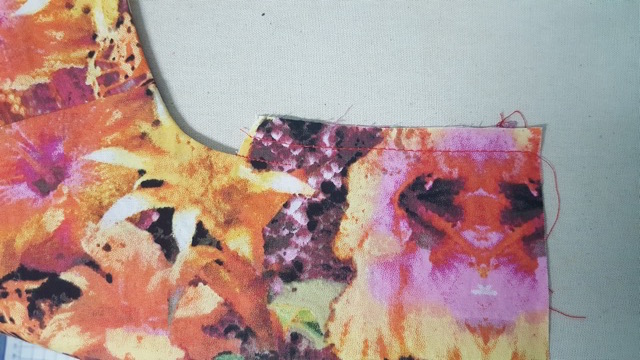
And this is what it looks like from the inside once the neckband is on:

The sides are reversed since this is the inside, but you get the picture.
And here is the inside of the front for good measure:

The facing goes from the right shoulder, around the front, over the left shoulder to the center back. The right back side has no facing, just the neckband.
That neckband is the worst part of the whole thing. It's only about 1/2" wide and curved, so attaching it and then trimming and clipping and pressing and finally hand stitching it together are a pain. But well worth it in the end.

The pattern is offered in sizes 36 through 44. I cut a 42 through the shoulders and a 44 from the bust down. I made my usual petite adjustment above the bust and added 1.5" of length to to the bodice just above the waist. (I could go for another 1/4 to 3/8" of length.) I also shaved 3/8" off the bottom of the back bodice between the darts, tapering to nothing at the sides- a sway back adjustment.
My fabric is a fabulous floral print cotton shirting from Joann's. It was the color combination that caught my eye. I love pink, orange, and yellow together. And did you see the snakeskin? It's very "tropical" and yet I think the colors will take me right into fall. Check out my mad pattern matching skills on the front of the dress.
I didn't do quite so hot on the back:

Other than the neckline, the dress is really simple. It's an A-line with bust and waist darts, a waist seam, and side seam pockets. The sleeves are finished with a narrow hem and the dress closes with an invisible zip and a hook and eye.

I did make one little mistake. The overlay is supposed to be sewn to the bodice front from the side seam to just before the dart. I didn't catch the placement line when I traced the pattern and didn't see it in the instructions until I already had the darts sewn. I considered topstitching it down once the dress was finished, but when I pinned it in place it formed an odd flap right at the bust, so I just left it loose. No one will know but us!
I love this dress! I am going to have a blast wearing it. Although this is a great pattern, and I highly recommend it, I doubt I will make it again any time soon. I don't think... even though I have several ideas for making a contrast overlay, binding the edge of the overlay, lining the overlay... Did I mention it's a great pattern?
12 comments:
This looks very difficult to sew and it looks great! That fabric is so, so pretty, too.
I love your dress! I'm currently making this now so I'm glad to see it looks wonderful on a real person
Looks great on you. Love the neckline.
It is so nice and you and fits perfectly.
Thanks, y'all!
I hadn't realised the neckline worked like that - thanks for posting all the details! And what lovely fabric.
A great dress, and the fabric you chose is perfect. I might even buy this issue.
Beautiful dress , fabulous fabric. I love burda for their unique details.
Gorgeous fabric and you did make a very cute top that will look equally good with a pencil skirt I think. Great design.design clothes online
Bravo to you for figuring out those always cryptic Burda directions. The dress looks wonderful and that detail is fantastic. I can see doing it on a simple sleeveless top for a little extra touch of chic.
So impressed with your sewing creativity! Lovely dress!
This is lovely. What a fabulous job on the pattern matching all round.
Post a Comment