Sunday, December 29, 2013

The Top 5 of 2013


Okay, I'm going to jump on the bandwagon and look back at my top five of 2013.  I feel like I haven't really been as prolific this year as I have in years past, so I was surprised that I actually made enough things that I could choose five.  But here goes.


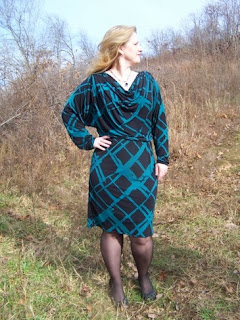
At the top of the list is Vogue 8742.  I LOVE this dress.  I love the color, the design, everything.  It's also an easy dress to make which makes it even more awesome.  I can see myself making this again for spring with a short sleeve or even sleeveless.  It's too bad I didn't have any Christmas parties to go to this year because this dress would have been perfect.


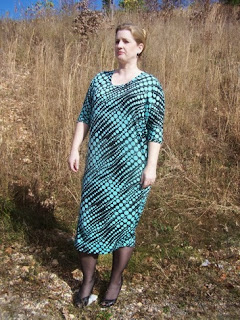
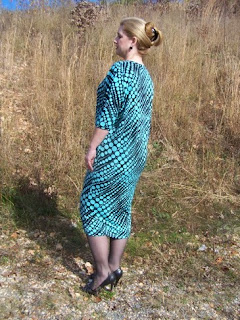
Second on my list is Burda Style 04-2013-109.  This should probably have been #1 on the list simply because I wore it so much.  The Vogue dress is just more dramatic and more "me" the way I'm used to. The best thing about this Burda dress is that in addition to being easy to make, comfortable, and (in my opinion) flattering, it changed the way I think about what looks good on me.  This was the first time I made something straight and with minimal shaping and ended up loving it.  I even made this one a second time.  And I think I might make it again when the weather warms up.


Third on my list is My Image M1303.  It was my first MI pattern, and even though it took quite a bit of finagling, I ended up with a skirt that got quite a bit of wear over the summer.  It was also another pattern that changed the way I look at what is flattering.  I really made this because I was curious about the way the pattern went together.  I wasn't sure the wide pockets would work with my already wide hips, but I ended up pleasantly surprised.


New Look 6095 comes in at #4 simply because it gets a ton of wear.  It was great all by itself during the summer and now that the weather is cold it still gets a lot of wear with hose and a cardigan.  I wasn't 100% happy with the fit through the sleeves and bust, but I think this one might be worth some tweaking to get it closer to perfect.  It could be a TNT.


And coming in at #5 is McCall's 5859, the Flamingo Jacket.  This one had to make the list simply because it is so much fun.  It didn't get much wear this past year, but I'm really looking forward to pulling it out this spring.  I think the problem was that I didn't really have anything to wear it with but jeans, and I don't wear jeans that often.  I'm thinking that a simple black sheath to wear under it will solve the problem.  I even already have the fabric in my stash.

Looking back at my list I'm noticing a lot of red, pink, and black.  Funny how the same colors keep popping up over and over.  I think in 2014 I'm going to try some new colors and see if something surprises me.

I also notice that 3 out of 5 of my top five are dresses.  Looking back over the year I saw that I made mostly dresses.  I think I need to stretch myself and make more tops, skirts, pants, and jackets.

Which brings me back to the jacket I'm working on now.  I got quite a bit of work done on it last night.  I might even be able to finish it before the end of the year!  How about you- any last minute finishes before the year is over?

Saturday, December 28, 2013

Holiday Lull

It's now that strange holiday time between Christmas and New Years.  I'm still off work and should be sewing, but I'm quickly coming to hate the jacket I'm working on.

First I lost the pocket flap pattern pieces.  No big deal- I can just draft new ones.  Done.

Then I broke a serger needle and didn't have any replacements on hand.  No problem- the jacket is fully lined.  None of the inside seams will show, so I can just keep going.

Then I ran out of thread.  Full Stop.  I can't use a different color to top stitch.  So that meant a trip to the fabric store to get more.

Did I mention that the fabric- stretch "cordless" corduroy is a pain to work with?  Ugh!

So yesterday the Princess and I had a Girls' Day Out and made the trek to the "local" fabric store (60 miles away) to stock up on serger needles, thread, and 1.99 patterns.  The Princess has been asking for some new dresses and has expressed an interest in a couple of patterns.  We are in two completely different size ranges, so new pattern purchases were in order.

Here's what she picked out:


We both love this one.  Simplicity 1609 is a reproduction of a cute little mod shift dress.  The Princess wants one with the petal collar (green version) and one with the bow (blue version.)  It's sleeveless, so I'll probably put off making it until the weather starts to warm up, but I can't wait to make this up.


Simplicity 1650 (above) and 1687 (below) are Project Runway patterns.  The Princess picked both of them out.  Both patterns go all the way down to a size 4 so I think we will be able to make them work for her.  Both have sleeve options so we can dive right in with these while the weather is cold.


She picked out S2246, a Lisette shirt dress.  I like view C with the puff sleeves, solid bodice, and the full print skirt.


Next up is New Look 6211.  I really didn't want to get this one- it's kind of tacky, and too old for the Princess.  But she likes the hi/lo (mullet) skirt.  View B (the one without the cut-outs) isn't too bad.  We might be able to do something with it for spring.


And last is McCalls 6787, a top, leggings, and 3 dress variations:


The Princess picked out a pretty, multi-colored knit fabric and we chose this pattern to make it up.  She likes the view pictured above.  It's sleeveless, but I think it will look cute over leggings with a tee shirt under it while the weather is cool , and then she can wear it alone with sandals once warm weather returns.  If all goes well with it, I hope she will let me make the little peplum version, too.

And of course I had to pick up a couple of patterns for me.  I snagged Simplicity 1653, which is very similar to S2369 which I had good success with a while back.  The new version offers a straight sleeve, which I was looking for and fresh pattern tissue.  My first version turned out pretty good, but I really need to make the next one longer and I wanted a fresh pattern to adjust.


I also picked up McCalls 6884, a plain and simple wrap dress:


I bought a chevron pattern ITY knit that I might just whip up into this pattern.  I haven't decided yet.

I was able to pick up some more thread, however it was not the exact same color as the thread I started the jacket project with.  So I will be hoarding what's left on the spool for topstitching and button holes, and using the new thread for construction on the lining.  And wonder of wonders, I was able to purchase just enough buttons to complete the jacket.  I already had several in my stash and Hancock's had the same buttons, and just enough!  That almost never happens.

So now I just need to get myself motivated to go finish the jacket so I can start something new.  The Princess is really excited about her new dress, so I need to get going on that pretty quickly.  There are also a couple of Burda patterns calling my name....

Happy Holiday Sewing!

Monday, December 23, 2013

McCall's 5190, a Work in Progress

Well, I made it to the Christmas holidays, and I've been able to squeeze in a tiny bit of sewing.  I'm working on this little jacket, McCalls 5190, which is now, sadly, OOP:


I'm making view A and debating whether to add the back waist band from view C/D.  I'm using a nice dusty periwinkle blue "cordless" corduroy...  looks a lot like velvet.
I've already run into problems.  I cut the jacket out last weekend (after a muslin and quite a few pattern adjustments) but neglected to cut the pocket flaps.  No problem- I had enough fabric left over, I figured I'd just cut them out when I got to them.  Well, I got to them yesterday, and guess what?  The pattern pieces are missing.  I looked all over and couldn't find them.  I fear they may have been thrown away.

So at that point I had to decide whether to forge ahead and make the jacket without flaps (sort of like view D) or try to make my own pattern pieces.  I decided to make my own.  They turned out quite nice- they're already stitched up with a coordinated cotton backing to reduce bulk.  They're topstitched and waiting for buttonholes.  All a lot of work really for faux flaps- there aren't even any real pockets on this thing!

It was right after making the pocket flaps that I broke a serger needle.  I figured that was my sign that sewing was done for the day.

I hope to get back into the sewing room today and at least get the back of the jacket put together.  Maybe the sleeves, too.  There are three pieces to each sleeve- the outer and inner sleeve, and the wide cuff.  Because of the way the sleeves are drafted, I'll have to set them in in the round.  I'm not looking forward to that part, but for a jacket, it's really the best way, I think.

I really need to get busy and make a couple more jackets.  My office is so cold that I often spend the day wrapped in a blanket- not very fashion forward!  

And since tomorrow is Christmas Eve and I'm not likely to post again before the big day, Merry Christmas!  And may your New Year be the BEST EVER!


Saturday, November 30, 2013

Burda Style 12-2013-119 C

I just put the finishing touches on this knit dress, Burda Style 12-2013-119 C:


Burda describes it as having a "large waterfall neckline, wide batwing sleeves, and ankle length skirt."  I don't need a long dress right now, so I shortened mine to knee length.


As you can see from the tech drawing, the dress/top has some simple, yet interesting lines.  I particularly like the way the sleeves are separate pieces sewn to the cowl neck bodice.  The bodice is narrow, but the wide sleeves keep the proportions from looking odd.


There is a lot going on up top, but the simple, straight skirt with elasticized waistband keeps the dress from getting too complicated.


I used an ITY knit in black and teal that I picked up at Hancock's a few months ago.  It's the perfect weight and has just the right amount of stretch for this pattern.  I'd been wanting to use it for a while, and I'd even been looking at other Burda knit dress patterns, when this issue arrived in the mail.  I decided to give this pattern a try.


The pattern is offered in sizes 36 to 44.  I cut a 42 from shoulder to waist, and a 44 skirt that I graded out to a 46 at the hip.  I had to estimate how long to make the skirt and I almost goofed.  I had just enough length to turn up a 5/8" hem and still have it hit at the knee.


I added one inch of length to the bodice just above the waist seam, and another inch to the skirt just below the waist seam.  I also shortened the sleeves by 1.25."  I made no other alterations to the pattern pieces.  However, when I tried the dress on, the neckline was very wide (thank goodness I remembered to interface the back neck and the shoulder seams to prevent further stretching) and the cowl hung very low in front.  Almost "wardrobe malfunction" low.  To remedy this, I took the shoulder seams in about 5/8," which brought the neckline in just enough to make it wearable.  Problem solved.


I'm pretty happy with the finished dress, however, there a a couple of things I wish I'd known, or wish I'd anticipated before construction.  First of all, the cowl, or what Burda calls the "large waterfall neckline" is very generous.  There is a lot of fabric in that bodice.  It's almost overwhelming.  If I made this again, I'd look for a way to decrease the volume in the cowl.  It is well drafted, though.  The extra fabric is pleated and caught into the shoulder seams and the facing inside is plenty long enough and caught into the armhole seams so there is no chance that it will flop to the outside.


The second thing is that the shoulder seams are quite bulky.  There are three pleats caught into each shoulder, and combined with the bodice back and the facing there are at least eight layers of fabric in those seams.  I folded carefully, basted and stitched, and then trimmed carefully, too, but it's just a lot of fabric in one seam.  As a result it almost looks like I added shoulder pads, but it's simply the way the dress is made.  It doesn't bother me, but it's something to be aware of.

The sleeves are still quite long, even though I shortened the pattern.  I think this is a design feature.  The sleeves look long on the model, and Burda often shows very long sleeves pushed up on the arm.  I may go back and take the sleeves in a little bit from wrist to elbow to make them more snug.  As they are now, I have to push them up or they hang loose and combined with the cowl, they start to look a little sloppy.

This is a pretty simple dress to cut out and put together.  Burda rated it a 1.5 dot pattern and there are only four pattern pieces to trace (and a neckband for the back.)  It does take quite a bit of fabric because the sleeve pieces are very wide and the front bodice is quite long.  It took almost 3 whole yards of fabric for this knee length version.  I had just enough left to cut a sash, but I don't think I will.  With the front draping, I think a narrow belt will look better.

All in all it's a pretty good pattern- a nice variation on the cowl neck dress/top.  I doubt I'll make it again, though.  There are too many other patterns out there calling my name.  In fact, there is a chevron pattern ponte in my stash calling me right now and a New Look pattern somewhere in the sewing room that is just dying to be made.

What are your December sewing plans?

Sunday, November 24, 2013

Alphabets, Hearts, and Sheep...

There has been a tiny bit of stitching going on around here...


This is Primitive Sheep by Ewe and Eye and Friends.  The design has a 1996 copyright on it, but it looks like it is still available from Twisted Threads.  It's not really my style, but I was fortunate enough to receive the pattern and the Anchor floss it calls for in a Secret Stitcher exchange years ago.  Something about it really pulled me in, and even though it's probably not something I would have bought myself, I found myself wanting to stitch it.  (It's especially appropriate since my family raises sheep!)

I finally decided to give it a go a couple of weeks ago.  I'd planned to use the Anchor floss, but I noticed that I had a lot of hand dyed threads in my stash that looked like they would work well, so I decided to make some substitutions.  So far, so good.

I've been working nights lately, so my stitching time has been seriously curtailed.  I'm back to a regular day schedule this week, so I hope to have this finished this week.  Because after Thanksgiving, I plan to turn my attention to Christmas stitching!

And in sewing news, the December Burda arrived this week.  It's nowhere near as good as the November issue, but there is a knit dress calling my name and a fabric in my stash begging to be used.  There may be a new dress to share soon.

Saturday, November 16, 2013

Acorns and Owls

Here is the little sampler I blogged about previously, all finished and ready to be finished:


This is Acorns and Owls, a freebie chart from Blue Ribbon Designs.  I must have found it right before it retired, because it is no longer available on the site.  However, there are some very cute designs still available.


I just love that it's a tiny sampler with a complete alphabet!  I don't know why, but I just love stitching alphabets.  I also love the pumpkins, acorns, and leaves that give it that fall theme.

I stitched this on 32ct Lambswool linen and it finished up at 4 3/8" X 4 3/8".  The pattern called for Gentle Art Sampler Threads, which I had in my stash.  The finished sampler is a little "warm" for my taste.  If I stitched it again, I think I'd make some thread substitutions and work in some darker, cooler colors.  The owls, I think, would look nice in a brown/grey.  I absolutely LOVE the Tarnished Gold that was used in the alphabet.  That color is perfect, I think.  I actually had two skeins of it and one was rather dull while the other was a bit brighter with more color variation.  I used the brighter one, of course, and it looks fabulous.  The pumpkins, too, turned out quite nice.  I smile every time I look at them.


This was a quick and easy stitch.  It's all cross stitch- no specialty stitches or backstitches.  Somehow, I didn't get bored, though.  Maybe it was all the lovely hand dyed threads and plenty of color changes.

I have already begun a new stitching project.  It's a little bit different for me, but I'm excited about it.  It's been slow going because I've been working late lately and my evening stitching time has been severely curtailed.  It won't last much longer, though.

I'm also starting to feel the urge to work on something Christmasy!  I have some small ornament projects in mind, and then there's my Victoria Sampler Heirloom Christmas project from last year that needs to be finished.  I should have plenty to keep me busy the rest of the year!

Sunday, November 10, 2013

Burda Style 11-2013-135

There has been sewing at House of Frog!  I just put the finishing touches on Burda Style 11-2013-135B:


This is a very simple dress featured in the plus section of the November issue.  Something about it captured my attention and it looked easy and fast, a good combo for me since I haven't been sewing much lately.


I was worried about the neckline.  It looks wide and low in the model photo.  But I figured it would be easy to bring it in, and it was.  You can just see the tiny tech drawing on the left side of the photo above.  And in the photo below, you can see that the finished dress looks exactly like the model in the magazine.


This dress is so simple to put together.  It's a 1.5 dot pattern, and only has three pieces- front, back, and a neckband.  I really liked the loose, breezy top with the sleeves that gradually narrow at the elbow and the more close fitting skirt portion.  I cut my "standard" Burda size- 44 top grading out to 46 at the hip.  I could have graded down to a 42  at the shoulder, but the dress has such a simple, loose shape that I figured why bother?

I did add my customary 2" of length at the waist, and I added narrow bands at the sleeve hems... just because.  The pattern calls for a simple turned up hem.  Oh, and the neckline- I raised the bottom of it about 1.5" and brought it in about 1/4" the rest of the way around.  Then I made my band 5/8" wide instead of 3/8.  It's still open and easily allows room for a funky necklace, but I don't feel like it's too big.


I used this cool, black and aqua dot ITY knit that I purchased from Fabric.com a couple of years ago.  I love the print, but when I got it I realized that the strong diagonal design could be problematic.  I wanted to use a pattern that would let the print do all the work for me.  I think this one works.


Long and loose is not really my thing.  Or at least it hasn't been my thing.  But since discovering that sometimes things work that you never would have thought, I decided to just give it a try.  And I quite like this.  It makes me feel long and lean, and I really can't argue with that.


And yes, you may be thinking that the dress is quite long.  And it is.  On purpose.  Because I also wanted to be able to do this:


I'm not sure which way I like it best.  It's like a completely different dress with a belt.  The skirt skims the hips and the top blouses over the belt nicely.  And it's still comfortable.


I can easily see myself making this again in the right print.  I don't think I would like it as much in a solid fabric.  Burda very kindly offers a cutting line to make this a top instead and I could see myself making that version as well.  Maybe in a sweater knit.  Maybe with a wide band at the hem.


So there you go.  A simple, comfortable knit dress with two options for wearing.  It doesn't get much better that that.

Oh, and did I mention, the November Burda was a great issue!  There are five other dresses and a skirt in it that I would love to make.  I just need to go dig through my stash and see what fabric I can match up with the patterns.

Happy sewing!

Sunday, October 27, 2013

McCalls 2206

I have finally finished McCalls 2206, and it only took me two years and ten months.


This is the dress I started for the Vintage Sewalong of 2011.  It's a simple, A-line "mod" shift with inset princess side panels, a martingale belt, and a fold down collar.


I made the long sleeve version.  The pattern has nice little vintage touches:  elbow darts, shoulder darts in back, and of course, the cool mod shape.


The biggest challenge in making this was the size.  The pattern was one size- an 18.  It fit great at the hips, but the rest of it was too big.  I had to "downsize" the bodice to make it fit.  I did not enjoy it and I doubt I'll ever do it again unless the pattern in question is just really special.  It's so much easier to start with something that fits the shoulders and upper bust and then add extra below.


I made a muslin to work out my fitting adjustments and everything seemed fine, but when I cut my fashion fabric, I ran into problems.  It was still too big.  I ended up shortening the sleeves by 7/8" and taking in the waist about 3/8" on each side.  The belt was too long also.  That's why my dress has two buttons in back instead of one like the pattern drawing.  That turned out to be a happy accident though- I quite like the double buttons and I think it adds to the overall look.


The collar is cut on the bias and is very wide.  It is turned down like a turtleneck.  The pattern calls for hooks and eyes in back so that the collar stands up all the way around the neck.  I thought that might be uncomfortable and impractical with my long hair, so I let mine fall open in the back.  My dress is also longer than the model drawing.  I finished it at the knee to be more age appropriate and more suited to an office environment.  You can't really see it in the photos, but I'm wearing it with patterned tights.  I think I'll wear it to work with nude or sheer black hose instead.

I used a dark red "suede cloth" from Hancock fabrics.  I like the fabric.  It has a little bit of stretch and a nice hand.  The right side has a nap and the wrong side has a satin finish that slides over the skin and undergarments.  It's very heavy, though and will be suitable for cold weather.  The weight of the fabric pulls the belt down in back which causes pulling where it is attached in front.  I'll probably add thread loops at the sides to help support it and try to alleviate the wrinkles.

I'm pleased with the finished dress and I will wear it to work, but honestly...  it's a little bit dull.  I think a patterned or textured fabric would have really been nice.  Maybe a big statement necklace- like a large locket or pendant would spiff it up.  I can maybe see making it again in a patterned fabric for spring with the short sleeves.  We'll see.  So many patterns, so little time...  I'm just happy to have completed it.

Next up will be a knit dress...  maybe...

Saturday, October 26, 2013

My First Pattern Ever

The other day I was doing some cyber window shopping and I came across this:


This is Simplicity 7876, the first pattern I ever sewed, the one that started it all.

There was a little shop in our town that sold sewing machines and fabric, and the proprietress held sewing classes in the back of the shop.  I think I was about 11 or 12, so it must have been around 1979 or '80 that my mom signed me up.  I was so excited and couldn't wait to get started!

Our first project was actually a tote bag made of plain cotton.  The pattern was cut all in one piece and was a hand-drawn pattern provided by the instructor.  It was basically just a simple project designed to teach us to pin the pattern to the fabric, cut it out, and then how to use the machine to sew straight seams, and gentle curves.  After it was complete we moved on to the pattern above.

Simplicity 7876 is a very simple wrap skirt.  It has a very generous A-line silhouette and wraps in front.  There are no closures, the only "challenging" detail was marking the left side seam of the waistband to leave an opening for the tie band to go through so you could wrap it and have a smooth waist.

The class instructor taught us to read the back of the envelope to determine what fabric to use and how much to buy.  We learned how to read the measurements and figure out what size to make.  Once we opened it up, she showed us how to find the pattern pieces, cut them out and press them.  Then we learned how to follow the pattern layout to fit the pattern onto the fabric and cut it all out.

And then it was on to the sewing.  I loved every minute of that class and I whizzed right through the construction of that skirt.  I remember how excited I was to pull it from the machine and try it on...

...And that was when I had my first experience with the mysteries of fitting.  My skirt was too big!  With the waist band cinched up as tight as it would go, it was too loose.  I didn't understand why- I had measured carefully and followed the chart on the back of the envelope.  Why didn't it fit?

I don't even remember asking the teacher about it.  I guess as a child, I didn't think to investigate too far.  It didn't fit like I wanted it to, so I just tried to think of a way to make it work.  ( I was years ahead of Tim Gunn!)

My amateur fix was to simply fold under the vertical edge of the skirt front under layer an inch or so and stitch it down.  I didn't trim, I just folded the already finished edge under and added a couple of rows of stitching to hold it all down.  It added bulk and looked odd, but I figured it was going to be under the front wrap- who was going to see it?  When I showed it to my mom and explained, she praised me for being clever and solving a problem.

I had so much fun in that class and I was so excited to have made a wearable garment that my mom turned right around a let me pick out fabric for a second skirt!  The first one was a quilting weight, plain, purple cotton.  If I remember correctly, I had picked it from my mom's stash.  My second skirt was made out of a glorious pale pink cotton that was much lighter weight and had the perfect drape for this skirt.  It had gorgeous fuchsia strawberries as big as my whole hand scattered all over it.  I didn't know anything about the concept of muslins at the time, but I did know that my first skirt had had a problem, so for the second one, I knew in advance to take in the skirt under layer so I could pull the waist ties tight enough.

I remember proudly wearing that skirt to school the next year.  And that was the beginning of my love affair with sewing.

What was your first pattern ever?


Sunday, October 20, 2013

More Autumn Stitching

This is my latest WIP, Acorns and Owls, from Blue Ribbon Designs:


Amazingly, I had almost all of the Gentle Art Sampler Threads that the chart called for.  I only made one substitution, one of the orange fibers in the pumpkins.

I love this little design.  What I'm not really liking is the over all color way.  It's too... brown.  The owls, in particular, are not really working for me.  I'm going to go ahead and finish it, but I might end up re-doing the owls in a darker, cooler color.  We'll see...

In sewing news, I'm about to go work on the hem of my vintage mod dress.  Stay tuned...

Monday, October 14, 2013

Blessed Be

All it took was one uninterrupted afternoon of stitching (while watching my favorite TV show, Top Gear) to finish up this little piece.


This is Blessed Be, a complimentary design by Barbara Cooley, of Plum Pudding Needleart.


This finished up right at 3 3/16 X 2 3/4 inches on 32ct Lambswool linen by Wichelt.  The chart comes with suggested DMC colors, but I used hand dyed Sampler Threads and Weeks Dye Works from stash.


It's a very easy stitch- all cross stitch with no fancy stitches.  I'm pleased with the way it finished up.  Of course, I still need to "finish" it.  Any suggestions?

Now I'm off to peruse my stack of charts and pick out my next small project.  Happy stitching!

Sunday, October 13, 2013

Weekend Stitching Progress Report

Blessed Be is slowly coming along.  It's a very tiny piece, but it's taking a long time to stitch because I just can't work on it as often as I'd like.  So much to do, so little time, you know?


Anyway, I hope to wrap it up and start something else soon.

In the meantime, there has been sewing here at the House of Frog!  I don't have photos to share yet.  In fact, I still need to finish the hem, but I pulled out a vintage UFO this weekend and except for the hem, finished the project up.  I say vintage, because the pattern is vintage:


And because I began the project in January of 2011.  I don't remember exactly why I tossed it aside unfinished, except that I was disgusted with something about the fit of the real garment as opposed to the muslin.  But I pulled it out and tried it on yesterday, and other than the fact that the sleeves were too long, it seemed okay.

The pattern has a nifty little dart in the sleeve at the elbow (nice vintage detail) and it fell way too far down my little T-Rex arm.  So rather than just trimming length at the wrist, I had to remove the one sleeve that was already attached, open the already serged sleeve seam, and trim the top of the sleeve down by 7/8 of an inch.  I also took an additional 1/2" out of the sleeve cap to reduce the horrendous amount of sleeve cap ease.

It's going to be a short work week- I'm taking Thursday and Friday off, so I hope to have the hem done, and then get just the right combination of weather, lighting, good hair, and an available photographer to get some decent photos.  Wish me luck.

Does anyone else out there have a UFO that needs to be finished?