Monday, October 7, 2013

Pumpkin Hollow

Pumpkin Hollow is all done!

Details:  Pumpkin Hollow free chart by Nancy Woodson of Liberty House Primitives.  The design measures 5.25 X 4.75 inches on 28ct natural linen.  All threads are DMC floss.


I followed the pattern almost exactly.  I changed the year from 2010 to 2013.  I added my initials in the lower right corner of the green grass.  You can just barely see them in the photo above.


I did not have DMC 936, the lighter green called for in the chart, so I used one strand of 934, the darker green, and one strand of 469 together in the needle to stitch the areas of lighter green.  I think it turned out just fine.

I'm pleased with the way this turned out.  I was worried when I first pulled all the colors for it that it was going to be dark and dreary- there's a lot of navy, black, and dark green- but now that it's done, I think it looks great.  I'd love to stitch it again using hand dyed threads for the pumpkin, the house, and the grass.  I think it would look good stitched on a dark fabric as well.  Hmmm...  I might have to visit my stash.

I'm not sure how I want to finish this.  It's a little bit big for an ornament, although I could see it hanging on my china hutch door.  It might look nice finished as a small pillow to sit on top of a bookcase.  Any suggestions?

Sunday, October 6, 2013

A Walk Down Memory Lane

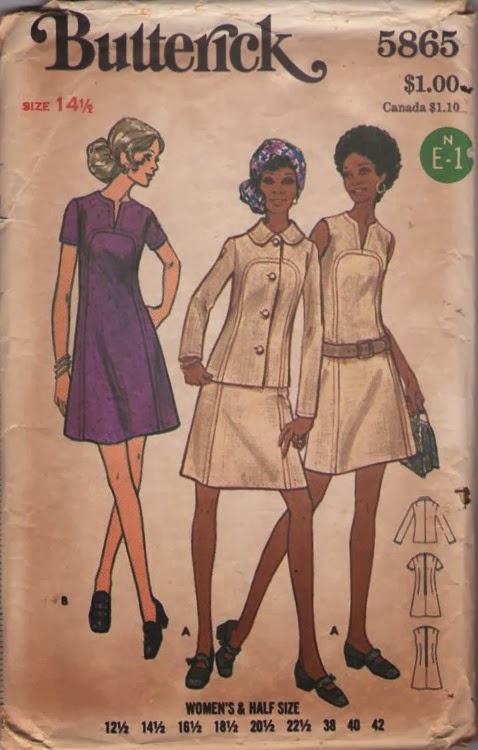
 This morning I decided to peruse my favorite vintage pattern site, MomsPatterns, in hopes of finding a little bit of inspiration, and maybe a pattern or two that I can't live without.  I started, as I usually do, in my favorite section- the Mod Era.  But then the Princess joined me at the computer and I decided to jump into the 80's patterns to see if they had anything that I had made way back then.  I thought the Princess would get a kick out of seeing some of the "crazy" things I wore when I was younger.  I wasn't disappointed.

First I found McCall's 2589, a princess seamed strapless dress with an oversized blazer.  I made this, both pieces, around the time I graduated from high school, in a soft, light weight, light wash denim.  It was easy to make, and the dress was the first garment I ever made that I underlined.  The jacket was completely unlined.  I wore it with a pair of large silver hoop earrings (and big hair) and I thought I was  quite something!


The next pattern almost brought tears to my eyes.  This is Butterick 5895, my wedding dress.  I made view A, the white dress in the background, exactly as it appears except I left off the shoulder bows, which I thought were too fussy. I used ivory moire taffeta with wide ivory lace ruffles at the wrist.  The dress rustled so sweetly.  I still have it, packed safely away, in case the Princess ever wants to see it.  I doubt she'd want to wear it.


This next pattern, Butterick 6204, is what I used to make the skirt and top I wore the day after my wedding.  I made view A (on the far right) out of a pretty sea green watercolor print cotton.  Check out that peplum.  I think I originally made it as an Easter dress, but I liked it so much I wore it after the wedding, too.


I started making Butterick 3662 a few years after my wedding, but I never finished it.  I don't remember why, but it probably had something to do with fitting issues.  I wish I still had the pattern because I still love this dress and I'd make it and wear it today.  Yes, I could buy it from MomsPatterns, but this pattern is way too small.


So did I actually find anything in the Mod section, you may be wondering?  Why, yes, I did!

I love this shift dress.  The pink and white version is my favorite, although I like the white dress with the black trim, too.

And this one is really cute, too.  I love the curved front seam and the matching jacket.


And one more.  I love the funnel neck and the cut on cap sleeves.  The length on this one looks a little bit more generous, too.  The brown version looks to be cut on the bias- very cool.


Is anyone else out there mad about Mod fashion?  Do you ever go and look at old patterns from years gone by and recognize the ones you had or made?  Does it take you back?

Wednesday, October 2, 2013

More Pumpkins

The days are getting shorter and the temps are getting cooler.  Fall is definitely in the air.  I haven't been able to stitch nearly as much as I'd like but I have made a little bit of progress:


Pumpkin Hollow is almost done.  All that is left is the green grass and a few green leaves on the tree.  I'd be done with it, except somehow I've misplaced the skein of green DMC floss that I need.  I can't find it anywhere.  I'm starting to wonder if I just didn't pick it up on my last trip to Hobby Lobby.  I'm anticipating an online supply order in the very near future!

This little piece is a really fun and easy stitch.  If you are interested in stitching it for yourself, it is a freebie design from Liberty House Primitives, designed by Nancy Woodson.


I also have another small piece under way, Blessed Be by Barbara Cooley of Plum Pudding Needleart. The design calls for DMC but I decided to substitute hand dyed fibers from stash.  So far I'm loving it.  The pumpkin has really great depth and even the bird looks good in a dark, mottled grayish brown.  I can't wait to get this one finished.

There is still no garment sewing to report.  The October issue of Burda Style left me a bit underwhelmed, but the September issue is still tempting me and the November issue looks to be good.  I have a ponte knit and an ITY print calling my name from the stash right now, so maybe this weekend I can get something started.

Happy fall sewing and crafting!  May all your projects turn out perfect!

Tuesday, September 17, 2013

First Pumpkins of the Season

Say hello to C'est l'automne:


 This is a sweet little free design that I found (through Pinterest) on the blog, Gazette94.  It features beautiful stylized pumpkins, leaves, and vines all in shades of orange and green.


I stitched it up on 32ct Lambswool linen from Wichelt.  I wanted raw linen, but I didn't have any in my stash and I didn't want to wait to stitch this.  The design worked up at 5 1/8" by 4 7/8" including my signature and date at the bottom.  (Remember, folks, sign your work!)


The designer offered suggested floss colors, but I substituted DMC floss from stash.  My greens are a little bit lighter and my oranges are a bit deeper than the model.


The designer also shows it on the blog charted up in one color.  You could stitch this all in one shade, with a hand-dyed thread and it would be gorgeous, but totally different.


This stitched up pretty quickly in just a few nights in front of the TV.  (Season 8 of Criminal Minds is out on DVD and I've been catching up before the season premier!)  Even though it's almost completely cross stitch, there is a bit of backstitching to liven things up.  I love the effect that it gives with the vine that completely borders the design weaving in and out of the tiny leaves.


I'm not sure yet how I'm going to finish this up.  Maybe a small pillow?  A door-hanger?  I'm waiting for inspiration to strike.

Still no garment sewing.  I'm still working on getting the new sewing room together.  I'm itching to get back to it, though.  I want some new knit dresses for fall.  And the Princess wants some things, too.

How about you?  Any sewing or crafting projects on the table for fall?

Tuesday, September 3, 2013

Jumpstart on Autumn

There hasn't been any sewing around here for a month and a half.  It's not that I don't want to sew, it's just that I don't have anywhere to do it right now.  My current sewing space is out of commission and my new, dedicated sewing room is not quite usable yet.  There is a lot of work to be done on it and not a lot of time to do it.

In the meantime, my stitching urge has hit early this year.  I usually turn to needlework in the fall.  Something about autumn colors and designs just gets me going every year.  I don't know if it's the mild summer we've had or what, but I pulled out my needlework stash in August.
 

The first piece I worked on was this, Summer Scene, by Cynthia Zittel of The Drawn Thread.  This little house was featured in the August 2000 issue of Just Cross Stitch.  I had saved it in a notebook of things I thought I might want to stitch one day, and now here it is.


This design stitched up just a little bit over 3 inches square on 28ct Glass Blue Monaco.  I'm not crazy about Monaco- it feels kind of stiff and scratchy, very "cottony."  As well it should, since it's 100% cotton.  I really wanted a blue fabric like the model, and I didn't have anything in my stash.  I found this at Hobby Lobby and decided to try it.  The color is okay.  Maybe  a bit "grayer" than I'd like, but I can live with it.  I actually think it will be great for stitching some snowy winter scenes later on, but that will have to wait.


I used the suggested DMC flosses.  The model was stitched in silk and I'm sure it's gorgeous, but I figured cotton would work.  Check out the Woven leaves, Double Leviathan Stitch on the front door, and Reversed Cushion Stitch for the walkway.  The pink flower petals are actually tiny Smyrna Cross Stitches.

Cynthia Zittel is one of my all-time favorite designers.  Even if you are not into cross stitch and needlework, check out her designs at The Drawn Thread.  I promise you'll be amazed by her gorgeous gardens, delicate flowers and, whimsical seasonal designs.


After stitching the Summer Scene, I started on this Halloween design called Pumpkin Hollow Sampler by Nancy Woodson of Liberty Primitives & Needlework.  I have a way to go on this one.  It's going to have a big pumpkin behind the black bird, colorful leaves on the tree, and some grass.  There is also a border on this design.  I'm using DMC floss on 28ct raw linen.  Stay tuned for an update soon.

And in other stitching news, I picked up some more linen and floss in these wonderful fall colors:


I have a lot more autumn stitching planned...

Monday, July 15, 2013

Butterick 5179

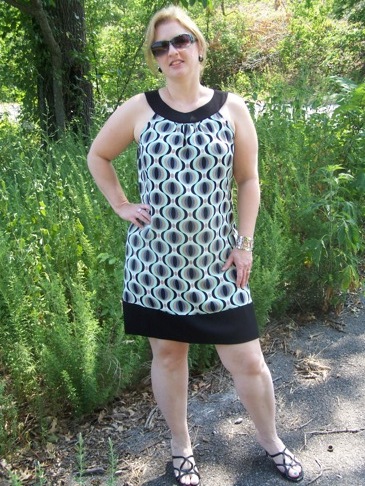
Last week I put the finishing touches on Butterick 5179, another little shift dress.  I figured since I'd been so happy with the last couple that I'd made, I'd pull this one out and give it a go.


The pattern has been in my stash for some time (OOP now.)  I bought it and then never made it because I was worried that it just wouldn't work for me.  Well, the joke's on me, because I'm not sure that it does work for me.


I made View A, the one photographed on the model.  I really liked the print against the contrast hem and I knew that's what I wanted to try.  Of course, as you can see, I made the yoke in contrast fabric also.  I really like having "lines of demarcation" or borders sometimes.  Anyway, the fabric just seemed to need the contrast at neck and hem.


The main fabric is a super cool rayon challis that I picked up a few years ago at Hancock's.  I love the colors- green, taupe, and black- and the groovy print.  The black is simply a solid rayon challis.  I have a love-hate relationship with challis.  It can be such a drag to lay out, cut, and sew.  It's not slippery like satin, but it is limp and loves to wiggle around.  It also wrinkles easily, although it presses pretty well, so that's not so bad.  But once it's sewn, it's mighty comfortable to wear and usually flattering, so I take the bad with the good.


I cut a size 14 yoke and the dress front and back in a size 16.  I made a 3/8" petite adjustment above the bust.  I really didn't need to- I could have just raised the bottom of the armhole a bit instead, but it worked out okay.  After checking the finished measurements, I decided I did not need to grade out to an 18 at the hip.  I have plenty of room- the fit on this is loose.  I did, however, add my customary 1.25" of length at the waist.  There is some subtle shaping in the side seams and the CB seam, so I added the extra where I need it most.  I also ended up taking in the waist about 1/2" on each side after the dress was all put together.

I made a muslin and the back yoke seemed to gape a tiny bit, so I took out a tiny wedge to compensate. Unfortunately, I did not notice any issues with the front yoke and I did not adjust that piece.  Once I got the dress finished, the front yoke now seems too wide and instead of lying flat against my chest, it wants to bunch up ever so slightly causing it to look wavy.  It's not bad sewing, it's bad fitting.


I did not use the instructions for this dress.  In fact, I don't think I ever looked at them.  It seemed like an easy enough dress to put together.  There are only 5 pattern pieces- front and back yoke, front and back dress, and the bottom border.  I sewed the front and back together, added the bottom border, ran the gathering stitches at the top of the dress, finished the armholes with bias binding and then added the yoke.  I then attached the yoke facing at the inside neckline seam and then sewed the yoke and facing together by hand all around the lower edge.  I did not put in the zipper as called for because I knew from my muslin that this dress would slip on and off over my head without it.  I also interfaced both the yoke and the yoke facing to add some body to the flimsy challis and give the yoke some structure.  I'm glad I did, too, otherwise the waviness might have been worse.


I love the dress... on the hanger.  I think the fabrics are perfect for this pattern.  It's also a super comfortable dress to wear- the challis really does feel light and airy- perfect for hot summer days.  But... it does require a strapless bra.  The bodice is cut in just enough that regular bra straps show in front and in back.

I'm just not sure this dress is all that flattering on me.  I don't hate it, but I'm not loving it either.  It feels very short.  I don't think the photos show just how short it is because my photographer is taller than me and the photos are at a slightly downward-looking angle.  I'm also worried that the busy print combined with the fullness of the dress is not doing me any favors.  It's also possible that a wide, horizontal band of black right above my chubby knees is making things worse, but ironically it's the black contrast against the print that I like most about the dress... I don't think this dress would work at all without it.

I definitely will not be making this one again.  I might be tempted to try the view with sleeves and no contrast band, but View A is officially retired.  Now the question is, will I work up the nerve to wear this out somewhere and road test it?

Thursday, July 11, 2013

McCall's 5859: Flamingo Power

I've been hinting at this project for a few weeks now.  I actually finished it up about a week ago and I'm just getting around to taking some photos.  This is McCall's 5859- the Flamingo Jacket.


From the pattern envelope:  Close fitting jacket with peplum, lapel and collar, pockets, gathered sleeve variations and front button closing... jacket A has piping trim.


Yep, I made view A just like the one in the envelope photo.  I've actually been wanting to make this for a while- ever since 2009 when the pattern was released.  I waited so long that sadly, it's OOP now.

I guess I was just waiting around for the right fabric.  And oddly enough, this fabric has been waiting around my stash since long before 2009, for just the right pattern.  I'm not sure that this pattern was meant for this fabric, but one afternoon, I was playing around in my sewing room and I saw the two together.  There was just enough of this bold, flamingo print quilting cotton to make this jacket, so I just started cutting.


And there you go.  It's a bright, happy, attention grabbing jacket that brings to mind the 80's, summertime, and fun.


So, on to the details.  I cut my standard size- 14 through the shoulders, 16 at the bust and waist, and I eased out to an 18 at the bottom of the peplum.  I did not make a petite adjustment above the bust.  I think I was afraid to adjust the collar pieces, but it was okay- I didn't need the adjustment.  I added 1" of length at the waist.  The muslin seemed fine, but once I tried on the finished jacket, I wished I had added 1.25 or maybe even 1.5."  It just feels short on me.  It looks okay, though, so I'll deal with it.


The jacket looks pretty much exactly like the envelope photo.   The model in the photo appears to be wearing her jacket as a top with nothing under it.  I found the neckline to be much to wide and low to wear without something under it.

And even though the jacket is described as having a peplum, it's a very tame peplum.  After all, this pattern came out before the current peplum trend hit.


The pattern description doesn't mention that this little jacket is fully lined.  The peplum and the center front pieces are faced with self fabric, while the sides, back and sleeves are fully lined.  I used a black "lining" fabric from my stash- probably poly something or other.  It's very nice inside and slides easily over my tank top underneath.


I piped the whole thing exactly according to the instructions which were kind of awkward.  McCall's has you pipe the jacket fronts, tapering to nothing at the side seam, and then pipe the back peplum hem, tapering to nothing at the side seam.  Then you sew the sides, turn the already lined jacket right side out and hand sew the lining side seams.  It works, but it's awkward and there isn't a smooth line of piping across the hem at the sides.  I could not for the life of me figure out how to change the order of construction to have one continuous line of piping.  Believe me, I would have done it differently if I had figured it out.  But in the end, it's okay.  No one but me will ever know- or care- that the piping isn't continuous.


I love this pattern.  It makes an adorable jacket.  And even though it's lined, it's quite comfortable in the heat- the neckline is open and the cap sleeves are loose and allow air to circulate.

I don't have any plans to make this again at the moment.  Although, the version with sleeves looks nice and would make a cute piece to wear to work in the fall.  Maybe even now- the AC in my office is quite powerful.  If I do make this again, the only change I will make is a smidge more length at the waist.


And here's my parting shot.  All these great photos, are courtesy of my first string photographer, Brendan, who is home on leave from the Air Force.  When I put on the jacket to take the photos, he asked, "Is this the muslin?"

Friday, July 5, 2013

I Did it Again

 I know I said I didn't have any plans to make BurdaStyle 04-2013-109 again any time soon, but that's exactly what I found myself doing this week.


Last weekend, Mr. Frogs and I decided to take the tadpoles to a movie.  I wasn't feeling all that great and the thought of squeezing myself into a pair of cargo shorts was not appealing.  My go-to Adidas gym shorts, although comfortable, are not exactly what I want to be seen in when I'm out and about.  I found myself thinking:  Wouldn't it be great to have another shift dress like the palm tree dress?


I immediately thought of this colorful cotton seersucker that's been patiently waiting in my stash.  I pulled it out, and sure enough there was plenty to make this little dress.


Since the pattern was already made and all the fitting issues were already worked out, all I had to do was cut and sew.  This time I didn't install a zipper.  The dress slips right over my head.  I used purchased binding for the armholes and neckline, which saved time and energy also.

I love how it turned out.  The fabric is super cute and super comfortable.  I can't wait to wear this dress out and about.  It will even look cute with a little cardigan over it for work.

Okay, so I have no plans to make this again...  but no promises.

Tuesday, July 2, 2013

BurdaStyle 06-2012-114B

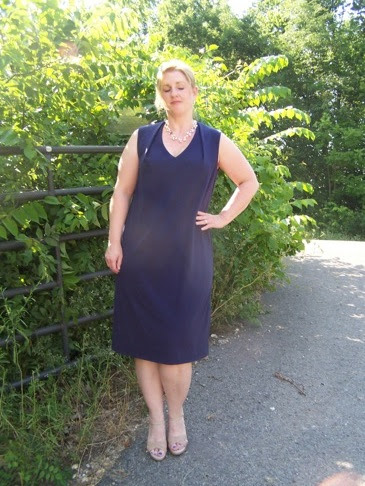
Another project in the bag!  BurdaStyle 06-2012-114B is done.  I just finished the hem a little while ago.


This is what Burda had to say about this dress:  "The simple, straight dress has practical inseam pockets and refined tucks in the shoulder seams.  The deep V-neckline adds an alluring touch."
 Simple and straight?  Definitely.  This dress couldn't be easier.  There are just four pattern pieces including the facings.  Not even a center back seam to deal with.  And I left out the pockets, which made it even faster and easier to make, although I kind of wish I'd put them in.  I'm finding I quite like pockets lately.


I used a gorgeous, navy blue ponte knit that I picked up at Joann's a week ago.  I had it in my head to use a simple cotton interlock, but I really wanted navy and the only pretty navy fabric in stock was this ponte.  It's pretty light, though, for ponte and drapes well.  I figured, too, that the slight extra weight to the fabric would help camouflage any lumps and bulges.  I think it worked out well.


I cut my standard 42 at the shoulder, 44 at the bust, and 46 at the hip.  The pattern is offered in sizes 34-44, so I had to grade up at the hip.  No problem though, because the side seams are straight and so it's easy to size up or down.  I made my standard adjustments- 3/8" petite adjustment above the bust and 1.25" of length at the waist.


I did make a muslin, and once again, even though the design is simple, I'm glad I did.  I brought the armhole up approximately 5/8" to cover my bra band.  I also took the side seams in about 1/4" from the armhole tapering to nothing at the waist.  Unfortunately, my muslin was a woven, so I still had to fine tune a bit when I got my fashion fabric basted together.


I ended up taking the sides in another 3/8" from the armhole down to just below hip level.  I could have taken it in all the way down, but I wanted to keep it loose and easy.  If I made this dress in a similar fabric again, I would just go down a whole size all over- 40/42/44.  I should have know- using a knit for a woven pattern, but it all turned out okay in the end.


My favorite feature of the dress is definitely the deep pleats at the neckline.  They are super easy to achieve and very dramatic when finished.  I probably could have raised the neckline ever so slightly, but it's okay.  I just have to remember not to bend over!

I added an extra 2" to the length of the skirt and I hemmed this a little bit long.  I want to be able to wear a belt with this and I figured I would need a bit of extra length to blouse at the waist.  I really like the nude strappy sandals with this and I'm going to be looking for a suitable belt to go with the ensemble next week while I'm on vacation.


I really like this dress.  Maybe not quite as  much as the last one, but enough to get lots of wear out of it.  I think you could really play around with it and add some shaping for a whole different effect, too.  It would be so easy to nip the side seams in or add a couple of darts to the back.


Burda also offered this as a rather unattractive, boxy top in "rep weave" in the same issue.  I think in a knit it would make a great sleeveless t-shirt.  I could definitely see throwing it on over a pair of jeans or shorts.  The V-neck and pleats really frame the face and are great for showcasing a pretty necklace.

So another project down, another dress to wear.  I'm glad to have this one out of my head and in my closet at last.