So a few posts back I announced that I wanted to make the Asymmetrical Dress from the May 2014 Burda Style. I even blogged the fabrics that I ordered from Fabric.com. Well, those fabrics arrived right before I went out of town on a business trip, and as I feared, they weren't exactly what I thought they would be. Don't get me wrong, they are all great on their own and I will use them all... Just not as I had planned.
Here is the combo I ordered for the dress. The red pique is gorgeous! It's a bright, saturated red with a fabulous texture and a little bit of stretch. I'm seriously thinking about ordering more in a different color(s!)
It's the knit that is the problem. It doesn't go with the red. I expected a little bit of color variation, after all they are two completely different fabric types which take dye differently, even if they had used the same dye, which I am pretty sure they didn't. But the "red" in the knit print is much closer to pink. Even though I am okay with the colors not being "matchy matchy" it's just too great a color difference to look right to me. Sigh...
Lucky for me, I ordered a back-up:
This knit is from the same line, but a different print with different colors. It's not quite as contrasty and exciting as the first print would have been, but the colors go with the pique better. There is green in it as you can see in the photo above, but not as much green, as you can see below (different part of the fabric.)
I did order a little extra, so I may be able to cut strategically to get the best contrast. I'll have to see when I lay it out. And the first knit fabric? I think it will make a cute top for me or maybe a cute dress for the Princess.
So fabrics are here, and even though I'm going with plan B, I'm still procrastinating. I am still trying to shed some winter pudge before I cut and sew a fitted sheath dress with a side zipper that will be hard to take in, so it may be another couple of weeks before I actually cut this out. In the meantime, if you've made this dress or know someone who has, please share a link. I'd love to see it!
Saturday, June 28, 2014
Sunday, June 22, 2014
New Look 6297
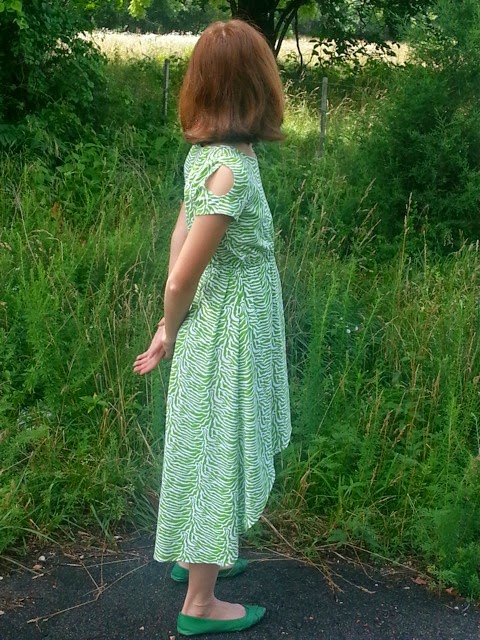
Here is another little project that rolled out of the sewing room this week. New Look 6297 in lime green zebra print for the Princess:
We used a lime green zebra print knit from Hobby Lobby. This fabric has been around for a few years and I bet they carry it for a while yet. I used the same print a few years ago for a top for me, and the hot pink color way for a halter dress for the Princess. She prefers the green- lime is her favorite color.
I used the size 14 per the waist and hip measurements. The Princess actually measured at a size 12 through the bust, but I decided to use the 14 just to give her some extra growing room and I'm so glad I did. I don't think the 12 would have fit.
I added 5/8" extra length to the bodice and increased my waist seam allowance to 1" because there is a waist casing and I wanted to make sure I could use some substantial elastic there. Other than that, I made no changes to the pattern.
The neckline is finished with a band made of the same fabric as the dress. It's folded in half and stitched to the right side of the bodice. Then the band is pressed out and the seam allowances are topstitched to the bodice. It's a quick and easy finish that looks quite nice on the outside.
The sleeves had me worried- I wasn't looking forward to finishing that tiny cut-out. But the pattern is actually pretty creative. Each sleeve is two pieces. You do have to do a tiny 3/8" finish on the cut-out, but it's in 2 pieces so that makes it easier. (I found that clipping the seam allowance helped a lot.) Then you stitch the sleeve together at the bottom below the cut-out, and the top overlaps at the shoulder.
New Look would have you stitch the inner sleeve seam and then set the sleeves into the bodice, but I sewed them in flat and then sewed up the side seams from hem to sleeve hem- so much easier!
With the mullet skirt you do see the wrong side of the fabric so I serged my side seams and did a very neat 5/8" hem. In this fabric, I think it's okay. The hem is curved, but it's pretty gentle so I had no problems getting my hem to lie flat.
I think the dress turned out super cute and the Princess loves it. It was pretty quick to cut and sew and it's completely age appropriate, so if you have a young lady who needs a new dress this is a great pattern to try. I'd love to make the sleeveless version as temps are finally starting to rise here, or even the maxi version, but the Princess has said she doesn't want a maxi dress.
Up next is a project the Princess and I are working on together, plus a maxi dress for me. More sewing soon...
I found this pattern recently and snapped it right up. New Look so rarely makes anything for "tweens" and I thought the Princess would love this dress. Just as I suspected, she went right to View C with the mullet skirt and the shoulder cut-outs.
We used a lime green zebra print knit from Hobby Lobby. This fabric has been around for a few years and I bet they carry it for a while yet. I used the same print a few years ago for a top for me, and the hot pink color way for a halter dress for the Princess. She prefers the green- lime is her favorite color.
I used the size 14 per the waist and hip measurements. The Princess actually measured at a size 12 through the bust, but I decided to use the 14 just to give her some extra growing room and I'm so glad I did. I don't think the 12 would have fit.
I added 5/8" extra length to the bodice and increased my waist seam allowance to 1" because there is a waist casing and I wanted to make sure I could use some substantial elastic there. Other than that, I made no changes to the pattern.
The neckline is finished with a band made of the same fabric as the dress. It's folded in half and stitched to the right side of the bodice. Then the band is pressed out and the seam allowances are topstitched to the bodice. It's a quick and easy finish that looks quite nice on the outside.
The sleeves had me worried- I wasn't looking forward to finishing that tiny cut-out. But the pattern is actually pretty creative. Each sleeve is two pieces. You do have to do a tiny 3/8" finish on the cut-out, but it's in 2 pieces so that makes it easier. (I found that clipping the seam allowance helped a lot.) Then you stitch the sleeve together at the bottom below the cut-out, and the top overlaps at the shoulder.
New Look would have you stitch the inner sleeve seam and then set the sleeves into the bodice, but I sewed them in flat and then sewed up the side seams from hem to sleeve hem- so much easier!
With the mullet skirt you do see the wrong side of the fabric so I serged my side seams and did a very neat 5/8" hem. In this fabric, I think it's okay. The hem is curved, but it's pretty gentle so I had no problems getting my hem to lie flat.
I think the dress turned out super cute and the Princess loves it. It was pretty quick to cut and sew and it's completely age appropriate, so if you have a young lady who needs a new dress this is a great pattern to try. I'd love to make the sleeveless version as temps are finally starting to rise here, or even the maxi version, but the Princess has said she doesn't want a maxi dress.
Up next is a project the Princess and I are working on together, plus a maxi dress for me. More sewing soon...
Thursday, June 12, 2014
Simplicity 2369 New and Improved
Here is another finished project that rolled off the sewing table about a week and a half ago. I had to wait for a sunny afternoon after I got home from my trip. But here it is, finally, after a day of road testing.
This is Simplicity 2369, which I made once before back in the summer of knit dresses (2011.) I love that dress and I still wear it, but not as often as I'd like because the fit is off. I didn't know how to adjust for length through the torso without distorting the pleats and the sash at the waist so I just didn't do it. And I'm very sorry I didn't. When I wear that dress I'm constantly tugging it down because it feels like the tie is right up under my bust- not comfortable!
Since making the last dress, I thought I'd figured out a way to adjust the length without affecting the front wrap. So I decided to try it again. I even went so far as to buy the Amazing Fit version, S1653, with a new dress in mind. But when I opened the envelope and saw that the new version has a bust dart and a waist seam (hidden under the front wrap) I decided to just go with what already works, and I pulled 2369 out of the stash.
I used the same pattern pieces as before, the knee length skirt, and the short raglan sleeves, size 14 shoulders, and 16 from the bust down. (Last time I had to take it in down the sides, but this time I'm still working off the winter pudge and the 16 was fine.)
My idea for the length adjustment was to simply slash the pattern across the waist, but angle the cut up above the pleats and slide the pieces apart. Like so:
I added 1.5 inches of length at the waist, but because of the angled slash, it only added about 3/4" to the neckline edge. I was able to easily blend it in and it didn't lower the crossover point much, if at all. I moved the left side waist tie down 1.5" and the result is a wrap and tie that fits much more comfortably and looks much better without me having to constantly tug it into place.
I had no issues until I went to hem the dress by machine. The hem wanted to roll out of place as it went under the presser foot and after 3 attempts complete with ripping out the stitches, I gave in and just hand hemmed. It didn't take long because the skirt isn't very full, although, in my opinion, it has just the right amount of flare to be sort of disco fabulous.
I love this dress and I know I'm going to wear it a lot this summer. I'll probably give this pattern a break for a while, but I may come back to it, or the 1653 version, because it has a long sleeve view which would be perfect for fall and winter.
In other news, I'm taking a much needed day off tomorrow. Hopefully I can get started on the Burda Asymmetrical Dress and at least get a muslin done. I also have some cute knits and a new dress pattern for the Princess. We'll see if the weekend goes as planned...
This is Simplicity 2369, which I made once before back in the summer of knit dresses (2011.) I love that dress and I still wear it, but not as often as I'd like because the fit is off. I didn't know how to adjust for length through the torso without distorting the pleats and the sash at the waist so I just didn't do it. And I'm very sorry I didn't. When I wear that dress I'm constantly tugging it down because it feels like the tie is right up under my bust- not comfortable!
Since making the last dress, I thought I'd figured out a way to adjust the length without affecting the front wrap. So I decided to try it again. I even went so far as to buy the Amazing Fit version, S1653, with a new dress in mind. But when I opened the envelope and saw that the new version has a bust dart and a waist seam (hidden under the front wrap) I decided to just go with what already works, and I pulled 2369 out of the stash.
I used the same pattern pieces as before, the knee length skirt, and the short raglan sleeves, size 14 shoulders, and 16 from the bust down. (Last time I had to take it in down the sides, but this time I'm still working off the winter pudge and the 16 was fine.)
My idea for the length adjustment was to simply slash the pattern across the waist, but angle the cut up above the pleats and slide the pieces apart. Like so:
I added 1.5 inches of length at the waist, but because of the angled slash, it only added about 3/4" to the neckline edge. I was able to easily blend it in and it didn't lower the crossover point much, if at all. I moved the left side waist tie down 1.5" and the result is a wrap and tie that fits much more comfortably and looks much better without me having to constantly tug it into place.
My fabric is a poly knit from Joann. It's a geometric design on a mottled field of purple, maroon, and gold. It's a great weight and drapes beautifully. It was also pretty easy to cut and sew with a stretch needle. I used a straight stitch to baste my seams and then serged everything for security and neatness.
I had no issues until I went to hem the dress by machine. The hem wanted to roll out of place as it went under the presser foot and after 3 attempts complete with ripping out the stitches, I gave in and just hand hemmed. It didn't take long because the skirt isn't very full, although, in my opinion, it has just the right amount of flare to be sort of disco fabulous.
I love this dress and I know I'm going to wear it a lot this summer. I'll probably give this pattern a break for a while, but I may come back to it, or the 1653 version, because it has a long sleeve view which would be perfect for fall and winter.
In other news, I'm taking a much needed day off tomorrow. Hopefully I can get started on the Burda Asymmetrical Dress and at least get a muslin done. I also have some cute knits and a new dress pattern for the Princess. We'll see if the weekend goes as planned...
Wednesday, June 11, 2014
Burda World of Fashion 07-2008-108
This top has been finished and waiting to be blogged for weeks. I waited for just the right combination of sun, an available photographer, and time... and we got one shot before the camera said "memory card full."
So that's why I only have one photo. I just gave up.
In any case, this is top #108 from the July 2008 issue of Burda world of Fashion (back before it was Burda Style.) It's a simple tunic with a curved yoke and an inverted pleat. Believe it or not, I've been wanting to make this top ever since the magazine came out almost six years ago. I even went so far as to muslin it a few years back, but I didn't make it up at the time. I can't remember now exactly why but I think it was because of fit issues through the upper bust/underarm area.
A few weeks back I dug it out and decided to give it another try. I've been on a quest for easy tunic tops this year and this pattern seemed like it would be just the thing. I had to re-trace and start over, but it's such a simple design that I didn't care. I traced a 44 and tapered out to a 46 at the hip. I didn't try to start with a 42 at the shoulder and I didn't make my normal petite adjustment because it always seems like I need the extra room with Burda's cut on sleeve patterns. Maybe it's because my upper arms are chubby. I raised the neckline 1/2"and lowered the top of the side seam the same amount. A quick muslin seemed fine- the neckline was a bit wide, but I figured I could just take a smaller seam allowance and bring it in just a bit. I had some drag lines in the back which seemed to indicate the back was too long. So I shaved 1/4" off the top of the back bodice tapering to nothing at the side seam.
For the actual top, I omitted the pockets and the center back zip. I cut the back yoke on the fold. The neckline is plenty wide enough to go over my head without a zipper and the top is loose enough that I have no problems getting in and out of it. The center back seam does have some subtle shaping so I kept that and I did make the vertical darts in back. I also used stay tape to reinforce the top of the side seams. That area gets a lot of stress and I didn't want it to rip during wear.
My fabric is a linen rayon blend purchased specifically for this project from Joann. It's a gorgeous emerald green with a windowpane design woven into it. I washed it in hot water and dried it on the highest setting to preshrink it. It does wrinkle, but a short trip through the steam refresh cycle in the dryer perks it right up and smooths it out nicely.
I'm quite happy with the finished top, however, I do have a few quibbles. The neckline is still too wide for my taste. It just barely covers my bra straps. That could be easily fixed, though. The top has plenty of room through the hips, but it hits me right at the top of my thighs so when I sit down, wrinkles form across my lap. You can just see them starting to appear in the photo above. I like the length, so perhaps a different fabric would work better. I also still feel like I need more room to move through the upper bust/underarm area. I think I need to drop the side seam down another half inch or so.
So maybe I need to make this again.
In other news, I have not started on the Asymmetrical Dress. The fabric arrived right before I headed out of town on a business trip. Now that I'm back, I see that the print fabric doesn't quite match the solid red fabric. Good thing I ordered a back-up! More on that project later...
So that's why I only have one photo. I just gave up.
In any case, this is top #108 from the July 2008 issue of Burda world of Fashion (back before it was Burda Style.) It's a simple tunic with a curved yoke and an inverted pleat. Believe it or not, I've been wanting to make this top ever since the magazine came out almost six years ago. I even went so far as to muslin it a few years back, but I didn't make it up at the time. I can't remember now exactly why but I think it was because of fit issues through the upper bust/underarm area.
A few weeks back I dug it out and decided to give it another try. I've been on a quest for easy tunic tops this year and this pattern seemed like it would be just the thing. I had to re-trace and start over, but it's such a simple design that I didn't care. I traced a 44 and tapered out to a 46 at the hip. I didn't try to start with a 42 at the shoulder and I didn't make my normal petite adjustment because it always seems like I need the extra room with Burda's cut on sleeve patterns. Maybe it's because my upper arms are chubby. I raised the neckline 1/2"and lowered the top of the side seam the same amount. A quick muslin seemed fine- the neckline was a bit wide, but I figured I could just take a smaller seam allowance and bring it in just a bit. I had some drag lines in the back which seemed to indicate the back was too long. So I shaved 1/4" off the top of the back bodice tapering to nothing at the side seam.
For the actual top, I omitted the pockets and the center back zip. I cut the back yoke on the fold. The neckline is plenty wide enough to go over my head without a zipper and the top is loose enough that I have no problems getting in and out of it. The center back seam does have some subtle shaping so I kept that and I did make the vertical darts in back. I also used stay tape to reinforce the top of the side seams. That area gets a lot of stress and I didn't want it to rip during wear.
My fabric is a linen rayon blend purchased specifically for this project from Joann. It's a gorgeous emerald green with a windowpane design woven into it. I washed it in hot water and dried it on the highest setting to preshrink it. It does wrinkle, but a short trip through the steam refresh cycle in the dryer perks it right up and smooths it out nicely.
I'm quite happy with the finished top, however, I do have a few quibbles. The neckline is still too wide for my taste. It just barely covers my bra straps. That could be easily fixed, though. The top has plenty of room through the hips, but it hits me right at the top of my thighs so when I sit down, wrinkles form across my lap. You can just see them starting to appear in the photo above. I like the length, so perhaps a different fabric would work better. I also still feel like I need more room to move through the upper bust/underarm area. I think I need to drop the side seam down another half inch or so.
So maybe I need to make this again.
In other news, I have not started on the Asymmetrical Dress. The fabric arrived right before I headed out of town on a business trip. Now that I'm back, I see that the print fabric doesn't quite match the solid red fabric. Good thing I ordered a back-up! More on that project later...
Friday, May 23, 2014
Plans
Have you seen this dress in the May issue of Burda Style?
When I first saw it, I admired it and kept on paging through the magazine. That was a month ago. Then I looked again and decided I might like to have a go at making it.
I like the shape and the contrast of the print center panel against the solid sides. I also like that the center is a knit and the rest of the dress is a stretch woven. The asymmetrical neckline is rather interesting, too.
I decided to take Burda's lead in choosing fabrics and these lovelies are on their way to me right now:
Vivid Stretch Jersey Stripe
Bermuda Stretch Pique
Bright, saturated summer colors- I hope they are as exciting in person as they are on the screen. Let the muslin begin!
Sunday, April 27, 2014
Burda Style 01-2013-133
My Burda tunic is done. It's actually been done for a week and has already been worn and road tested. Here's me doing my best German model imitation. Yeah, I know... Not quite.
Anyway, here is the model photo for reference:
And the tech drawing:
This project is from the plus section of the January '13 issue. I made view A, the tunic. It's pretty much made up as drafted in size 44. The only fitting change I made was to grade the shoulders down to a 42. I did not make a petite adjustment above the bust, but I wish I had. The front darts seem a tad low. Oh well, no one else will notice.
As far as construction changes, the only thing I did differently than Burda was I self-lined the bodice. It was easier to do than binding the neckline and front slit with bias and it gave me an opaque bodice. You can see in the photo above that my fabric is semi-sheer.
This chocolate brown gauze has been in my stash for a long time. I used it back in 2008 to make a dress and I'm happy that this project used up the last of it. There's nothing like stash busting!
Over all I'm pretty pleased with this project. I wore the top to work on Friday and out again to do some shopping on Saturday and it was comfortable and looked nice. It was quick and easy to make up, also. I can see myself making this again in a more "summery" fabric- maybe a batiste or challis. This brown version seems more suitable for autumn, although it was very comfortable and appropriate for my chilly office.
Up next is another Burda top in linen and maybe a knit dress. What's on your sewing table?
Anyway, here is the model photo for reference:
And the tech drawing:
This project is from the plus section of the January '13 issue. I made view A, the tunic. It's pretty much made up as drafted in size 44. The only fitting change I made was to grade the shoulders down to a 42. I did not make a petite adjustment above the bust, but I wish I had. The front darts seem a tad low. Oh well, no one else will notice.
As far as construction changes, the only thing I did differently than Burda was I self-lined the bodice. It was easier to do than binding the neckline and front slit with bias and it gave me an opaque bodice. You can see in the photo above that my fabric is semi-sheer.
This chocolate brown gauze has been in my stash for a long time. I used it back in 2008 to make a dress and I'm happy that this project used up the last of it. There's nothing like stash busting!
Over all I'm pretty pleased with this project. I wore the top to work on Friday and out again to do some shopping on Saturday and it was comfortable and looked nice. It was quick and easy to make up, also. I can see myself making this again in a more "summery" fabric- maybe a batiste or challis. This brown version seems more suitable for autumn, although it was very comfortable and appropriate for my chilly office.
Up next is another Burda top in linen and maybe a knit dress. What's on your sewing table?
Thursday, April 10, 2014
Burda Style 08-2013-119 Tunic Update
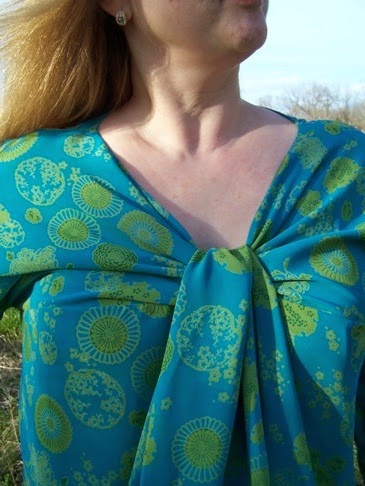
Wow. It's been two months since I announced on March 1st that I was working on this project. I finished it last weekend, and I've been waiting for warm, dry weather to snap a few photos. So here she is- Burda Style 08-2013-119:
The "To the Point" chiffon blouse:
I wish I had noticed the word "blouse" in the description, because really that's what it is. Yes, it's long like a tunic, but the fit through the shoulders and upper arms is closer than I was expecting.
I think I was sucked in by the dropped shoulders, the curved yoke seams, and the length. It's not quite as loose and easy as I was wanting, but it will do.
So here it is. I cut a 42 yoke and sleeves and a 44 lower bodice. I graded out to a 46 at the hip and then added another inch on each side at the bottom for insurance. I also omitted the cuffs and shortened the sleeves by 1.5 inches.
I used a semi-sheer poly chiffon from stash. I LOVE this fabric. It's turquoise with green medallions and has an Asian vibe to it. I think I got it at Hancock Fabrics, oh, maybe 10 years ago. It's been marinating in the stash waiting for the right pattern. I figured why not this one. (I still have several yards left, too. I must have really liked it at the time!)
Because my fabric is semi-sheer, and I wanted an opaque top, I made some changes to the pattern instructions. I read Burda's directions, and they were okay, although they seemed tedious. My changes allowed me to not only have an opaque blouse, but they actually made the construction easier (in my opinion.)
I cut two yokes (front and back) and two bodices (front and back.) I began by sewing the front and back yokes together at the shoulders. Then I sewed the outer yokes to the inner yokes right sides together from the joining point on one side all the way around the tie, the neckline, the other tie, and to the joining point on the other side. I had sewed a line of reinforcing stitches right where the yoke and bodice meet (under the ties in the photo) and I clipped my seam allowance right there and turned the right sides out.
The I stitched the underarms and basted the sleeve seam edges and the yoke seam edges together. I sewed my side seams and finished the hems. Then I put the inner and outer bodice sections together with right sides facing and stitched them with the yoke sandwiched in between. When I turned it all right side out, the seam was hidden inside the bodice layers and the blouse was finished inside and out.
At that point all that was left was to add the sleeves, which I finished with a narrow casing and 1/4" elastic. It sounds like a lot of work, but I think it was easier and faster than trying to narrow hem that entire edge around the ties and the neckline and tapering allowance toward edges of allowance, which is what Burda would have had me do.
The finished blouse is quite unique. The depth of the V in front can be somewhat controlled by how you tie the front. I've got it pulled up rather tight in the pictures (maybe too tight!) But I found that even after only a few minutes of wear, the weight of the ties starts to drag them down and the V creeps lower. I think when I wear this out to road test it, I'll wear a cami underneath for insurance. The blouse also tends to slide forward on my shoulders. I'm sure the weight of the ties is the issue, especially since I used a double layer of fabric. It would probably behave better if I'd made it as Burda intended.
But having said all that, I'm pretty pleased with my version. It's distinctive and comfortable and I think I'll get plenty of wear out of it.
Back when I first blogged this project, I also mentioned I was working on this:
I'm happy to report this one is almost complete, too. I just need to finish the sleeves and it will be done. Stay tuned for an update.
And I also cut out this one last weekend:
This one is a fabulous, relaxed tunic which I'm making from a delicious chocolate brown gauze with embroidery. I can't wait to get this one done. Of course if it takes me as long as the two above, I'll be lucky if I get to wear it for Fall!
The "To the Point" chiffon blouse:
I wish I had noticed the word "blouse" in the description, because really that's what it is. Yes, it's long like a tunic, but the fit through the shoulders and upper arms is closer than I was expecting.
I think I was sucked in by the dropped shoulders, the curved yoke seams, and the length. It's not quite as loose and easy as I was wanting, but it will do.
So here it is. I cut a 42 yoke and sleeves and a 44 lower bodice. I graded out to a 46 at the hip and then added another inch on each side at the bottom for insurance. I also omitted the cuffs and shortened the sleeves by 1.5 inches.
I used a semi-sheer poly chiffon from stash. I LOVE this fabric. It's turquoise with green medallions and has an Asian vibe to it. I think I got it at Hancock Fabrics, oh, maybe 10 years ago. It's been marinating in the stash waiting for the right pattern. I figured why not this one. (I still have several yards left, too. I must have really liked it at the time!)
Because my fabric is semi-sheer, and I wanted an opaque top, I made some changes to the pattern instructions. I read Burda's directions, and they were okay, although they seemed tedious. My changes allowed me to not only have an opaque blouse, but they actually made the construction easier (in my opinion.)
I cut two yokes (front and back) and two bodices (front and back.) I began by sewing the front and back yokes together at the shoulders. Then I sewed the outer yokes to the inner yokes right sides together from the joining point on one side all the way around the tie, the neckline, the other tie, and to the joining point on the other side. I had sewed a line of reinforcing stitches right where the yoke and bodice meet (under the ties in the photo) and I clipped my seam allowance right there and turned the right sides out.
The I stitched the underarms and basted the sleeve seam edges and the yoke seam edges together. I sewed my side seams and finished the hems. Then I put the inner and outer bodice sections together with right sides facing and stitched them with the yoke sandwiched in between. When I turned it all right side out, the seam was hidden inside the bodice layers and the blouse was finished inside and out.
At that point all that was left was to add the sleeves, which I finished with a narrow casing and 1/4" elastic. It sounds like a lot of work, but I think it was easier and faster than trying to narrow hem that entire edge around the ties and the neckline and tapering allowance toward edges of allowance, which is what Burda would have had me do.
The finished blouse is quite unique. The depth of the V in front can be somewhat controlled by how you tie the front. I've got it pulled up rather tight in the pictures (maybe too tight!) But I found that even after only a few minutes of wear, the weight of the ties starts to drag them down and the V creeps lower. I think when I wear this out to road test it, I'll wear a cami underneath for insurance. The blouse also tends to slide forward on my shoulders. I'm sure the weight of the ties is the issue, especially since I used a double layer of fabric. It would probably behave better if I'd made it as Burda intended.
But having said all that, I'm pretty pleased with my version. It's distinctive and comfortable and I think I'll get plenty of wear out of it.
Back when I first blogged this project, I also mentioned I was working on this:
I'm happy to report this one is almost complete, too. I just need to finish the sleeves and it will be done. Stay tuned for an update.
And I also cut out this one last weekend:
This one is a fabulous, relaxed tunic which I'm making from a delicious chocolate brown gauze with embroidery. I can't wait to get this one done. Of course if it takes me as long as the two above, I'll be lucky if I get to wear it for Fall!
Sunday, March 9, 2014
Butterick 4724: The Story of My Saint Barbara's Day Dress
This morning I was relaxing with a cup of coffee while I surfed the internet, and I wandered onto my favorite vintage pattern site, Mom's Patterns. It's always fun to find a pattern that I had back in the day, even more so when it's a pattern I actually made. Imagine my surprise and delight when I found this, Butterick 4724 in the "just arrived this week" section:
From the website: 1990, 90s Glamour, Retro Evening Clothing Patterns - MISSES' DRESS Close-fitting, lined, boned dress, mid-knee or evening length (center back) and above mid-knee (center front), has princess seams and back zipper. A: tapered, short sleeves with boning and elastic. B: stays with attached, contrast ruffles with side front seams. B,C: inside belt. C: bias drape with bow and pleated knot and self-lined skirt.
And here it is, View C, made up in Artillery Red Satin for Saint Barbara's Day.
Saint Barbara is the patron saint of Field Artillery and St. Barbara's Day, which falls on December 4th, is recognized with a military ball.
I made this dress for the 1990 St. Barbara's ball. We were living in Germany at the time, and I had the pattern, but I had to have my mom send me the materials for the dress from the states. If I recall correctly, it was about 7 yards of heavy satin, lining material, boning, zipper, etc. She also got the shoes for me and had them dyed to match the dress fabric. The fabric had to be just the right color- Artillery Red- for this special occasion.
I was very proud of this dress. Other than my wedding dress, it was the biggest project I had made up until this point. It was also the first time I made a length adjustment to a pattern... or really any kind of adjustment to a pattern. I didn't know a thing about fitting. I was young and relatively slim, so I just made things straight out of the envelope and assumed that the less than perfect fit was something I had to deal with just like RTW. But I had noticed that dresses were often too short through the body, and I figured I could fix that.
I had never heard of a muslin, or a toile. But I just decided to pull some ugly fabric out of my stash and cut just the bodice out and sew it up to try on. When I got it on, I pulled it up so the bust was in the right place and I drew a line right onto the fabric right at my natural waist. Then I tugged it down so the hips were in the right place and drew another line at my natural waist. The distance between the two drawn lines, if I remember correctly, was about 1.5 inches. So I cut my pattern pieces at the waist and added that much length. The finished dress turned out perfect. And I've been making that adjustment ever since.
While I was working on this dress we found out that my husband's unit was going to be sent to the Persian Gulf right after the new year. The St. Barbara's Day Ball was canceled due to the preparations for deployment. I finished the dress anyway and he left in January 1991. Operation Desert Storm began on January 17, 1991.
My husband returned safely later that spring. By the time December 4th rolled around again I was pregnant with our second son and I couldn't squeeze into my red dress. I made a cute little baby-doll dress from a Vogue pattern that year, and the red dress sat in the closet.
It wasn't until St. Barbara's Day 1992 that I finally got to wear my dress- two years after making it. That's when the photo above was taken. It's one of my favorite pictures of the two of us.
I think I wore that dress for one more event a year or two later. And I still love the look of that pattern. And I still like to wear red.
From the website: 1990, 90s Glamour, Retro Evening Clothing Patterns - MISSES' DRESS Close-fitting, lined, boned dress, mid-knee or evening length (center back) and above mid-knee (center front), has princess seams and back zipper. A: tapered, short sleeves with boning and elastic. B: stays with attached, contrast ruffles with side front seams. B,C: inside belt. C: bias drape with bow and pleated knot and self-lined skirt.
And here it is, View C, made up in Artillery Red Satin for Saint Barbara's Day.
Saint Barbara is the patron saint of Field Artillery and St. Barbara's Day, which falls on December 4th, is recognized with a military ball.
I made this dress for the 1990 St. Barbara's ball. We were living in Germany at the time, and I had the pattern, but I had to have my mom send me the materials for the dress from the states. If I recall correctly, it was about 7 yards of heavy satin, lining material, boning, zipper, etc. She also got the shoes for me and had them dyed to match the dress fabric. The fabric had to be just the right color- Artillery Red- for this special occasion.
I was very proud of this dress. Other than my wedding dress, it was the biggest project I had made up until this point. It was also the first time I made a length adjustment to a pattern... or really any kind of adjustment to a pattern. I didn't know a thing about fitting. I was young and relatively slim, so I just made things straight out of the envelope and assumed that the less than perfect fit was something I had to deal with just like RTW. But I had noticed that dresses were often too short through the body, and I figured I could fix that.
I had never heard of a muslin, or a toile. But I just decided to pull some ugly fabric out of my stash and cut just the bodice out and sew it up to try on. When I got it on, I pulled it up so the bust was in the right place and I drew a line right onto the fabric right at my natural waist. Then I tugged it down so the hips were in the right place and drew another line at my natural waist. The distance between the two drawn lines, if I remember correctly, was about 1.5 inches. So I cut my pattern pieces at the waist and added that much length. The finished dress turned out perfect. And I've been making that adjustment ever since.
While I was working on this dress we found out that my husband's unit was going to be sent to the Persian Gulf right after the new year. The St. Barbara's Day Ball was canceled due to the preparations for deployment. I finished the dress anyway and he left in January 1991. Operation Desert Storm began on January 17, 1991.
My husband returned safely later that spring. By the time December 4th rolled around again I was pregnant with our second son and I couldn't squeeze into my red dress. I made a cute little baby-doll dress from a Vogue pattern that year, and the red dress sat in the closet.
It wasn't until St. Barbara's Day 1992 that I finally got to wear my dress- two years after making it. That's when the photo above was taken. It's one of my favorite pictures of the two of us.
I think I wore that dress for one more event a year or two later. And I still love the look of that pattern. And I still like to wear red.
Saturday, March 1, 2014
What time is it? Tunic Time!
The thing that I was afraid would happen has happened. I was so productive during the Christmas holidays when I was off from work- both sewing and blogging. And then the holidays were over and I went back to work. The hours have been long, the days have been short, and I just don't get anything done here at home. It's all I can do sometimes in the evening to just leaf through an issue of Burda Style. I'm hoping that with the days getting longer and Daylight Savings Time starting next weekend, that things will improve. I seem to have more energy during the long summer evenings than I do in the cold dark winter.
I have so many projects planned. There's the Vogue dress out of teal ponte, the herringbone print ponte that is still deciding what it wants to be, the Traveler Dress that sits unfinished on the ironing board.
But last weekend, I turned my attention to tunics. We have casual Friday at work and it's nice to trade the pantyhose in for jeans. The problem is that I have so few "nice" tops to wear with jeans at work. The things I do have tend to be close fitting, and sometimes I just really want something loose, long, and comfortable. Yet stylish- don't forget stylish.
So I turned to a stack of Burda back issues that were sitting out on a shelf. I didn't even dig into my whole stash of magazines and I was able to find several patterns that looked interesting. I spent last Sunday evening tracing in the hopes of getting a couple of muslins made this weekend.
The first contender was this one, number 119 from the August 2013 issue:
It's got the simple shape and length that I want and I love the curved yoke seams, the dropped shoulders, and the front yokes that extend into long, wide ties. The sleeve cuffs with buttons are very nice, too, but I'll probably opt for elastic. It will be simpler to make, and will allow me to push the sleeves up. (Plus, the "cuff-less" pattern pieces look like just the right length for my little T-rex arms!)
The pattern is traced and ready to go, but I'm still mulling over some construction ideas. I'm going to deviate from Burda's instructions...
The second pattern that I traced was chosen because I've long liked the look of dress #107 from the February 2012 issue:
It's super, super simple. I could have just used that to make a shorter top, but Burda kindly provided a shorter view:
I went ahead and traced view A, but depending on how the muslin turns out, I think I may want a little extra length and I may play around with adding a contrast band at the bottom like the dress.
I have a pretty apple green satin picked out for this. If all goes well, I can see wearing it with a statement necklace and white jeans this spring. (This is the year that I plan to add white jeans to my wardrobe, darn it!)
And if the top turns out, I may even make the dress. I even have coral satin in my stash! I've always just admired this dress and then turned the page thinking that I couldn't wear a straight boxy dress with my figure. I discovered last year that I like straight and boxy- and the worst that could happen is that I might make a muslin and not like it. So what, right?
So I'm off to dig around in the stash for muslin fabric and to find that green satin. Do you like tunics? What is your favorite tunic pattern?
I have so many projects planned. There's the Vogue dress out of teal ponte, the herringbone print ponte that is still deciding what it wants to be, the Traveler Dress that sits unfinished on the ironing board.
But last weekend, I turned my attention to tunics. We have casual Friday at work and it's nice to trade the pantyhose in for jeans. The problem is that I have so few "nice" tops to wear with jeans at work. The things I do have tend to be close fitting, and sometimes I just really want something loose, long, and comfortable. Yet stylish- don't forget stylish.
So I turned to a stack of Burda back issues that were sitting out on a shelf. I didn't even dig into my whole stash of magazines and I was able to find several patterns that looked interesting. I spent last Sunday evening tracing in the hopes of getting a couple of muslins made this weekend.
The first contender was this one, number 119 from the August 2013 issue:
The pattern is traced and ready to go, but I'm still mulling over some construction ideas. I'm going to deviate from Burda's instructions...
The second pattern that I traced was chosen because I've long liked the look of dress #107 from the February 2012 issue:
It's super, super simple. I could have just used that to make a shorter top, but Burda kindly provided a shorter view:
I love the simplicity here. Burda used the play of the shiny satin against the matte wrong side of the fabric to make it interesting.
I went ahead and traced view A, but depending on how the muslin turns out, I think I may want a little extra length and I may play around with adding a contrast band at the bottom like the dress.
I have a pretty apple green satin picked out for this. If all goes well, I can see wearing it with a statement necklace and white jeans this spring. (This is the year that I plan to add white jeans to my wardrobe, darn it!)
And if the top turns out, I may even make the dress. I even have coral satin in my stash! I've always just admired this dress and then turned the page thinking that I couldn't wear a straight boxy dress with my figure. I discovered last year that I like straight and boxy- and the worst that could happen is that I might make a muslin and not like it. So what, right?
So I'm off to dig around in the stash for muslin fabric and to find that green satin. Do you like tunics? What is your favorite tunic pattern?
Saturday, February 15, 2014
Burda Style 11-2013-109
My knit dress has been finished for over a week. It's been way too cold and dreary here to take photos, however. Today was the first decent weather day we've had in a while. So even though I felt awful today- frizzy hair, puffy face, bloating, and just all around feeling blah, I seized the opportunity to get a couple of pictures.
This is dress #109 from the November 2013 issue of Burda Style. It's a fabulous issue with several other dresses I'd like to make. This dress caught my eye and I thought it would make a comfy, warm, work appropriate piece and would look great in ponte knit.
I used this gorgeous plum ponte from Fabric.com. I love this color. I wish I had bought more. It's a great weight and it sewed up very nicely. Ponte is one of my all-time-favorite fabrics. Burda used a stretch wool twill to make this dress, so stretch wovens would be suitable also.
I cut a 42 at the shoulder, 44 at the bust and waist, and eased out to a 46 at the hip. I had to grade up because the pattern only goes up to 44. (It's offered in 36 to 44.) I made my standard adjustments- 1.5" of extra length at the waist, and a 3/8 petite adjustment above the bust. My muslin told me that I needed some additional adjustments and extra length. You can read about all my pattern doctoring in the previous post.
I'm pretty pleased with the finished dress. It turned out a little bit looser than I expected. It's probably because I made my muslin out of cotton and then the finished dress in the ponte. I had to take it in from hip to sleeve about about 1/4". If I made it again I would just cut a 42 from shoulder to hip and then a 44 from hip to hem.
It's still a little loose, but it's very comfortable and I didn't want it to be too fitted. I've already road tested it by wearing it to work and it was not only comfortable, but kept me warm in the office, and I got several compliments.
It's hard to see in the photos (and it was too windy and I felt too irritable to take close-ups) but I wore the dress with a gold choker and matching bracelet that belonged to my grandmother. They are probably from the 80's and have a Dynasty vibe to them. I thought they looked fabulous with the dark plum fabric.
I'm glad I made this dress. I like that from far away or at a glance it looks rather plain, but once you really take a look, you see all the criss cross seaming. It was challenging to get the waist seam in the right place, but in the end it turned out fine. I recommend the pattern, but if you normally make length adjustments (lengthening or shortening the waist) I recommend a muslin to make sure the horizontal seams are in the right places.
And now I'm off to take another look at the February issue of Burda. There are a couple of things in there calling my name. Happy sewing!
This is dress #109 from the November 2013 issue of Burda Style. It's a fabulous issue with several other dresses I'd like to make. This dress caught my eye and I thought it would make a comfy, warm, work appropriate piece and would look great in ponte knit.
I used this gorgeous plum ponte from Fabric.com. I love this color. I wish I had bought more. It's a great weight and it sewed up very nicely. Ponte is one of my all-time-favorite fabrics. Burda used a stretch wool twill to make this dress, so stretch wovens would be suitable also.
I cut a 42 at the shoulder, 44 at the bust and waist, and eased out to a 46 at the hip. I had to grade up because the pattern only goes up to 44. (It's offered in 36 to 44.) I made my standard adjustments- 1.5" of extra length at the waist, and a 3/8 petite adjustment above the bust. My muslin told me that I needed some additional adjustments and extra length. You can read about all my pattern doctoring in the previous post.
I'm pretty pleased with the finished dress. It turned out a little bit looser than I expected. It's probably because I made my muslin out of cotton and then the finished dress in the ponte. I had to take it in from hip to sleeve about about 1/4". If I made it again I would just cut a 42 from shoulder to hip and then a 44 from hip to hem.
It's still a little loose, but it's very comfortable and I didn't want it to be too fitted. I've already road tested it by wearing it to work and it was not only comfortable, but kept me warm in the office, and I got several compliments.
It's hard to see in the photos (and it was too windy and I felt too irritable to take close-ups) but I wore the dress with a gold choker and matching bracelet that belonged to my grandmother. They are probably from the 80's and have a Dynasty vibe to them. I thought they looked fabulous with the dark plum fabric.
I'm glad I made this dress. I like that from far away or at a glance it looks rather plain, but once you really take a look, you see all the criss cross seaming. It was challenging to get the waist seam in the right place, but in the end it turned out fine. I recommend the pattern, but if you normally make length adjustments (lengthening or shortening the waist) I recommend a muslin to make sure the horizontal seams are in the right places.
And now I'm off to take another look at the February issue of Burda. There are a couple of things in there calling my name. Happy sewing!
Subscribe to:
Posts (Atom)