Sunday, October 27, 2013

McCalls 2206

I have finally finished McCalls 2206, and it only took me two years and ten months.


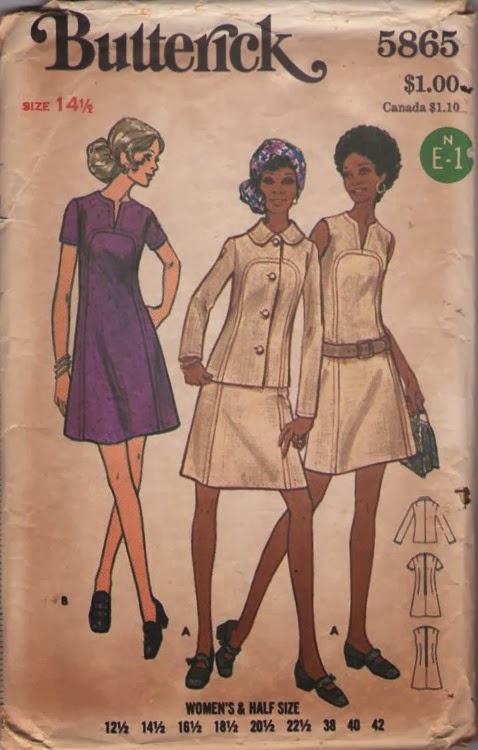
This is the dress I started for the Vintage Sewalong of 2011.  It's a simple, A-line "mod" shift with inset princess side panels, a martingale belt, and a fold down collar.


I made the long sleeve version.  The pattern has nice little vintage touches:  elbow darts, shoulder darts in back, and of course, the cool mod shape.


The biggest challenge in making this was the size.  The pattern was one size- an 18.  It fit great at the hips, but the rest of it was too big.  I had to "downsize" the bodice to make it fit.  I did not enjoy it and I doubt I'll ever do it again unless the pattern in question is just really special.  It's so much easier to start with something that fits the shoulders and upper bust and then add extra below.


I made a muslin to work out my fitting adjustments and everything seemed fine, but when I cut my fashion fabric, I ran into problems.  It was still too big.  I ended up shortening the sleeves by 7/8" and taking in the waist about 3/8" on each side.  The belt was too long also.  That's why my dress has two buttons in back instead of one like the pattern drawing.  That turned out to be a happy accident though- I quite like the double buttons and I think it adds to the overall look.


The collar is cut on the bias and is very wide.  It is turned down like a turtleneck.  The pattern calls for hooks and eyes in back so that the collar stands up all the way around the neck.  I thought that might be uncomfortable and impractical with my long hair, so I let mine fall open in the back.  My dress is also longer than the model drawing.  I finished it at the knee to be more age appropriate and more suited to an office environment.  You can't really see it in the photos, but I'm wearing it with patterned tights.  I think I'll wear it to work with nude or sheer black hose instead.

I used a dark red "suede cloth" from Hancock fabrics.  I like the fabric.  It has a little bit of stretch and a nice hand.  The right side has a nap and the wrong side has a satin finish that slides over the skin and undergarments.  It's very heavy, though and will be suitable for cold weather.  The weight of the fabric pulls the belt down in back which causes pulling where it is attached in front.  I'll probably add thread loops at the sides to help support it and try to alleviate the wrinkles.

I'm pleased with the finished dress and I will wear it to work, but honestly...  it's a little bit dull.  I think a patterned or textured fabric would have really been nice.  Maybe a big statement necklace- like a large locket or pendant would spiff it up.  I can maybe see making it again in a patterned fabric for spring with the short sleeves.  We'll see.  So many patterns, so little time...  I'm just happy to have completed it.

Next up will be a knit dress...  maybe...

Saturday, October 26, 2013

My First Pattern Ever

The other day I was doing some cyber window shopping and I came across this:


This is Simplicity 7876, the first pattern I ever sewed, the one that started it all.

There was a little shop in our town that sold sewing machines and fabric, and the proprietress held sewing classes in the back of the shop.  I think I was about 11 or 12, so it must have been around 1979 or '80 that my mom signed me up.  I was so excited and couldn't wait to get started!

Our first project was actually a tote bag made of plain cotton.  The pattern was cut all in one piece and was a hand-drawn pattern provided by the instructor.  It was basically just a simple project designed to teach us to pin the pattern to the fabric, cut it out, and then how to use the machine to sew straight seams, and gentle curves.  After it was complete we moved on to the pattern above.

Simplicity 7876 is a very simple wrap skirt.  It has a very generous A-line silhouette and wraps in front.  There are no closures, the only "challenging" detail was marking the left side seam of the waistband to leave an opening for the tie band to go through so you could wrap it and have a smooth waist.

The class instructor taught us to read the back of the envelope to determine what fabric to use and how much to buy.  We learned how to read the measurements and figure out what size to make.  Once we opened it up, she showed us how to find the pattern pieces, cut them out and press them.  Then we learned how to follow the pattern layout to fit the pattern onto the fabric and cut it all out.

And then it was on to the sewing.  I loved every minute of that class and I whizzed right through the construction of that skirt.  I remember how excited I was to pull it from the machine and try it on...

...And that was when I had my first experience with the mysteries of fitting.  My skirt was too big!  With the waist band cinched up as tight as it would go, it was too loose.  I didn't understand why- I had measured carefully and followed the chart on the back of the envelope.  Why didn't it fit?

I don't even remember asking the teacher about it.  I guess as a child, I didn't think to investigate too far.  It didn't fit like I wanted it to, so I just tried to think of a way to make it work.  ( I was years ahead of Tim Gunn!)

My amateur fix was to simply fold under the vertical edge of the skirt front under layer an inch or so and stitch it down.  I didn't trim, I just folded the already finished edge under and added a couple of rows of stitching to hold it all down.  It added bulk and looked odd, but I figured it was going to be under the front wrap- who was going to see it?  When I showed it to my mom and explained, she praised me for being clever and solving a problem.

I had so much fun in that class and I was so excited to have made a wearable garment that my mom turned right around a let me pick out fabric for a second skirt!  The first one was a quilting weight, plain, purple cotton.  If I remember correctly, I had picked it from my mom's stash.  My second skirt was made out of a glorious pale pink cotton that was much lighter weight and had the perfect drape for this skirt.  It had gorgeous fuchsia strawberries as big as my whole hand scattered all over it.  I didn't know anything about the concept of muslins at the time, but I did know that my first skirt had had a problem, so for the second one, I knew in advance to take in the skirt under layer so I could pull the waist ties tight enough.

I remember proudly wearing that skirt to school the next year.  And that was the beginning of my love affair with sewing.

What was your first pattern ever?


Sunday, October 20, 2013

More Autumn Stitching

This is my latest WIP, Acorns and Owls, from Blue Ribbon Designs:


Amazingly, I had almost all of the Gentle Art Sampler Threads that the chart called for.  I only made one substitution, one of the orange fibers in the pumpkins.

I love this little design.  What I'm not really liking is the over all color way.  It's too... brown.  The owls, in particular, are not really working for me.  I'm going to go ahead and finish it, but I might end up re-doing the owls in a darker, cooler color.  We'll see...

In sewing news, I'm about to go work on the hem of my vintage mod dress.  Stay tuned...

Monday, October 14, 2013

Blessed Be

All it took was one uninterrupted afternoon of stitching (while watching my favorite TV show, Top Gear) to finish up this little piece.


This is Blessed Be, a complimentary design by Barbara Cooley, of Plum Pudding Needleart.


This finished up right at 3 3/16 X 2 3/4 inches on 32ct Lambswool linen by Wichelt.  The chart comes with suggested DMC colors, but I used hand dyed Sampler Threads and Weeks Dye Works from stash.


It's a very easy stitch- all cross stitch with no fancy stitches.  I'm pleased with the way it finished up.  Of course, I still need to "finish" it.  Any suggestions?

Now I'm off to peruse my stack of charts and pick out my next small project.  Happy stitching!

Sunday, October 13, 2013

Weekend Stitching Progress Report

Blessed Be is slowly coming along.  It's a very tiny piece, but it's taking a long time to stitch because I just can't work on it as often as I'd like.  So much to do, so little time, you know?


Anyway, I hope to wrap it up and start something else soon.

In the meantime, there has been sewing here at the House of Frog!  I don't have photos to share yet.  In fact, I still need to finish the hem, but I pulled out a vintage UFO this weekend and except for the hem, finished the project up.  I say vintage, because the pattern is vintage:


And because I began the project in January of 2011.  I don't remember exactly why I tossed it aside unfinished, except that I was disgusted with something about the fit of the real garment as opposed to the muslin.  But I pulled it out and tried it on yesterday, and other than the fact that the sleeves were too long, it seemed okay.

The pattern has a nifty little dart in the sleeve at the elbow (nice vintage detail) and it fell way too far down my little T-Rex arm.  So rather than just trimming length at the wrist, I had to remove the one sleeve that was already attached, open the already serged sleeve seam, and trim the top of the sleeve down by 7/8 of an inch.  I also took an additional 1/2" out of the sleeve cap to reduce the horrendous amount of sleeve cap ease.

It's going to be a short work week- I'm taking Thursday and Friday off, so I hope to have the hem done, and then get just the right combination of weather, lighting, good hair, and an available photographer to get some decent photos.  Wish me luck.

Does anyone else out there have a UFO that needs to be finished?

Monday, October 7, 2013

Pumpkin Hollow

Pumpkin Hollow is all done!

Details:  Pumpkin Hollow free chart by Nancy Woodson of Liberty House Primitives.  The design measures 5.25 X 4.75 inches on 28ct natural linen.  All threads are DMC floss.


I followed the pattern almost exactly.  I changed the year from 2010 to 2013.  I added my initials in the lower right corner of the green grass.  You can just barely see them in the photo above.


I did not have DMC 936, the lighter green called for in the chart, so I used one strand of 934, the darker green, and one strand of 469 together in the needle to stitch the areas of lighter green.  I think it turned out just fine.

I'm pleased with the way this turned out.  I was worried when I first pulled all the colors for it that it was going to be dark and dreary- there's a lot of navy, black, and dark green- but now that it's done, I think it looks great.  I'd love to stitch it again using hand dyed threads for the pumpkin, the house, and the grass.  I think it would look good stitched on a dark fabric as well.  Hmmm...  I might have to visit my stash.

I'm not sure how I want to finish this.  It's a little bit big for an ornament, although I could see it hanging on my china hutch door.  It might look nice finished as a small pillow to sit on top of a bookcase.  Any suggestions?

Sunday, October 6, 2013

A Walk Down Memory Lane

 This morning I decided to peruse my favorite vintage pattern site, MomsPatterns, in hopes of finding a little bit of inspiration, and maybe a pattern or two that I can't live without.  I started, as I usually do, in my favorite section- the Mod Era.  But then the Princess joined me at the computer and I decided to jump into the 80's patterns to see if they had anything that I had made way back then.  I thought the Princess would get a kick out of seeing some of the "crazy" things I wore when I was younger.  I wasn't disappointed.

First I found McCall's 2589, a princess seamed strapless dress with an oversized blazer.  I made this, both pieces, around the time I graduated from high school, in a soft, light weight, light wash denim.  It was easy to make, and the dress was the first garment I ever made that I underlined.  The jacket was completely unlined.  I wore it with a pair of large silver hoop earrings (and big hair) and I thought I was  quite something!


The next pattern almost brought tears to my eyes.  This is Butterick 5895, my wedding dress.  I made view A, the white dress in the background, exactly as it appears except I left off the shoulder bows, which I thought were too fussy. I used ivory moire taffeta with wide ivory lace ruffles at the wrist.  The dress rustled so sweetly.  I still have it, packed safely away, in case the Princess ever wants to see it.  I doubt she'd want to wear it.


This next pattern, Butterick 6204, is what I used to make the skirt and top I wore the day after my wedding.  I made view A (on the far right) out of a pretty sea green watercolor print cotton.  Check out that peplum.  I think I originally made it as an Easter dress, but I liked it so much I wore it after the wedding, too.


I started making Butterick 3662 a few years after my wedding, but I never finished it.  I don't remember why, but it probably had something to do with fitting issues.  I wish I still had the pattern because I still love this dress and I'd make it and wear it today.  Yes, I could buy it from MomsPatterns, but this pattern is way too small.


So did I actually find anything in the Mod section, you may be wondering?  Why, yes, I did!

I love this shift dress.  The pink and white version is my favorite, although I like the white dress with the black trim, too.

And this one is really cute, too.  I love the curved front seam and the matching jacket.


And one more.  I love the funnel neck and the cut on cap sleeves.  The length on this one looks a little bit more generous, too.  The brown version looks to be cut on the bias- very cool.


Is anyone else out there mad about Mod fashion?  Do you ever go and look at old patterns from years gone by and recognize the ones you had or made?  Does it take you back?

Wednesday, October 2, 2013

More Pumpkins

The days are getting shorter and the temps are getting cooler.  Fall is definitely in the air.  I haven't been able to stitch nearly as much as I'd like but I have made a little bit of progress:


Pumpkin Hollow is almost done.  All that is left is the green grass and a few green leaves on the tree.  I'd be done with it, except somehow I've misplaced the skein of green DMC floss that I need.  I can't find it anywhere.  I'm starting to wonder if I just didn't pick it up on my last trip to Hobby Lobby.  I'm anticipating an online supply order in the very near future!

This little piece is a really fun and easy stitch.  If you are interested in stitching it for yourself, it is a freebie design from Liberty House Primitives, designed by Nancy Woodson.


I also have another small piece under way, Blessed Be by Barbara Cooley of Plum Pudding Needleart. The design calls for DMC but I decided to substitute hand dyed fibers from stash.  So far I'm loving it.  The pumpkin has really great depth and even the bird looks good in a dark, mottled grayish brown.  I can't wait to get this one finished.

There is still no garment sewing to report.  The October issue of Burda Style left me a bit underwhelmed, but the September issue is still tempting me and the November issue looks to be good.  I have a ponte knit and an ITY print calling my name from the stash right now, so maybe this weekend I can get something started.

Happy fall sewing and crafting!  May all your projects turn out perfect!