This is what we did with the Wall-E fabric:

 The Wall-E fabric is 100% cotton. We chose this black cotton with white dots as our contrast fabric and this school bus yellow cotton/poly broadcloth as our accent fabric. The front bands, hem band, and armhole bindings are piped in yellow, and of course, the sash is yellow. Here's a close up of the bottom band:
 I decided to add the yellow buttons to make it a little different from the previous two dresses, and because they just went so perfectly:
We made Simplicity 3900, our TNT little girls's dress pattern. It may look familiar- this is the pattern I used as the jumping off point for Cherry Blossom and for the Asian Princess dress from last year. Incidentally, Savannah wore the Asian Princess dress a couple of weeks ago while we were out shopping. While we were in the Disney Store, a man with a young daughter stopped us and asked us where we found the dress. He said it was an awesome dress. I was tickled because I got to say that I made it, and because it must be cute if a dad noticed it!
Sadly, the pattern is OOP, but if you have it in your stash or know someone who has it and will let you use it, I highly recommend it. It a great pattern for customizing your own look.
The Wall-E fabric is 100% cotton. We chose this black cotton with white dots as our contrast fabric and this school bus yellow cotton/poly broadcloth as our accent fabric. The front bands, hem band, and armhole bindings are piped in yellow, and of course, the sash is yellow. Here's a close up of the bottom band:I decided to add the yellow buttons to make it a little different from the previous two dresses, and because they just went so perfectly: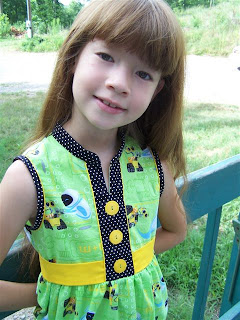 The Princess loves the dress. She's already announced that this will be her "First Day Back to School Dress." She's also informed me that she wants a matching pair of capris to wear underneath it. Those may have to wait until after the Wardrobe Contest.


 I actually made this dress for the first time a few months ago- without success. I thought that since it is loose-fitting, I could get away with fitting my shoulders and starting with a size 14. My first muslin was a straight 14. It was entirely too tight across the bust and the hip area needed a little more ease as well. So I did a second muslin trying to add room across the bust, and yet a third trying to take out some of the extra room which I somehow put in the wrong place. Eventually I gave up. But one thing I did realize from these muslins was that this dress just won't work, at least not for me, in a woven cotton fabric. It was just too stiff.
  I started Round 2 with a new muslin- a straight size 16. It looked pretty good. The dress is roomy, so there was plenty of width through the bust, but I got diagonal drag lines from the bust points down to the waist. There didn't seem to be enough length in the front. So I made an adjustment to the front pattern piece to add length over the bust. I think the problem with my first couple of muslins, is that I tried to make my adjustments to the yoke piece and that didn't work. This time, I only altered the dress below the yoke.
 To add one extra inch of length, I slashed the pattern front through the bust point from the center front foldline to the side seamline, leaving a hinge at the side seam. I also made a vertical slash from the yoke seam to the bust point leaving a hinge at the bust point. I spread the tissue so that there was one inch of extra length across the front between the bust point and the center front. I had to spread the seamline above the bust just slightly so that I could make my cut edges parallel to each other across the front. This added approximately 1/8 of an inch to the yoke seamline, but I figured this could easily be eased into the yoke and it was. You can just see my adjustments in the photo above.
 I may have to wear this one a couple of times before I make up my mind completely on whether I like it on me or not. I need to get some different shoes, though. Maybe some strappy brown sandals.

 This is an adorable little sundress that buttons down the front, ties on the shoulders, and of course, has a sweet little sash in back. Oh, and it's smocked with an easy half space wave pattern and embroidred in Lazy Daisy (detached chain) daisies. My version will be hot pink microcheck:
 (You can see Summertime Pink behind the pink microcheck piece. See, I really did start them at the same time!)
 I made view B, the short sleeved, flared skirt version. I cut a 14 through the neck and shoulders and a 16 from the underarm down using the D-cup front pieces. I didn't make any adjustments to the pattern pieces, but once the dress was sewn, I decided the bust point was just a tad too low, so I took in the princess seams just below the bust about an eighth of an inch.
  I used a stash fabric- a 100% "hand-dyed" cotton with all-over chain stitch embroidery that I purchased at Hancock Fabrics last summer. I didn't have quite as much as the dress called for, so I had to add a center back seam to the back skirt panel and I was unable to make the belt. I had planned on shopping for a belt to wear with this dress, but now that it's finished, I really don't think I need it. I probably could have used a sway back adjustment, but I'll have to wait for the next version.
 I wasn't really planning on making it again, but this was one of those instances where the fabric had its own ideas. I had originally planned to use this fabric to make the Threads Shirtdress, but it told me it wanted to be something a little bit more mod, so here you go. You really can't argue when the fabric speaks. I love this fabric, by the way. It makes me think of sliced kiwi. It came from Hancock Fabrics and it's a quilting cotton type fabric. The black is Kona cotton.
  It's not quite done yet. It still needs a hem- as soon as I decide how long I want it to be- and it needs buttons and buttonholes. I want to use faux mother of pearl buttons like these that I've already sewn to the sleeve tabs: